Tactile Immersion - General Discussion - Hardware & Software

That and new math help make 4-corner loaded tire slip more credible, particularly tuning
by adding gamma and reducing gain for acceleration properties as well as loaded slip effects.
I discovered that SimHub 7.3.14 provides wheel load properties, hence no need to estimate them from acceleration. The basic concept for this profile is that, e.g. for braking and cornering, tire slippage for unloaded wheels is typically unimportant. This simplified 4-corner loaded tire slip profile now also includes an additional separate dedicated (e.g. trailing throttle oversteer) unloaded rear wheels slip tactile output. Front wheel slips, unloaded or otherwise, are easily felt thru steering wheel force feedback reduction. Wheel load values are in some unknown scale; Wheel load Response filter Input Gain may need adjusting for individual vehicles to obtain 100 output for e.g. nearly peak cornering loads.

August 16, 2021: SimHub wheel load properties are game-specific (e.g. Assetto Corsa, but not RaceRoom)
 
Last edited:
Hi Guys.

First time posting here. I seem to be stuck with my new tactile install and need help.

Im having real trouble getting Simhub to output separated and multiple channels at the same time. It doesn't seem to matter if i run them off of my soundcard (5.1) or onboard mobo audio (7.1), the most I could get working is 3 channels when testing in Simhub. Often one of those outputs would operate multiple shakers at once also (im testing on the custom 8 channel map) despite them all being independently connected to their own output channels.

After a few days of frustrating testing i decided one of the amps has a faulty output, so sent it back and ordered a NX3000D to replace it. Fingers crossed this helps and in theory i should still be able to get 2 channels working from the amp that remains, but again now im only getting 1 output working. its starting to feel more like a software issue so im wondering if others had experienced this?

This is the gear im running.

1x Sound Blaster Z SE
2x NX1000D
4x Buttkicker mini LFE (blue sticker)

Cables:
Computer to amp, 3.5mm split to 2x XLR. one for each amp plugged into front and rear soundcard inputs.

Amps to shakers are NLR4 plugs using 16 gauge wire.

Thanks in advance for any help with this!
 
Last edited:
Im having real trouble getting Simhub to output separated and multiple channels at the same time.
That may be related to e.g. configuring Quadraphonic instead of 5.1 or 7.1 Surround in Windows control panel:
"Quadraphonic" prevents SimHub from accessing channels directly one-for-one...
Configuring Windows 10 surround is unobvious.
FWIW, I maintain a Sim folder with appropriately renamed shortcuts,
e.g. to C:\Windows\System32\mmsys.cpl:
View attachment 437120

Select the appropriate device, then click [Configure]:
View attachment 437121
 
That may be related to e.g. configuring Quadraphonic instead of 5.1 or 7.1 Surround in Windows control panel:
Cheers man that was very helpful. I followed the guide in the link and that has got me at-least going in the right direction. Now I have both shakers working. However channels are not separated. Both shakers activate on channels 1,2,3,4 and at an increasing strength with channel 1 being the softest output. I guess that confirms my suspicions of software being the issue.
 

Attachments

  • Screenshot 2021-05-07 185141.png
    Screenshot 2021-05-07 185141.png
    148.1 KB · Views: 93
That smells like some other audio processing being active.
Were you able to test them individually in the Speaker Setup window?
configuration-gif.437121

Sorry, I know of no easy way to manage Windows audio devices and APOs.
agreed. by the looks of the amps front panel lights, I seem to have correct signal traveling to the amp but very reduced on one channel. depending where i test them decides the result. I cannot get the channels to output the same across windows, simhub, or the soundcard interface. i read through the link on the C++ commands but its a bit past my experience level i think.
 
Rig Update

More teasing of progress.
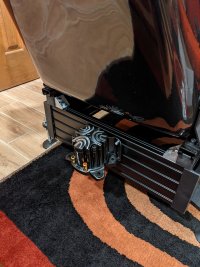
My new frame rebuild is coming along, here bathed and glowing in ambi-light colour.
Well, firstly it's now, so much stronger than before with an also improved design and meeting the target I am happy with.


Dynamic real-time lighting with the chrome is
one of the features of the build.

Creative Approach With Speaker Installation?
This large soundbar is old-school, none of that plastic nonsense like today, no sir.
Instead, a big hefty metal casing (13Kg).

Long ago, the YSP 1100 what was once Yamaha's top of the range soundbar costing a whopping £900 when released in 2005. These days as they are so old, you can pick them up for approx £100

I knew these were good and owned a previous Yamaha (800) model in the past as well as having several high-end AV receivers during the old laserdisc and DVD era.

Now, mmmmmmmm.
I have a feeling, nobody has ever built a sim rig using 2x of these in L/R to give a much wider dispersion of either stereo or quad surround?


The floor section, still w.i.p
Note the wifes dresser stool is not part of the build (lol)

Well, just part of one area I wanted my own build to be different. Taking audio further than the norm. Each of these units has dual woofers but also an incredible 40 mini drivers, which can control how/where its audio reflects within the room. On top of that, you can have just plain stereo or apply many of Yamahas renowned DSP cinema or venue-based soundfields.

It took a lot of effort to come up with a design that contained and supported these, yet keeps the build compact. It's also much better than where they were placed more under the seat area on the first build.

Below I am having a bit of a poke at the common approach of Logitech 5.1 systems being used on many rigs. Not that they are bad but people will spend more these days on a wheel rim or shifter than they will on their systems audio. What I illustrate here, while I got mine for a bargin and yes they are old. Nor up to date with digital audio formats. On sound quality, these would still outperform many modern £500/£600+ soundbars but having dual units is taking the audio immersion they offer much further than a conventional solution.


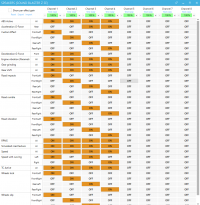
5.1 or 7.1 in "sim racing" is rather underused.
It's one reason why I have opted for something different.
This will be one of the things I showcase looking into how sims use each channel.


The next phase for my build is the 2nd tier that will support the seat/pedal sections and enable the beginning of installing and testing the tactile with the rigs planned isolation. At least now I have all the tubing and clamps ready to go.
What would be the effect of configuring dual YSP-1100s--one at the front and one at the rear of a rig?

I ask because I bought one YSP-1100 without the Yamaha remote (it took awhile to program but a Philips universal remote handles most functions EXCEPT it cannot adjust the sound beams). I am now looking to pick up another YSP-1100 with a remote for USD $60 plus shipping for LESS THAN MY FIRST UNIT COST!--and only a little more than a genuine Yamaha replacement remote (around USD $55).
 
Hi all. New to tactile. Looking for recommendations on where to mount a Buttkicker Advance on my Simlab P1-X. Was thinking the easiest place to start was on the rear crossmember under the seat. Basically like in the attached picture but mounted on the other side of the profile (under the seat). I also plan to put some rubber pads under the 4 feet. I have NX1000D amp and plan to use Simhub. May eventually mount another Buttkicker by pedal tray if I enjoy it. Thanks!

Other options:
1) cut a spare piece of profile and mount it across the 40x40 seat rails under the seat and mount there
2) drill holes in the seat bottom and mount directly to seat. Worried this will be too strong and possibly crack the seat (Corbeau FX1 Wide).
 

Attachments

  • buttkicker.jpg
    buttkicker.jpg
    1.9 MB · Views: 127
I had 4 Aura's as my first foray into tactile. They were OK, for the price and performed quite well across the range of effects. The Mini's though are a step up and I would not consider returning to anything transducer based now unless they were the Clarke models. Mini LFE's are a very good value for money item, as is the Earthquake MQB-1 model that I have recently acquired. A little more expensive than the Mini and in some ways not as hard hitting but it has a slightly better range especially in the low end and hz at the low end are very desirable.
 
  • Deleted member 197115

thanks for your assessment, so now I have to think what to do with my 4 Auras then...:thumbsdown:
Auras are easier to drive and don't have piston pang like Mini-LFE. I don't feel that Mini-LFEs really that much better than AuraSounds.
In fact idea of replacing them with another pair of AuraSounds crossed my mind few times already.
 
Last edited by a moderator:
  • Deleted member 197115

drill holes in the seat bottom and mount directly to seat. Worried this will be too strong and possibly crack the seat (Corbeau FX1 Wide).
Corbeau has mounting holes at the bottom, just cut a board to mount using theses 4 holes and attach transducers to it.
 

Latest News

What does easier access mean to you?

  • Free access

    Votes: 49 68.1%
  • Better structured events

    Votes: 19 26.4%
  • Better structured forum

    Votes: 17 23.6%
  • Standard game content

    Votes: 16 22.2%
  • No 3pa registration pages

    Votes: 16 22.2%
  • To casual

    Votes: 7 9.7%
  • Other, please post

    Votes: 4 5.6%
Back
Top