HS6-GT – DIY H-Pattern Shifter

I tried the nylon bearings, but they are too thick, so they didn't fit :roflmao:. I might order different ones and let you guys know how that worked out.

I'm only 6 days late, but didn't forgot ya.
I opened the files and ready to tune.

Quick questions tho;
- Size of your bearing ?
- Do you want the case or the retainer alone ?
(i'd try the retainer alone first, see if it fits; but you tell me)

Bitacaia, for how long have you been using Fusion ?
Damn man, your files are clean and complete !
I've been using it for a few weeks now, coming from SW, and i struggle with all those parts in one.
But once i got the hang of it, it's really nice to use.
Thanks for sharing the files BTW ! ;)
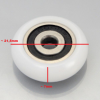
I´m at the moment making some variants for the different bearing sizes.
But because of the Corona pandemic, I have my two kids at home, plus my daily work (will start with home office soon), so i have no time... Hope in the weekend i can advance with the work.
And to make things worst i discovered a stupid mistake in the Bottom Case. Because i have no experience with Fusion (this was my first time using) I cutted the Bottom Case when designing other component. Only now i notice it... The problem is corrected in Fusion. But i need to update the thingiverse page.

1584636108729.png


About my experience with Fusion, as i said before, my first time using. But my daily work is using Siemens NX, and before was CATIA. In the end they all work the same way. But i would like to say, i don´t like Fusion... In the fight of the Free CAD software, for me Onshape is much better app.
I started this project in Onshape, but because of their subscription model, i was afraid to have some legal problems, if i intended to sell the shifter (luckily decided not to go in that direction). Then i started with FreeCAD, but after 2 months, i had to give up... was to difficult to work. Then i moved to Fusion. And here we are... I would happily start again in Onshape.

Be patient, i will try to deliver updated parts, suitable for different variants
-625zz naked bearing (current being used)
-V-Slot Wheel using MR105 Bearings
-MR105 Naked bearings

Tiago Viana
 
Nice man, thanks for keeping up with the work !
Pumped up about the correction you made (although i sliced the files yesterday and saw nothing :rolleyes:)
Drop a message when you update the Thingi page, i haven't printed the bottom part yet; will wait for the updated one.

... First time using, you shitting me.
Awesome job man, really.

Thanks !!
 
I'm only 6 days late, but didn't forgot ya.
I opened the files and ready to tune.

Quick questions tho;
- Size of your bearing ?
- Do you want the case or the retainer alone ?
(i'd try the retainer alone first, see if it fits; but you tell me)

Bitacaia, for how long have you been using Fusion ?
Damn man, your files are clean and complete !
I've been using it for a few weeks now, coming from SW, and i struggle with all those parts in one.
But once i got the hang of it, it's really nice to use.
Thanks for sharing the files BTW ! ;)

See picture for size of the bearings, width is around 21,5mm and thickness is around 7mm. I use the case, but I dont know if I want to print the entire case again :). I also ordered the POM wheels Bitacaia suggested, so when they get deliverd I will try those first.

bearing.png
 
Last edited:
I just received the Pom wheels, these are even thicker than the nylon bearings. The diameter of the wheel is 15mm and the thickness is 9mm. Shipping from aliexpress was only 2 weeks so I also recommend the seller Bitacaia suggested.
 
Nice news !

I bought mine from another one ... Still waiting for it :rolleyes:
But i miss the switches and board too, so i'm not close to completing it !

And I'll try (if i manage to do it properly) to do an easy instructional video, just on how to assemble it ;)
Tiago's video is really nice and complete, but a bit long if you're only looking for the assembly process.
 
Hey, just wanted to check in. I got my shifter back together with the offset level parts printed on their sides and a nylon 625 bearing. I used it for a couple races but that's it so far. The engagement feels firmer now than the first try. I'll check the wear after a few more uses.
 
Happy to hear you took time to fix it.
What changes did you make ? Just layed it on it's side ?
It will help, but i'm afraight the weakness might be coming from something else, as you're only one who's encountered this failure so far ...

Anyway, would love to hear back from you in a few weeks, to see how it's holding ! :)

Tiago, are you ok ?
We didn't heard from you for a long time, I hope you didn't get that damn virus :/

Cheers
 
I printed on it's side, used a 0.8mm nozzle instead of the 0.4mm. I also switched out the metal bearing with a nylon bearing.

It's working nicely and isn't nearly as loose feeling as my first print. Still have to put some time on it before I it's worth checking the wear though.
 
This looks very promising! What 3d printer and settings do you use? You can try to improve the strength of the parts by printing it in petg or abs?
The way to go is PC "Polycarbonate" for the offset lever or Nylon 910 but i cant print Nylon 910 cos you need a tempered cabinet to the printer.. Alternativ is to get one milled in aluminium or do a Lost PLA casting
( printing one offset lever as thin as possible with almost no infill add a inleed and outleed to pour aluminium in to )
Dip the whole construktion in Liquid putty "Floor Fix" several times to form a casting mold and letting it dry
Put it in owen upside down at 250* to melt out the pla and you have a ceramic form to pour Alu in to....
 
Awesome work! have you even compared this to the Pro Sim Quaife H pattern shifter for any possible additions to desing! im looking at CNC machining your design out of aluminum or another material and try that, ideally trying to get a 6spd + Reverse design.
 
Oh man. First post here. I'd been looking to see if anyone else had thought of this. I was looking at doing the same with possibly a mustang short shifter, and that led me to this forum and post. There's a lot of gold in this thread. Nice work. One thought I had about the project is that with linear hall sensors, you would really only need 2 of them for 2 axis. This is how the logitech shifter work *except it uses 2 potentiometers*. the secret sauce would be in the programming, but that could probably be picked up here in the code for this usb adapter for the logitech shifter.
https://github.com/AM-STUDIO/LOGITECH_USB_ADAPTER
 
Last edited:
Well, the program philosophy would be quite easy, and the guy in the post above did it also that way.

See Sketch:
You have 2 axis, Axis 1 (green) and Axis 2 (blue).
These axis both give you values from 0 to 1023. No matter if it is a pot or a hall or whatever.

All you do now is work with if arguments in the Arduino Sketch.

So simply said: (for example 1. gear)

If Axis 1 value is higher than 800 and Axis 2 value is smaller 250, activate "Button X".

This would be the most simple way.


Shifter-analouge.png
 
Well, the program philosophy would be quite easy, and the guy in the post above did it also that way.

See Sketch:
You have 2 axis, Axis 1 (green) and Axis 2 (blue).
These axis both give you values from 0 to 1023. No matter if it is a pot or a hall or whatever.

All you do now is work with if arguments in the Arduino Sketch.

So simply said: (for example 1. gear)

If Axis 1 value is higher than 800 and Axis 2 value is smaller 250, activate "Button X".

This would be the most simple way.


View attachment 379315
Right, you would first just enable serial output and find the data points for each. With the hall sensor, since it detects polarity and distance, the values may be a little different. I use one in my handbrake and only use from 503-1023 because it will never read the other pole of the magnet.
 
Hello, I've never have tried to assemble anything like this and have 0 experience with 3d printing. How should i go about this and where can i buy the nissan shifter?
Hi Kurage,
If you check in the first post, there is a BOM. In this BOM you can find links for all the required parts (except for the basic hardware, like bolts and nuts). All links direct you to Aliexpress. Just pick the one that suit you better.

Regrading the 3D printing parts, just ask if anybody is willing to print them for you, or in this forum or somewhere else. For sure you can find someone that has a 3D printer that lives near you.

Tiago Viana
Obrigado!!!
 
Hi Tiago,

How are you ? ;)
By any luck, did you find time to modify the models and upload them ?
All my parts have finally arrived, and i could finish it soon :D

Thanks !
Cheers
 
A quick update: my offset leaver also had the delaminating problem. So I decided to adjust the spring retainer to fit the pom wheel. For now I will only print the spring retainer without the case if that works I will adjust and print the spring retainer with the case. I asked a friend about making the offset leaver in aluminium he is on holiday so he doesn't have a lot of time. If he can't make it out of aluminium I will print the offset leaver again but this time in PLA (last time I printed it in PETG) and print it on its side.

offset-leaver.png
 
Last edited:
Hi,
First: Sorry for not being active in this project. But at the moment i don´t have my shifter, since Feb. I gave it to a friend to try out, but because of Covid, we have never been together again. Because i don´t have the shifter, my motivation to do improvements went away...

Now, returning to the subject.

After seeing the Pic from Fatapoc, it looks like the "delamination" of the printed part is a recurrent problem and needs to be addressed.
Luckily I have a solution! I´m designing another Shifter (Old F1 style), although is taking allot of time to finish it, and is using another method for making the bumps. Using just regular Washers pressed together with nuts.
IMG_20200810_161149.jpg

The spacing between washers is good. The feeling will be greatly improved, but the noise will be much worst. I know, for Fatapoc this is a problem. But you can always use the POM wheel. Although it will probably be destroyed with the sharp edges of the washers (the sharp edges can always be filled to a more round shape).

Problem: my first overview tells me i need to make allot of modifications to the Case and Offset Lever.
And at the moment i don´t have much time to spend on this project... Only after August.

Tiago Viana
 

Latest News

What's needed for simracing in 2024?

  • More games, period

  • Better graphics/visuals

  • Advanced physics and handling

  • More cars and tracks

  • AI improvements

  • AI engineering

  • Cross-platform play

  • New game Modes

  • Other, post your idea


Results are only viewable after voting.
Back
Top