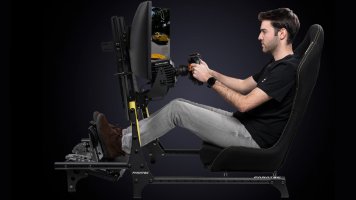
Buying advice please - Next Level v3 Motion Platform

I'm looking for some advice and thoughts of other owners or people with good knowledge of the product, please.

I always said I'd buy myself a motion simulator if I could afford one and had the room available. Well, that day may have arrived. I'm impressed by what I've seen of the Next Level v3 Motion Platform

This seems to meet all my criteria:

+ Limited space requirements, I don't have room for a huge sim rig but this seems compact enough to work.
+ Works with Oculus Rift VR, that fixed head position setting solution is impressive
+ Great support and regular updates from the developers
+ Available in the UK
+ Works with my current Thrustmaster wheel and accessories.
+ Sub £3k for the full setup, I'm not a pro racer I'm not looking for a practice simulator this is just for fun so the cost/fun balance has to be right.

So help me do the man maths! Is it worth it?

Is there another similar product I should also look at? It would need to be reasonably compact, work with VR, available in the UK without too much hassle and in the same £3-5K price range.

Is there anywhere I can try one or even better several of the systems in the UK?
 
I thought that the NLR V3 had 10mm bolts going into it. Looks like you went about 1" from the bottom. The nylon washers make sense. I just ordered some 8mm nylon washers. I have a good supply of 10mm SS washers for spacers.

I added some nylon washers to the retractable workbench casters and tightened them enough that there is no play. The last thing I want is them doing is rattling around when the transducers are busy.
 
Last edited:
Upvote 0
I didn't use the nylon washers in the end because I never move my seat.
The M8 spacer washers can also be removed if you want, it'll just mean the holes in the top flange of the angle will be off-centre. I'd suggest you drop the whole assembly into your P1, get it centred, and mark where the top holes go, then remove it and drill.
If doing any drilling, filing etc near the NLMv3 make sure you bag it up and seal with tape - you don't want any swarf or filings getting into any moving parts. Hoover any bits off the bag before unsealing/taking it off too.
 
Last edited:
Upvote 0
My plan is to keep the Motion base in the finished part of my house and to do all the machining in my shop.

Once I verify the offsets are 120 and 80mm like the drawing I have or something different, I'll measure and take a punch to angle aluminum, cut the 10mm holes on my drill press. Put a small bevel on the outer edge of the holes and do any deburring as needed.

Cutting the top holes to fit vs. using spacers is the cleanest solution. I may keep the nylon washers on initially. I'm planning bolt up the P1 cockpit base slightly different from the typical configuration and I may change my mind about some things after a little use. Once I'm done iterating, I can remove the washers.

If I get really ambitious I have a friend with a full metal machining shop who has offered to fabricate anything I need (within reason). So far I don't think I'll need anything I can't fabricate myself.
 
Last edited:
Upvote 0
I've ended up going back and having to use spacers (or in my case, a couple of shortened window packers) for the angle brackets on the V3 side. I removed the profile that they were mounted to that was bridging the gap that others needed to account for and found myself in the same position. Brackets going right onto the top of the main railing. Had made the SFX-100 feel a lot more 'believable' as you feel more connected to the motion and movement almost as if you're in the middle of it.

Unfortunately I cannot get the seat any lower (I'd like to) as I need the profile between the platform and the underneath of the seat. A few reasons. My seat has a curve underneath so it will not mount flush up against the platform at all. A slider may have helped things but then you are adding more semi-moving parts and something in between anyway, albeit a little shorted. Also the hole pattern on the V3 is curious, to say the least. Using the profile I am able to account for the holes not lining up and it basically eliminates that problem for me. I do have some isolation pads directly under the seat that the bolts actually go through and they are about 10mm. Not sure if that's enough to solve the curved underside of the seat but I'm at a stage now where I've lowered the overall COG about 100mm down. V3 is almost at the same level to the ground as it was pre actuator installation which amazed me.

All of this is probably not that informative for the V3 on it's own, but some problems will still be present in a non SFX-100 type build. The hole pattern, for one, is annoying.
 
Upvote 0
I stand corrected. They are using 8mm bolts going into the side of the NLRv3. I've figured out a way to bolt up my seat so there will be just one layer of 40x40 between the bottom rails of my seat and the top of the NLRv3 which keeps the overall height down. However I lose clearance for the transducer mount on the underside of the seat. Keep in mind this was just a plate to cantilever the transducers just behind the seat base.

If I add back the additional layer and 40mm of height, I have full seat slider motion and room for my transducer mount.

How much of an impact does 1.57" of height make? I assume that the longer the lever arm is the more torque is required from the motors effectively derating their power or speed. This makes me wonder what they used as a reference point when they rated it for 285lbs. Obviously having a well balanced COG matters quite a bit as well to take load off the motors.

Thoughts?
 
Upvote 0
hi guys, maybe a dumb question:

Can the V3 platform work together with buttkickers/transducers? Is the tactile feature of the V3 good or is it still supplemented when combined with some shakers?
 
Upvote 0
I had my Aura bass shakers the way that you describe, @RCHeliguy. I had to change them when I swapped out the old chassis but it worked OK for me at the time.

I already don't like the fact that I need the 40mm profile to account for the hole spacing and underside of my seat so if you can help it I wouldn't be adding any more height. You risk taking away the natural feeling of the motion if you're sitting too high on top of it. I wouldn't be worried for wear and tear as much as just not having an optimal experience.

@Jasje Yes you can run both at the same time. The tactile ability of the platform itself is limited. It does have vibration motors but they are not a direct replacement for things like engine vibes and road texture should you want that, although you do get a nice separated rumble strip effect in rFactor 2, at least. Not all titles utilise the platform the same way but I've noticed rF2 has had some nice rumble effect added, somehow.
 
Upvote 0
(To avoid confusion, this is to mount the seat to the top of the NLRv3 )

How about 2"x4" 1/4" x 12" long aluminum angle mounted to the sides of the top mounts? That would allow mounting the seat basically flush with the top of the unit.

If you mounted it with the horizontal part of the angle on the bottom, a piece of 40x40 could be mounted to the angle and even be below the top level.

OK, so I'm thinking about this idea.
Assuming the NLRv3 is in the middle, 12"x 2x4 angle bolted to that, then in my case 80x40 bolted to the angle. In my case I would mount the rail from the right side on the outer slot and the left side to the inner slot. My seat is a passenger side seat with manual controls on the right side, so this would center the seat.

Now I'm feeling a lot better about ordering 4 pieces of angle! They arrived today and still need deburring and to have the cutting oil removed.

In addition the exposed half of the 80x40 on the left side would be perfect for mounting my flight throttle. The other good news is that I can fit my transducers this way and even drop the seat a bit deeper :) I also keep full seat slider action to help center my COG easier.
NLRV3mountingidea.jpg
 
Last edited:
Upvote 0
Why just don’t drill 3 holes in both sides of the lateral P1 cockpit profiles? I remember to see some one doing this in YouTube and it very easy,

The biggest reason is that you have to choose your position very carefully since you can never slide the platform forward or backwards. I have a lot of iteration ahead of me and I'm don't want my 160x40 to look like swiss cheese when I'm done.

I'm planning to mount retractable casters to my system and I "think" I know how I want to do things, but I'm not planning to have the rear most base piece flush with the left and right sides.
 
Upvote 0
My NLRv3 arrived today. Pretty well beatup by FedEx missing cables and bolts and with one box wall that was just packing tape. I connected it up with a USB and PS cable I had laying around, downloaded the software from NLR and ran diagnostics on it. It appears to be working and I've been told I should get replacement bolts, USB and power cable sent to me.

My angle aluminum looked really rough too, but that was manufacturing. I've degreased it, filed all the burs off and sanded it so it has a nice brushed finish. At $9 per 1' long piece, I guess that is expected.

Fingers crossed my P1 Cockpit arrives in good shape!
 
Last edited:
Upvote 0
My NLRv3 arrived today. Pretty well beatup by FedEx missing cables and bolts and with one box wall that was just packing tape. I connected it up with a USB and PS cable I had laying around, downloaded the software from NLR and ran diagnostics on it. It appears to be working and I've been told I should get replacement bolts, USB and power cable sent to me.

My angle aluminum looked really rough too, but that was manufacturing. I've degreased it, filed all the burs off and sanded it so it has a nice brushed finish. At $9 per 1' long piece, I guess that is expected.

Fingers crossed my P1 Cockpit arrives in good shape!
Very excited to see your flight/sim racing cockpit come together with the P1 and NLRv3. This is exactly what I'm looking to do, with the addition of the Obutto Keyboard and Mouse tray for regular gaming. Be sure to post some pics when you're done!
 
Upvote 0
Sadly it appears that more was messed up than the missing parts.
The seat mount is out of square and rotated to the right of the base :(
I guess I need to deal with returning the whole unit.
shippingdamage.jpg
 
Upvote 0
The level you can easily account for in the software. Next Level will tell you to do this and is part of the process. I have mine level adjusted by a few clicks both on the roll and pitch axis. The seat mount being out of square looks odd, however it seems that the base is also not aligned with the lines you have superimposed. It does look slightly off however if you're looking at the section between the NLR lettering and the warranty void sticker. I'd email them and see if there maybe is a way to get it back to square without sending the whole thing back. Might be a bolt and a little adjustment that does it.
 
Upvote 0

Latest News

What's needed for simracing in 2024?

  • More games, period

  • Better graphics/visuals

  • Advanced physics and handling

  • More cars and tracks

  • AI improvements

  • AI engineering

  • Cross-platform play

  • New game Modes

  • Other, post your idea


Results are only viewable after voting.
Back
Top