Mobile Driving/Flying Cockpit with Motion and Tactile ( Build )

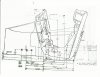
This is what I ended up with. I used 4 corner braces. 2 to mount the 40x40 to the seat brackets and another 2 to extend support of the aluminum plate higher.

RTbrackets_4510.jpg


This should has enough clearance for the NLRv3 and is a lot more solid than my trial run.
RearTransducer_4508.jpg


The extra rigidity helped. It worked better than the trial run. I think I'll be happy with this.
It's probably worth mentioning that it still felt a bit better under the old seat. Hopefully with a little more tweaking of the frequencies etc. I can get it a bit closer to where it was.

The track corner bumps feel good. So does the shift kick, engine rpm etc..

I've got a great lumpy idle right now that feels great, then the engine smooths out and only the road comes through and tire effects for wheels slipping or locking up and shift kick in the seat, at red line there is currently more engine vibration. Not sure if I want to keep that or not.
 
Last edited:
Some Meguiar's SCRATCH X 2.0 Fine Scratch Remover and a buffing pad took the scratches out of the fiberglass shell. I want to repeat that the tops of those seat brackets are sharp. I filed the top edges and then put UHMW tape on those edges to help protect the seat's finish while moving it into position. I was worried I'd have to work much harder to get the scratches out, but it cleaned up very quickly.

Also sitting of the floor below is the new table fan with remote. It is both much quieter than the old fan and pushes more air. It will continue to sit on top of my A/V rack at wheel deck level in front of the rig. The Remote is currently sitting on top of the button box. I'll add velcro so I don't accidentally knock it on the floor while I'm in VR.

This is it until I start working on adapting my flight controls to the new seat.
Rig_4505.jpg
 
I've think I've figured out how to make my rig convertible for flight again.

The expense of these Sparco 1/4" thick aluminum seat brackets was well worth it because of all the attachment points it offers. I suspected this when I ordered them, but I had no idea how I would use them yet.

Compromises
I need to remove the extension tube on my flight stick. There isn't enough clearance between the top of my stick and the front of the SC2 Pro. And I'm going to need to leave the seat in its current reclined position rather than a more upright position for flight. I don't believe the metal inserts laminated into the fiberglass were made for many cycles of loosening and tightening so I'm going to leave them tightened.

Flight Stick
For the flight stick mount I will put in a cross member identical to the back of the seat. Then a centered removable 40x40 piece will bolt to the top of the cross member and come out far enough to clear the front seat cushion. The bottom of seat bracket is still at a slight angle despite being bolted down to the NLRv3, so I need to use corner braces that will bolt on at a slight angle.

The flight stick will bolt on at 90 degrees to this centered piece. It is a tight fit under the front lip of the seat, but it will fit. For now I'll use corner braces to get everything fit together, but I'm thinking of using something like this as a more permanent solution.
8020_4350.jpg


Throttle
The throttle will be attached to the seat bracket using an 80mm long piece of 40x40 and T-nuts to the two holes three rows below where the seat is bolted in front. A second longer piece of 40x40 will bolt to this using a 2x2 hole joining plate. The 80mm long piece will remain attached to the seat permanently. The longer piece will be able to slide forward and backwards to adjust for arm length.

20191116_075710.jpg


Flight Pedals
The flight pedals will move forward from the position I had before, but they will require removal of the 40x80 risers and pedal deck.

I'm going to cut and test fit everything before ordering some additional 8020 materials. I would like to have longer 40x80 risers under the pedal deck for appearance. However I can slide them forward as they are now. I may be able to get a rigid 90 degree joint without the plates I listed above, but I'll need to test that.
 
Last edited:
About the seat position. Looking at the attached FA-18 diagram, I was somewhat surprised at the seat back angle, and pedal height. The layout seems very much like a GT racing setup. This is good news, as it will allow me to keep the seat in one position ( I agree about those NRG inserts), This will also allow me to keep the rudder pedals the same height as the race pedals. I plan to shove the race pedal deck forward,( as you do), and then plop the rudder pedal plate right on top of the main side rails. This make converting much simpler and easier since I have a modded P1 pedal deck for inside mounting, and motion actuators!
 

Attachments

  • FA-18 Dimentions.jpg
    FA-18 Dimentions.jpg
    877.4 KB · Views: 219
Last edited:
@Wmacky I was just playing with the flight pedals and I'm going to have to remove the pedal deck by the base of the 40x80mm profile risers on each side to have room, but that is entirely workable.

Getting that extension tube off was a real PITA!
But I got it :)
It was on tight and there was only a narrow nylon looking plastic area to grab hold of so I needed some narrow enough wood strips to fit in there, then some backing for clamps and another set of clamps to keep the wood from buckling.
20191116_094709.jpg
 
Last edited:
I've got the flight stick mounted and there is just enough clearance that I'm comfortable with how this is setup. However I wonder if I could find a front cushion that is a bit smaller or that is split to lower it a bit more.
flightStick_4520.jpg


This is using off cuts pieces, but it seems solid. A slightly lower front cushion seems like it would improve the situation a bit. It was easier for me to put the stick in place and then put the cushion back in.

I wonder if something like this replacement seat cushion will work for flight to replace the two seat bottom sections. The dimensions seem right. I would just reverse it so the wedge with the cutout would be at the front of the seat where the stick goes. I went ahead and ordered it to find out.


flightstick_4524.jpg


The cross brace will stay on the seat permanently like this. There is a corner brace on the inside that isn't very visible.
stickmount_4527.jpg


This part of the stick assembly will come off.
These are just off cuts, but I may leave it this way. It's pretty close.
stick_4526.jpg
 
Last edited:
Currently also looking into cushions to optimize seating position. Curious how this will work out for you!
I see a lot of effort went into your setup. :thumbsup:
 
Currently also looking into cushions to optimize seating position. Curious how this will work out for you!
I see a lot of effort went into your setup. :thumbsup:

I'll let you know tomorrow when the cushion arrives. I'm not going to dial in the pedal position until I know where my legs will be with the new cushion. I don't need the same leg support since rudder pedals are lighter effort and involve more leg movement.

The more I bolt up the more I love these Sparco seat brackets. So many places to attach things. A great addition in keeping with a flexible 8020 chassis!
 
Watching closely as I contemplate my own race to flight conversion........... I have additional issues to deal with such as SFX actuators in the way, and a giant F18 throttle group.


Also, my joystick base will be mount below seat level with a long extension. I'm not yet willing to cut a u holein the front of my new NRG seat bottom , so replacing the fat front cushion that overhangs the seat with a shorter / thinner cushion will allow more pull back ( I hope!)
 
@Wmacky if you used seat brackets like the Sparco brackets I was just crowing about, you could bolt a simple mount to it that a larger structure could bolt on to whenever you need it.

I'm going to try to downsize the static mount point that remains on the side of my seat. I ordered one of these to help clean up my seat a bit when I don't have the throttle connected. Hopefully it is strong enough. The holes on the seat are 8mm 1" apart and this is a series 25 to 40 converter, so it has two 25mm (.984") apart 6mm holes and two 40mm apart 8mm holes. It should work. time will tell.

For everything I'm mounting on the outside of the seat brackets I'm using either a nylon washer or UHMW tape so I don't scar it up and because I have no idea what I'll change going forward.

I have another 8020 order in with various connectors that I would like to try and more end caps since I've got a lot of cut sections with exposed ends now. I may even dremel a couple of them to leave room for T-Nuts.
 
That's a shame.

I'm looking for a front pad that matches the existing rear pad. I may buy some foam, and covering material and get a little old lady to sew me something up.
 
Next experiment. I think I have the dimensions right, this is supposed to be soft. There is no split cut and I would be putting this into the seat the way it was designed.

There are quite a number of race seat replacement cushions here as well.
 
Last edited:
Moved my flight pedals to where they feel right. Their pedal angle is also completely configurable and I put the flight pedal deck at a slight angle. There is more effort involved in converting from driving to flying mode now, but I guess that comes with having a better dialed in driving position.

The existing pedal deck has to be completely removed along with the 40x80 risers.
flightPedals_4543.jpg


It may not be quite perfect, but it is usable with the stock seat cushions :)
When the 8020 order arrives and the new cushion gets here I may tweak it just a bit more.
ReadyToPlay_4547.jpg


NO JOY! It appears that when I removed the extension tube and heard a "bad" noise that I broke my joystick. The buttons all work fine, but the actually stick action is very wrong. I'll open it up and see if I can fix it before replacing it.
 
Last edited:
You might as well use this as a chance to upgrade the joystick?

So now what happens to the profile risers for the car pedals?
 
Last edited:
What would you recommend for a joystick?

The risers are still attached to the pedal deck. I just drop in back in add 4 bolts and reconnect the transducers.
 

Latest News

What would make you race in our Club events

  • Special events

    Votes: 79 28.8%
  • More leagues

    Votes: 55 20.1%
  • Prizes

    Votes: 60 21.9%
  • Trophies

    Votes: 34 12.4%
  • Forum trophies

    Votes: 18 6.6%
  • Livestreams

    Votes: 43 15.7%
  • Easier access

    Votes: 140 51.1%
  • Other? post your reason

    Votes: 42 15.3%
Back
Top