Buying advice please - Next Level v3 Motion Platform

I'm looking for some advice and thoughts of other owners or people with good knowledge of the product, please.

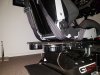
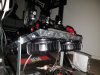
I always said I'd buy myself a motion simulator if I could afford one and had the room available. Well, that day may have arrived. I'm impressed by what I've seen of the Next Level v3 Motion Platform

This seems to meet all my criteria:

+ Limited space requirements, I don't have room for a huge sim rig but this seems compact enough to work.
+ Works with Oculus Rift VR, that fixed head position setting solution is impressive
+ Great support and regular updates from the developers
+ Available in the UK
+ Works with my current Thrustmaster wheel and accessories.
+ Sub £3k for the full setup, I'm not a pro racer I'm not looking for a practice simulator this is just for fun so the cost/fun balance has to be right.

So help me do the man maths! Is it worth it?

Is there another similar product I should also look at? It would need to be reasonably compact, work with VR, available in the UK without too much hassle and in the same £3-5K price range.

Is there anywhere I can try one or even better several of the systems in the UK?
 
Haha, yeah I bought mine on a whim as well. I was mulling over it for a while and thought it was too much money to justify spending. But something just made me do it and pretty much with everything I have bought in sim racing gear I haven't regretted it at all.

Did you receive shipping notice for your P1? I am waiting for my GT1 to be sent out, it's been around 2 weeks since I paid for it. How long did your order take to process?
Mine took a a while over the Xmas period but don’t worry they will be doing everything they can to get it out as quick as possible, problem is they are also at the whim of suppliers getting all their parts sent on time and they don’t ship the rig until everything is ready.

I suspect the Easter break has delayed things a bit.
 
Upvote 0
Oh yeah that too. Forgot about Easter. I have my new HE shifter now and I can't be bothered to mount it to the old rig so I am just going to have to wait for the new one to get here for that. No massive rush but I have built an extension to my house for my rig and PC, it's basically a games room. Now that it's finally finished (power should be in on the weekend) I am looking forward to moving everything down there. Except I don't have half the stuff!

I suspect they will send a shipping notice and since they haven't yet I'd bet they still haven't sent it. Hopefully once it does go out, it won't be too long once it arrives. $700 AUD shipping, it would be nice if it made it here in a week from being sent :)
Ha ha..! I made some amendments to my rig a coupe of weeks ago, knowing full well I'd be ordering a P1 a few days afterwards. I actually enjoy the building, tinkering, shifter modding, cable tidying etc etc as much as the racing.

Nice work with the extension - now that's what I call dedication to one's art..!
Having a games room is awesome. I'm actually in two minds whether to build the P1 in a different room with about three times the space, but when I laid a new floor in my current games room I hid speaker and data cables behind skirting, put extra power in, fitted a blackout blind etc so I'll probably keep it where it is. It's nice and cosy in there. If I used VR for anything other than sim racing I'd probably move to a bigger space but that side of things doesn't interest me at all.

V3 ordered, by the way. YOLO.
 
Upvote 0
@AntoN_CheZ

Dont want to sidetrack this thread with tactile, so maybe best to do your own build thread come the time and then discuss things more. The fact you do not have overly powerful tactile is a good reason you want to maintain as much of the energy they produce in the seat and it not escape down into the VR3. We can limit this energy escaping and that's the point.

@Michal Burisin has started in his own cockpit build thread to muck about with various materials.

Tactile On 4 Corners With Seat Mover Motion:
You do not want to place tactile units on the 4 corners, like many people do, some think this placement is needed to represent wheels. It does not bring the best performance. Isolated platforms work best for seat and pedals sections as we want to direct the path and also limit where the tactile energy goes. This gives better control and efficiency of the energy.

Look at a SimXperience cockpit with rear tactile on the back of the main-chassis frame. Its primary path to reach the seat to feel their energy is via the cockpits own motion support arms, then down into the bolted on seat platform and then into the seat itself. Some energy may go up through the universal joint but again this is quite a long path and would mix the left/rear channels energy into mono.

If inspecting this closely, (see yellow/blue) such firstly creates quite a long route for the energy to travel, reducing the energy. It also enables the possibility of the rear left/right channels mixing together (see green) and ruining any potential stereo effects within the seat support section. This even prior to reaching the seat itself. Also if we look at the point of installing the tactile nothing would prevent the tactile energy also escaping up the main chassis frame where it won't even be felt, so is wasted. In my view their own cockpits are far from ideal in what can be achieved with an 8020 or custom build and seeking to install tactile more professionally.

.
It makes much more sense to have the tactile more directly installed in close proximity to the seat.
Then to consider isolation factors to maintain it in the seat for improved performance.
 
Last edited:
Upvote 0
According to my calcs, fixing the V3 using its standard M8 mounting points side-fixed into the second-from-top nut channel in the P1 frame will give the base of the V3 approx 35mm clearance above the bottom of the P1 rails, plus whatever the height of any feet attached to the P1 is. Should be more than enough for the fans. This should put the top of the main part of the V3 base almost level with the top of the P1 frame, which should look pretty tidy.

I really should do a sketch.
 
Upvote 0
@Mr Latte

I agree on hijacking the thread. I will stop now but just to clarify what you mean as I think I will have solved my problem and understand what you're saying all at the one time, have a look at these two pics. This is my current rig (you probably have seen it already) and how I mounted them currently. Are you suggesting basically leaving them the way that it is now, rather than move them off the seat? The pedals are pretty much the same, directly connected under the pedal tray.

I can definitely feel the stereo effects and don't feel the need to change this set up at all. I had them directly under the seat with my motionless cockpit but this is obviously impossible with the V3 in use.

@Mascot That's sick. Be sure to read my thread on settings and profiles once you set your V3 up. I feel I have been able to get much more out of it since spending the time tweaking. Out of the box is good but I feel my profiles help to bring out a seat movers qualities a little better. The extension was sort of a 'might as well' project for now and also future proofing for when kids arrive. Plus now I have a dedicated room so it's a little more fun this way, and I got an excuse to get a new 80 20 chassis! Everyone wins!

I'm the same with VR. No interest at all for it with anything apart from sim racing. I have been gaming for 30 years so I love games, just not big on the VR experience outside of racing.
 

Attachments

  • 20180411_235034.jpg
    20180411_235034.jpg
    607.8 KB · Views: 249
  • 20180411_235049.jpg
    20180411_235049.jpg
    661.7 KB · Views: 241
Upvote 0
@Mascot That clearance should be fine for the fans. Your main concern would be to make sure the seat has enough clearance of any surrounding profile it may bump into when tilted on its most extreme angle. You can test in the software the maximum range, with the mouse, so you can watch how far it moves while not being in the seat.
 
Upvote 0
According to my calcs, fixing the V3 using its standard M8 mounting points side-fixed into the second-from-top nut channel in the P1 frame will give the base of the V3 approx 35mm clearance above the bottom of the P1 rails, plus whatever the height of any feet attached to the P1 is. Should be more than enough for the fans. This should put the top of the main part of the V3 base almost level with the top of the P1 frame, which should look pretty tidy.

I really should do a sketch.

This sounds very promising.

- How will you then secure the V3 from sliding back&forth? Can you tighten the nuts (attaching the V3 to the P1 side rails) from the inside of the V3 or such?

- Did you also measure the clearance the side of the seat will have from the 'shifter rail' on the P1 when using full motion (i.e. Rollercoaster)?

Thanks for sharing your thoughts! I'm looking to buy the exact same config as you, but will have to wait till the Sim Lab guys start producing again. P1 + Sparco 2000 + NLV3 + OSW + HE Pro Pedals + HE Seq Shifter + HE Brake + Buttkicker Advance under seat + under pedals with help from the countless threads and answers from Mr Latte (thank god he still has the patience to answer everyone :)) . This should be a 'one-time' build and then hopefully years of fun. (probably will be upgrading next year again though..:whistling:)
 
Upvote 0
@Mr Latte

I agree on hijacking the thread. I will stop now but just to clarify what you mean as I think I will have solved my problem and understand what you're saying all at the one time, have a look at these two pics. This is my current rig (you probably have seen it already) and how I mounted them currently. Are you suggesting basically leaving them the way that it is now, rather than move them off the seat? The pedals are pretty much the same, directly connected under the pedal tray.

I can definitely feel the stereo effects and don't feel the need to change this set up at all. I had them directly under the seat with my motionless cockpit but this is obviously impossible with the V3 in use.

@Mascot That's sick. Be sure to read my thread on settings and profiles once you set your V3 up. I feel I have been able to get much more out of it since spending the time tweaking. Out of the box is good but I feel my profiles help to bring out a seat movers qualities a little better. The extension was sort of a 'might as well' project for now and also future proofing for when kids arrive. Plus now I have a dedicated room so it's a little more fun this way, and I got an excuse to get a new 80 20 chassis! Everyone wins!

I'm the same with VR. No interest at all for it with anything apart from sim racing. I have been gaming for 30 years so I love games, just not big on the VR experience outside of racing.

We will keep it for your own thread later....
Ideally, you want to try and avoid a single base platform with L/R units attached beside one another (yet many do this). I fully expect you can feel quite a bit of energy from a left wheel bump in your right pedal. Pedals are however more tricky.

Again with the seat, if we go with individual supports, often connected to seat rails or individual seat risers its possible to have the seat itself (as the final destination) be the only bridge between the L/R channels. It depends how much a user wants to fuss about the quality of the stereo tactile.

If you apply isolators or vibration control materials to the top of the VR3 (H) frame, possibly with alu or steel plate(s) yet have the tactile connection to the seat mounts. Then we are isolating the seat to reduce the tactile energy that goes down. The more we restrict this the more we maintain the energy in the seat.

With a small amount of effort I think you can gain improvements, its upto you how bothered you are in seeking them or implementing them into your new build.
 
Upvote 0
This sounds very promising.

- How will you then secure the V3 from sliding back&forth? Can you tighten the nuts (attaching the V3 to the P1 side rails) from the inside of the V3 or such?

- Did you also measure the clearance the side of the seat will have from the 'shifter rail' on the P1 when using full motion (i.e. Rollercoaster)?

Thanks for sharing your thoughts! I'm looking to buy the exact same config as you, but will have to wait till the Sim Lab guys start producing again. P1 + Sparco 2000 + NLV3 + OSW + HE Pro Pedals + HE Seq Shifter + HE Brake + Buttkicker Advance under seat + under pedals with help from the countless threads and answers from Mr Latte (thank god he still has the patience to answer everyone :)) . This should be a 'one-time' build and then hopefully years of fun. (probably will be upgrading next year again though..:whistling:)
I'm *thinking* that a pre-installed lock nut on the exposed thread between the NLV3 and the P1 side rail that bites against the P1 rail should do the trick.

Failing that, simple inverted angle brackets (say, 40x80mm) fixed into the vertically-orientated nut channel on the very top of the side rails (or even neater/stronger, a single L-shaped extrusion each side to accommodate all three fixings) would be even simpler, but not quite as neat.

There's a multitude of possible fixing options, I think.

The seat clearance on the side rail is a bit of an unknown right now, but I'll be looking to mount my h-pattern close to the wheel so might not even fit the side rail at all - I'll try to fix it to the front wheel mount if I can.
 
Upvote 0
I'm *thinking* that a pre-installed lock nut on the exposed thread between the NLV3 and the P1 side rail that bites against the P1 rail should do the trick.

Failing that, simple inverted angle brackets (say, 40x80mm) fixed into the vertically-orientated nut channel on the very top of the side rails (or even neater/stronger, a single L-shaped extrusion each side to accommodate all three fixings) would be even simpler, but not quite as neat.

There's a multitude of possible fixing options, I think.

The seat clearance on the side rail is a bit of an unknown right now, but I'll be looking to mount my h-pattern close to the wheel so might not even fit the side rail at all - I'll try to fix it to the front wheel mount if I can.

The L-shaped extrusion seems like a very good idea, that will also allow you to use hand tightening handles to allow whole ‘Seat+NLV3’ fore/aft adjustment, eliminating the need for seat sliders, making the whole thing even lower.
 
Upvote 0
We will keep it for your own thread later....
Ideally, you want to try and avoid a single base platform with L/R units attached beside one another (yet many do this). I fully expect you can feel quite a bit of energy from a left wheel bump in your right pedal. Pedals are however more tricky.

Again with the seat, if we go with individual supports, often connected to seat rails or individual seat risers its possible to have the seat itself (as the final destination) be the only bridge between the L/R channels. It depends how much a user wants to fuss about the quality of the stereo tactile.

If you apply isolators or vibration control materials to the top of the VR3 (H) frame, possibly with alu or steel plate(s) yet have the tactile connection to the seat mounts. Then we are isolating the seat to reduce the tactile energy that goes down. The more we restrict this the more we maintain the energy in the seat.

With a small amount of effort I think you can gain improvements, its upto you how bothered you are in seeking them or implementing them into your new build.

Do you still advise using these isolators to separate the tactile platforms from the rig?
http://www.shakercentre.co.uk/aspbi...tProductsID=14&content=rubber_isolator_rdb220

Or have you already found a better solution? Still not sure how to isolate the NLV3 + Buttkickers on plate + Seat from the rig.
Thanks!
 
Upvote 0
Are we talking about using these feet to isolate the rig from the floor or in between the rig and the shakers? If the latter, how would that work? I think with the V3 it's going to be hard to get optimum mounting and isolation due to the seat actually moving. On a static rig you don't need to worry about clearance, weight on the seat and all that. Like I mentioned above on my static rig I had shakers bolted directly under my seat. Impossible with the V3.

I am going to aim to have my GT1 cockpit look almost the same as the one I have now in relation to how the shakers are mounted. The only thing that I think I could do is separate the left and right shakers of both the front and the back. Maybe kick them out to the side rather than the rear but this would a) look way worse and b) get in the way when my rig is in my new room where access alongside the rig is limited.

Tactile is a super tricky thing to get right and I feel that how I have it now, as long as the feeling is the same on my new rig as it is on the old one, would be a win for me. Plus, in that link those parts are as much as each of my shakers!
 
Upvote 0
4" x 2" x 1/8" aluminium angle seems ideal to make two inverted 'suspension rails' to hang the NLV3 between the side-rails of the P1 cockpit. These would also work as a seat slider with some QR cam fixings.
A 1m length to make two 500mm rails can be delivered from eBay for £20 (mill finish, would need painting. Pre-anodised lengths may also be available somewhere). Even cheaper if bought in a shorter length to make six local brackets rather than two long rails.
 
Upvote 0
Decided to buy a thicker aluminium angle for maximum strength & stability, 4" x 2" x 1/4". Around £17 delivered for a piece 500mm long to give two 250mm rails. The two outer fixing holes in the side of the NLV3 are at 200mm centres (according to the drawing..!) which gives 25mm at each end of the rail from the centre of the bolt holes. Should be just about perfect. The 4" vertical leg will give a nice wide height range for the NLV3. I've been giving this a lot of thought and it seems to be the best method I can think of for mounting the NLV3 into the Sim Lab P1 frame while also giving quick and easy fore/aft seat adjustment.

Sounds great and look forward to seeing the results. So make sure you take some pics!

Just one thing to note although you probably have it covered.

The V3 performs best when your centre of gravity is directly over the motion platform's pivot point. So it's a good idea to set up your seat position on the platform with this in mind first and then move the platform and / or pedals to achieve the driving position, which is best for you.

Once you're happy you can tighten everything up properly. You can then use minor seat-slider adjustments, if required, without upsetting the COG too much. What you don't want to be doing once the platform is fixed in place is to be moving the seat forward or back too far in order to get comfortable, albeit you will have some scope at the pedal deck end. I've assumed however that your solution will allow you to make fore and aft seat adjustments, separate from the platform, i.e like having a slider. If not, ignore most of what I've said! :D
 
Upvote 0
Sounds great and look forward to seeing the results. So make sure you take some pics!

Just one thing to note although you probably have it covered.

The V3 performs best when your centre of gravity is directly over the motion platform's pivot point. So it's a good idea to set up your seat position on the platform with this in mind first and then move the platform and / or pedals to achieve the driving position, which is best for you.

Once you're happy you can tighten everything up properly. You can then use minor seat-slider adjustments, if required, without upsetting the COG too much. What you don't want to be doing once the platform is fixed in place is to be moving the seat forward or back too far in order to get comfortable, albeit you will have some scope at the pedal deck end. I've assumed however that your solution will allow you to make fore and aft seat adjustments, separate from the platform, i.e like having a slider. If not, ignore most of what I've said! :D
The method I described will move the NLV3 and the seat together, so once the seat position is set it'll stay there relative to the NLV3 no matter where you slide the whole assembly. From what you say this will be the ideal way to do it so as not to upset the CoG. I'm not even going to fit a traditional seat slider as that will potentially upset the pivot point, like you say.

All I need now is my P1, NLV3 and aluminium rails.
Next week, hopefully.
 
Upvote 0
Decided to buy a thicker aluminium angle for maximum strength & stability, 4" x 2" x 1/4". Around £17 delivered for a piece 500mm long to give two 250mm rails. The two outer fixing holes in the side of the NLV3 are at 200mm centres (according to the drawing..!) which gives 25mm at each end of the rail from the centre of the bolt holes. Should be just about perfect. The 4" vertical leg will give a nice wide height range for the NLV3. I've been giving this a lot of thought and it seems to be the best method I can think of for mounting the NLV3 into the Sim Lab P1 frame while also giving quick and easy fore/aft seat adjustment.

Brilliant sollution. Looking forward to the photos, hope you find the time to share it with us!

Will you be attaching some tactile transducers to your seat in the future? Any thoughts on that?
 
Upvote 0

Latest News

What would make you race in our Club events

  • Special events

    Votes: 2 25.0%
  • More leagues

    Votes: 1 12.5%
  • Prizes

    Votes: 1 12.5%
  • Trophies

    Votes: 1 12.5%
  • Forum trophies

    Votes: 0 0.0%
  • Livestreams

    Votes: 2 25.0%
  • Easier access

    Votes: 5 62.5%
  • Other? post your reason

    Votes: 1 12.5%
Back
Top