SketchUp

It takes some time to work with this prg but it's great fun.
I wish to thank escpecially Martinez for teaching me the very basics, but you're proberly still not happy with my amount of object poly's :D
But you are very right to try to keep it all as 'small' as possible.

I found that working with jpg's in SketchUp is (for me) the most difficoult part. I mean to import a jpg in a model and mess around with those axes...

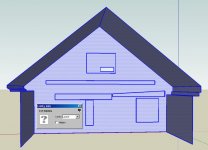
This is my first created house and I gladly want to get some critical comments about it. No mercy ;)
What I did: found some jpg on the Inet (more or less 2D) imported in a SketchUp model (just a square) and build it manual into a 3D model.

However I'm not too happy about the end result in rFactor, see pic (from left to right) Maybe something to do with sun&shadows ? too gray imo. Btw on the right side of the building, wich you can't see, it's brighter.
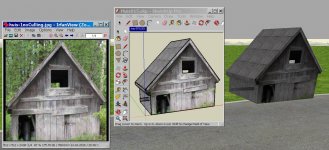
sketch_model_as_001.jpg
 
I use only 3 programs, BTB, Blender and SimEd. I like the simplicity of object creation in sketchup, but the mission to get it into btb made me give it a miss.
You really only need to use 2 programs, BTB and Blender. SimEd is a nice addon to the process to clean everything up at the end.

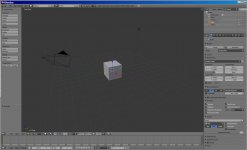
Andre you really should give Blender a go. Try this, open blender, right click once on the cube, look on the bottom left of blender is 'Link and Materials', in there click 'new'. Then up the top, click file > export > 3ds. Then import that 3ds into xpacker, you will get a texture error but don't worry, it will assign one for you, the important thing is that now that cube is ready to go into your project. It's as fast and simple as that. :)

Is it possible I've got a wrong version of Blender?
Can't even find what your trying to explain: 'Link and Materials' ?

Blender001_as.jpg
 
SkechUp poly entries

Martinez : Somewhere you wrote that people can create the most fantastic models but they don't think about the amount of poly's (game/fps)
What do you think is the maximal acceptable amount of poly's in my little house?

poly_001_as.jpg
 
However I found this.

At first, remember my 1th house object , I did it with SketchUp 6, the terrible
nightmare axes, right? to get a jpeg fit exactly into your square ?.
Forget it.

Start SketchUp 7, create the square, import the jpeg and done !
And when you prefer to work with SketchUp 6 just save it at 6.
Another approach: Start 6, create square, select paint bucket, create new material
from texture image. Add material into your square and play with the Edit option,
weidth/hight.

Saves me lot of time :)

Silly to reply myself, but Sketchup (6 ) seems to be much easier to map some textures ;)
Just use the Import function and then work with the Texture Postitons, fixed pins, etc. works great.

Saves even more time ;)
 
Martinez : Somewhere you wrote that people can create the most fantastic models but they don't think about the amount of poly's (game/fps)
What do you think is the maximal acceptable amount of poly's in my little house?

View attachment 30182

I didn't pay attention if this is for rFactor or not, but one of the rFactor tricks is that you can swap in the detailed model when the view is close (say <100 meters) and use a lower detailed model when the view is distant (>100 meters). Some of the other racing programs support similar features, I think, but rFactor is the one I'm familiar with.
 
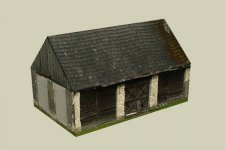
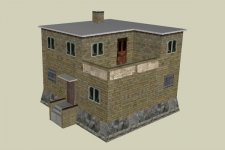
Andre, don't ask me, I don't own a building company ;) Really - it depends - sometimes even on texture I'm using. I have two buildings - a barn from my own photo - looks like more detailed than it is, but it has maybe 30 polygons (just straight walls and a roof). Then a house with more than 300 polys... Both of them belong to one texture sheet. But from the barn part I can only build that barn. And from the rest of the texture I can make maybe 25 other houses because I can mix some parts of the texture... The funny thing is that they both look good from the close distance...
I think the limit is what your computer can hold. I have rather slow machine then it tells me soon if I think too much to make it beatiful ;) I always try to find some compromise... Had someday an idea to make rather lower poly buildings and additional objects like gutters or windowsills that I can use if the buildings stand close to the track to make them more detailed
By the way, nice things you have for rF :)
 

Attachments

  • barn.jpg
    barn.jpg
    33.2 KB · Views: 247
  • house.jpg
    house.jpg
    36 KB · Views: 242
Depending on how close to the eye the object will be, you can use bump mapping for windowsills and doors etc. I always look at how other games are made, you see a building that looks very 3d, but when you get up close to it, its just a flat wall. You can make a simple bump map by using different shades of grey then use the normal map filter in ps. The darker the grey, the deeper the bump.
 
You mean the bump maps can be grey? - I saw only blue ones. I'm not so experienced, so I kindly ask :)
I don't want to use bump textures too much for couple reasons:
- my buildings are on bigger texture sheets, and windows/doors etc. take maybe 2-3% of the texture. So, bump maps should also be big and that would hurt the perfrormance?
- I want to make tracks "compatible" with original RBR format (that means they can be converted with no problems if somebody wants to do it) - there's no bump in original format, but specular only.
I mean I'm talking of RBR, since I'm RBR nut :)
But, bump maps are very good also to make e.g. road much sharper in distance - I have some track like this (still working on that Kormoran 2003...)
I would rather make some "egdes" on the texture darker to have an impression of 3d. Sometimes I can even use natural shadows that windows have on photos.... On the screenshot all ground (two gravels) you see is on one texture.
 

Attachments

  • RichardBurnsRally_SSE 2010-10-22 11-58-43-85.jpg
    RichardBurnsRally_SSE 2010-10-22 11-58-43-85.jpg
    56.4 KB · Views: 266
I was referring to designing a bump map using grey, then using the normal map filter plugin from photoshop to convert it into a bump map (which would then end up blue).
For example, if you want to add door lines to a bump map on a car, you start with a white background and draw the lines on in black, then convert it to a bump map and the black line creates a depression.
door_bnw.jpg

door_bumped.jpg


Then as an example for what a grey shade does, I blur the black line and run the filter over it, now you see smoother changes.
door_blur.jpg

door_smoother.jpg


Lets say you have a house you want to add a bump to, (lets focus on the chimney)
By drawing in shades of grey you can create a base for a bump map. once you use the normal map filter it comes out as such.

house.jpg

chimney.jpg


Lets take the car one step further and put a side vent on it.
car_vent_grey.jpg

car_vent_bump.jpg

car_vent.jpg


There is a lot more to it than just this, there is different settings in the filter, and different types of dds formats to use, try using a bump map like this on a tree :D This is using the Du/Dv filter with a bump scale of 2
tree.jpg

treebump.jpg
 
My mind is going

Now I've lost it I think.

Can it be that the bottleneck of SketchUp is to create bowing/gebogen objects ?

I'm trying to create just a swimming pool stairs, swimming pool with texture done in a minute, but
what now ?

see pic and explain me what to do now. And yes I studied almost every available vid on the net.

I tried to paint with freehand then with circle (not allowed by Martinez;) too many poly's, correct btw !

How to bow/buigen ?!

stairs001.jpg

Thank you so much, Im really stuck here.

To bow or not to bow thats the question.
 

Latest News

Are you buying car setups?

  • Yes

  • No


Results are only viewable after voting.
Back
Top