I was gonna post this over @RSC but because they're down right now thought i would post it here.
Recently someone asked me todo an ingame MenuImage for a Custom Skin on a transparent background. So this is a small in 4 easy steps, well 5 if you include the final "saveas" lol.
"howto create an ingame Menuimage for your Custom Car Skin on a transparent background" like original car MenuImage in the car select screen...
Tutorial.txt along with 4pics are in the archive showing what screens you'll see and explaining exactly what todo so you can't go wrong.
And sorry if you folks already know this, but there's some out there that probably don't so...
could'nt post the archive for some reason so i'll just post the pics and steps here: Hope this ok and it helps some folks...
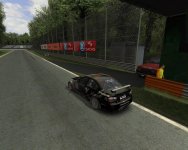
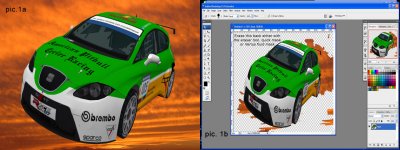
1st We'll start off with an eg. (see pic.1a)
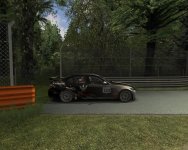
1./ you need to cut all the background away from the your screendshot(see pic.1b still some work todo) so that you just have the image of a car on a transparent background. I use vertus fluid mask to cut everything away, but you could use the eraser,magic eraser or quick mask tool if you don't have Vertus. When that's done...
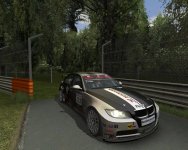
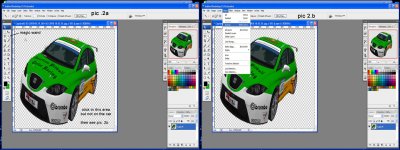
2./ Use the magic wand to click on the transparent background(see pic.2a) but NOT on the car. Then goto top menu: select/inverse (see pic. 2b)
3./ Then come across to the layers pallette and 1st, click on channels(see pic.3a). At the bottom of the channels menu you'll see a small square/rectangle with a circle in it: "save selection as channel" 2nd, clck it and now you'll see a small cutout of your car in white with a black background (Alpha Channel) at the bottom of the channels pallette. (see pic.3b)
4./ Make sure: "RGB, Red, Green, and Blue" are checked/highlighted and "Alpha Channel" is unchecked/not highlighted (pic.3b) then click back on "layers"(not important - just habit) in the pallette
Then goto menu

top of screen) Select and then click Deselect.
5./ File/Save as/targa(.tga) and (make sure alpha is checked when you ask to save as) (see pic.4a)Now press "Save"...
Choose 32bit and leave "compress(RLE)" unchecked...(see pic.4b)
The file can simply be saved as "MenuImage.tga" and renamed later to match your "Team Name" in the .ini file.
Done...
You can experiment with this step below if you find you're MenuImage looks stretched or squashed ingame:
The Image width and height ratio should be kept the same.
ie. if you only compress the width of the image, you'll end up with a car that's squashed to tall for its width and by the the same token the same goes when you only compress the height you'll end up with a fat looking car (nice effect through a fisheye lens though).
What you can also do is take the Screenshot from a more front on view, rather than side/profile view as in have the car sitting facing on a line from 8 - 2 o'clock or 4 and 10 o'clock and viceversa font/rear whatever you prefer...
It's again a lot easier just to use the "transform grab handles" and while holding a "shift key" push or drag any of the grab handles at the corners and this will ensure you keep the same width/height ratio of/in your image...
So to get there: do step2... then edit/transform/scale
Even if you already know all this mafrien's, then it might help someone else.
ps. usually at the end of step 2 - i would copy and paste the selection into a new document (512x330) with transparent background and then, in the new document do step 2 through to step 5. Better result for me...
The longest part is taking away the background accurately and with that done, steps 3-5 takes about 30seconds.
Also i've found it's always a good idea to take that cutaway image and paste it into a new document after you fill the new doc. with a solid colour background(eg. blue - to get an idea of what it may look like on the ingame screen) to make sure you got rid of everything/pixels you wanted. Then: Edit/step back once your sure everythings gone...


 2023 Racing Series Officially in Sim RacingThere are so many sim racing games out there aiming to recreate official real-world racing...
 Most Played Racing Games On Steam In April 2024Spring has arrived in most of the Northern Hemisphere, and it shows in the player numbers of...
 2024 Formula One Miami Grand PrixFrom new liveries to groundbreaking team personal changes, here's everything that's gone down in...
 2003 NASCAR Cup Cars Scanned For iRacingDale Earnhardt Jr. Has been at it again, teasing future iRacing content that will bring those...