F1 2020 Modding Questions Thread

hey man, you also need to replace the texture on all the myteam[engine] erp as they are using the same mipmaps. The reason why its blurred is the game is using the texture inside the erps that is not change and they are the low quality one.
5.png

Ahh! Okay thank you. Man, learning a ton here and I'm hooked on this lol. Appreciate the answers from everyone!
 
To all livery editors:

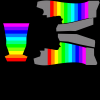
I did a specular map test in-game, using steps of 50%. Started with 255,0,0 RGB, then 255,128,0; 255,255,0; 128,255,0; etc. Diffuse map is just a medium gray (128,128,128).

This is what the specular map looked like for the DDS file, and here are the screenshots to how they appeared in-game.
Green (0,255,0) is full matte,
the dark-gray is the cyan band (0,255,255 RGB).
Chrome is blue (0,0,255),
Metallic finish seems to be almost the lighter blue (0,128,255) (may need some green channel in the color).
Purple (128,0,255) is very close to Chrome with just a bit more color showing through, while magenta (255,0,255) is less of a mirror finish but still has sharp reflections.

(While typing this post I opened the Arrows livery specular map in photoshop, and it uses magenta with some green for its metallic finish - 255,53,239)

Also, the shroud/fin area above the engine shroud with the bands is medium gray (128,128,128). The rear wing, nose, and halo/cockpit area is black. I'm still not fully sure of what those do. Black seems to be duller than gray, which is like a dull glossy finish.
livery_s.png spec-test1.png spec-test2.jpg

Edit: These are the values that Codemasters uses for these different effects in their Specular maps. Saved with these settings:
Spec Colors.png
specular_settings 2.png
 
Last edited:
Is it possble to edit the colour of tyre sidewalls?
I found sidewall_xxx.material file in the common.erp file, is that the file to edit&how can I edit it?
(forgive me if my question is a bit stupid, I have little experience in modding)
 
Hello, i have a question. How do you mod your "My Team Carrer Mode" logo,livery and put custom sponsors like brembo,etc. A detailed tutorial please :)
 
why do import many custom made numbers (all from 1 to 99) causing Ego ERP not able to find the mipmaps? is it recommended to put just one or few custom made number?
 
For complete crowd removal...

1) I changed the folder called "crowd_package" located here "C:\Program Files\F1 2020\2020_asset_groups\" to "crowd_package_OFF" and this removed the crowds from all tracks
2) The crowd waving flag animations in the grandstands still remain on some tracks. Does anyone know which files to delete or rename to completely remove the waving flag animations from the grandstands?

This is cool, shame the crowd reappears in the cut scenes pre & post race though :roflmao:
 
I've used the PSD files from the Porsche 99X Hybrid skin to create my own custom suit to match my skin but I'm struggling with a few things:

1) My suite and gloves (which replaced the 70Edition), still have some 70 edition stuff in them (I replaced the _d files) in the following files: \character_package\team_livery\fom01\fom01.erp, fom01_gloves.erp and fom01_helmet.erp. Any ideas why this is still showing up?
2) What files does the cap/hat go in?
3) How do I create the _n and _s files? Do I need them? I read you need the NVidia plugin, but from what file do I create those files?

My car livery works great, but my suits...not so much.
1. don't just import the glove diffuse (_d), import also a blank texture for logo_diffuse (_glove_logo_d & n) to hide the logo part as the act of alpha masking

2. it's in racenet01_cap_d/n/s in racenet01.erp & racenet01_gloves.erp

3. _n is normal map. you need it to make your texture have some "emboss/contour" feel on it (think about printing on your shirt, touch it), but sometimes not quite necessary. to do this you need nVidia DDS Plugin which can be downloaded here https://developer.nvidia.com/gameworksdownload#?dn=texture-tools-for-adobe-photoshop-8-55. after you install the plugin go to Filter->Nvidia Tools-> NormalMapFilter, or while you saving the normal texture click on Normal Map Settings, Check the convert to Tangent Space & setup necessary values (X, Y, Alpha Field etc). after you create a tangent normal map open the map and adjust the blue channel to black to make a green map.

_s is Specular. this act as reflection of your texture. unlike normal, you need to do it manually by adjusting & playing your RGB channel of your texture. most of _s texture can give you clue how the reflections of your texture will be. like orange for gloss etc.
 
Last edited:
Hey, is there a way to paste an image on a 3d model (not the texture itself) in photoshop or do i have to manually distort it on the texture to look good on the model (helmet)?
 
Hey, is there a way to paste an image on a 3d model (not the texture itself) in photoshop or do i have to manually distort it on the texture to look good on the model (helmet)?
With the template from jburon72, you have to remove the diffuse map that is in the photoshop file.
  • Remove the texture from the model, and create a new diffuse texture (sized 4096x4096).

  • Go back to 'Layers' and then paste in your Smart Object or other image you want to put on the car. It'll add it as a separate layer in the overall file.
    3D Painting_01.png

  • Position your 3D view to locate the image on the car where you want (since it locks its position on the screen even when rotating the view).
    3D Painting_02.png

  • Merge your 2D layer with the 3D layer. You have to create the new diffuse in the first step because the template as-is doesn't allow editing in 3D view.
    3D Painting_03.png

  • Edit your diffuse map to check that it was applied correctly.
    3D Painting_04.png
This method works with the template - if you create an image this way and re-open the jburon72 template, you can paste this in from the texture created (last screenshot) and it is applied to the wireframe correctly (this isn't necessary to create your texture, just noting that it should translate to the game correctly).
 
Last edited:
With the template from jburon72, you have to remove the diffuse map that is in the photoshop file.
  • Remove the texture from the model, and create a new diffuse texture (sized 4096x4096).

  • Go back to 'Layers' and then paste in your Smart Object or other image you want to put on the car. It'll add it as a separate layer in the overall file.
    View attachment 393572

  • Position your 3D view to locate the image on the car where you want (since it locks its position on the screen even when rotating the view).
    View attachment 393573

  • Merge your 2D layer with the 3D layer. You have to create the new diffuse in the first step because the template as-is doesn't allow editing in 3D view.
    View attachment 393574

  • Edit your diffuse map to check that it was applied correctly.
    View attachment 393575
This method works with the template - if you create an image this way and re-open the jburon72 template, you can paste this in from the texture created (last screenshot) and it is applied to the wireframe correctly (this isn't necessary to create your texture, just noting that it should translate to the game correctly).

The other way I saw this being done is using the 'merge down' function from the layer management popup. However, this seems to degrade the image quite a bit so what I was doing was doing merge down, checking the texture to see where exactly it put something, and then doing the same thing myself on the actual texture after undoing the merge down. However, I still have spots where even that resulted in a less than sharp texture...that's something I need to figure out for v2.0 of my first skin. I'm still finishing v1.0.
 
1. don't just import the glove diffuse (_d), import also a blank texture for logo_diffuse (_glove_logo_d & n) to hide the logo part as the act of alpha masking

2. it's in racenet01_cap_d/n/s in racenet01.erp & racenet01_gloves.erp

3. _n is normal map. you need it to make your texture have some "emboss/contour" feel on it (think about printing on your shirt, touch it), but sometimes not quite necessary. to do this you need nVidia DDS Plugin which can be downloaded here https://developer.nvidia.com/gameworksdownload#?dn=texture-tools-for-adobe-photoshop-8-55. after you install the plugin go to Filter->Nvidia Tools-> NormalMapFilter, or while you saving the normal texture click on Normal Map Settings, Check the convert to Tangent Space & setup necessary values (X, Y, Alpha Field etc). after you create a tangent normal map open the map and adjust the blue channel to black to make a green map.

_s is Specular. this act as reflection of your texture. unlike normal, you need to do it manually by adjusting & playing your RGB channel of your texture. most of _s texture can give you clue how the reflections of your texture will be. like orange for gloss etc.

1. Gotcha. Blank/transparent texture.
2. Okay, looks like FOM01 doesn't have that so I need to transition my race suit over to racenet which does have it, and use FOM for my car livery (or just switch everything to racenet). Fair enough.
3. I don't know if I understood all of that but I'll give it the ol' college try. I may be back but thank you. This forum and its members are a great resource and my first forray into modding is a blast even if it can be frustrating at times. The hope is that it results in a much more immersive game as a result.

Thanks!
i'm understand that you probably won't get it at all because breaking it down to written theory without applying it probably burns your head and frustrates you if you have no clue or just started at all (i wish i can tell it as simple & much understandable as i can) but i know you'll eventually get there to create your nice artwork :thumbsup: keep up the good work.
 
Last edited:
I need a little help. I am trying to create my first car skin (for myteam) and I am using the 70s anniversary car for it. Once I import the skin into the game the colours come out very washed out:

20200729223306_1.jpg


I am saving the DDS like this (Here you can also see the true colours):

1596055071271.png


I am probably messing up somewhere, but no clue why. Can someone point me in the right direction?
 
I need a little help. I am trying to create my first car skin (for myteam) and I am using the 70s anniversary car for it. Once I import the skin into the game the colours come out very washed out:

View attachment 393626

I am saving the DDS like this (Here you can also see the true colours):

View attachment 393627

I am probably messing up somewhere, but no clue why. Can someone point me in the right direction?
use DDS from Intel Texture Works. it seems when using nVidia DDS, the game turns the color pale (except we're using nVidia DDS for saving normal or specular map)
 
Last edited:

Latest News

What's needed for simracing in 2024?

  • More games, period

  • Better graphics/visuals

  • Advanced physics and handling

  • More cars and tracks

  • AI improvements

  • AI engineering

  • Cross-platform play

  • New game Modes

  • Other, post your idea


Results are only viewable after voting.
Back
Top