BTB ditches help

make decent detailed polys right beside your road side.

Use Add terrain, panels 4
distance 1= .50
distance 2= 1
distance 3= 2
distance 4= 3
dont use randomness for this

Of course you can use different settings then the ones i told you above.. the main thing is to get nice small enough polys to work with nice and tight to the road side

after youve done that.. simply select the raise/lower terrain tool and set it to say 50 in strength, then say 2 for brush size.. then all you do u paint (hold shift to lower) all the way down your road side and ull have a nice ditch... if you get some sharp edges, or the ditch is too deep, then use the "flatten terrain" tool as a soften tool... but use a very low strength and brush size.


after that you can simply pull out more terrain for your "main terrain".. then apply a different texture or blend a different texture into the ditch itself.. or add a water plain.. whatever

here is a quick example

http://www.fractalscapes.net/designs/btb/001a.jpg
(a quick job, with quick texturing, you can spend more time making it look better)
http://www.fractalscapes.net/designs/btb/001b.jpg
(raised the terrain a little bit on the outside for added effect on this angle)
http://www.fractalscapes.net/designs/btb/001c.jpg
(as you can see, here is the mesh,.. so there isnt "that" many polys

hope that helped

EDIT, you could also use the eMel method.. tho ive not yet tried this.
 
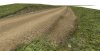
With eMeL it's easy, and I think you can have greater control on the roadside's shape. You can do everything just with road profiles. It's just the matter of adding some more points to the road's shape and move them away from the road. Then switch within the panel to Materials and move furthest points to the moddle (drag) - add some grass material or something else you want to have close to the road. I used three (actually four) textures/materials - road in the middle, two different roadsides and grass (I just repeated the procedure from above and added one more - grass). Please observe it on picture #2.

One advice - don't add too many shape sections at the beginning, because if you change your mind about the number of points (add more) - the more cross-sections you add, the more single points you will have to correct. Also, add Material Change sections at the end - textures like to move if you touch points in Shape and you have also checked the Material Change in the same cross-section.

I found the terrain shape tool as not very accurate, especially for more dense (with vertices) places. And moving every terrain's vertex manually is a nightmare for me ;)

You can of course experiment with horizontal and vertical randomness in road shape panel - this maybe can help in case you want to get more complex shape of roadside. Just use bigger values than in road.

Last thing - remember that adding new Material Change sections to the road will split it into new objects when you export. This works the same with Walls. Good thing about it is that for long tracks you will have less polygons to render at once*, the bad can be when you produce too many objects - it can harm the performance.

Shape crossections don't split roads nor Walls.
------------
* this is about LOD for roads, there was quite enough about it on the Forum (too much off-topic here - ask me if you want me to explain it again some day :) )
 

Attachments

  • eMeL_ditch3.jpg
    eMeL_ditch3.jpg
    125.2 KB · Views: 282
  • eMeL_ditch1.jpg
    eMeL_ditch1.jpg
    85.3 KB · Views: 266
  • eMeL_ditch2.jpg
    eMeL_ditch2.jpg
    83.8 KB · Views: 279
Hi! Thanks for helping me!!!
Pangaea I am trying your method! I can make a ditch but i didnt understand how to add the main terrain! Please help!
Martinez how to add more control points to the surface so i can make roadside and ditch???
 
here is a quick one.. the screenshots i did for you originally are better.
depends on what sort of ditch your talking about really.. but for this example its a typical irish roadside ditch, .. on the video I could have added a bit more terrain right beside the road itself.. but you can mess about with the terrain add settings to get what u want. (experiment on a small section like ive done to fine tune your settings before starting on the track for real)

perhaps

distance 1= 1
distance 2= 1.5
distance 3= 2.5
distance 4= 4

would suit better

you could also go all out and make super detailed ditches by simply pulling out (like i did in the video) more terrain with smaller polys, then reducing the polys at a greater distance from the road.

of course the "add to whole track" option im using is only really ideal for tracks that are fairly stright, otherwise ide recomend "click and drag".. and build up your terrain section by section that way.

if your track has very long stretched of ditches, then i would seriously recommend you have a look at the eMel method. Using this method you can do it quicker by simply copy / pasting cross sections, then variate them, or randomise....etc

i could think of other ways of doing this also, but you can experiment yourself to find what is best for you.

no sound, but easy to follow, choose 720p or higher for best quality


This link to go to youtube`s site itself so you have the fullscreen button option.
 
I think this can be helpful:

Adding points starts around 0:35 - CTRL+click the blue line in the shape cross-section panel.
If you want to add more terrain for this, use standart btb tools.

For Pangea's method/any time you want to build bigger terrains - refer to the picture :) It's better for me to draw new polygons in 2D View, where I see exactly what I'm doing.

When you make big polygons - split the area to make new group and set it's properties as non-driveable. You can select all polygons you need in Terrain/Materials window.
 

Latest News

Are you buying car setups?

  • Yes

  • No


Results are only viewable after voting.
Back
Top