Using content manager you can adjust the ksAmbient value of every detail of a car. Some may know this already but few have likely invested time to entirely transform cars
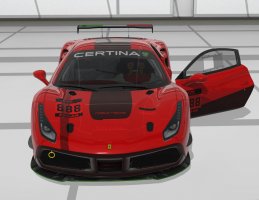
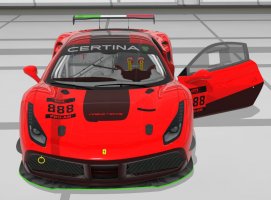
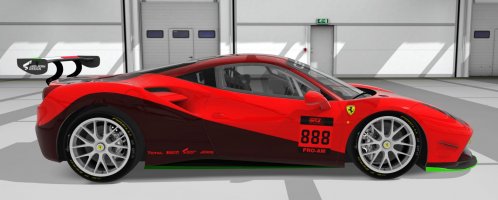
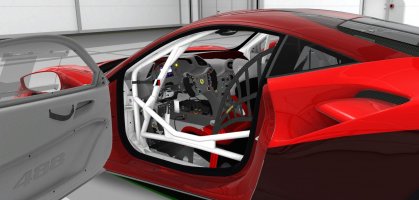
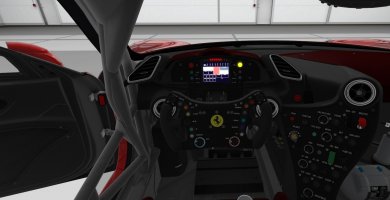
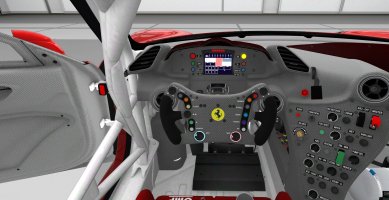
I picked a random example to share. This is the 488 GT4 by Sylvana (v1.2) ferrari_488_gt4
The actual paints and shadows can be additionally adjusted. What I am doing is adjusting the base model part values.
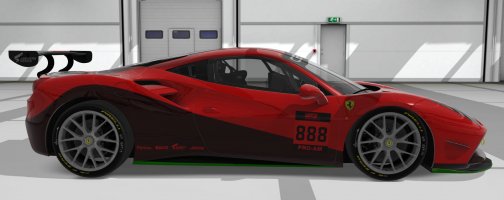
- On the car paint I am bringing the value up to 1.0. That is a good place to set and you can always drop this down if the car appears too bright in game.
- The emblems are brought up to 0.8. This value really matches with the paint ambient value
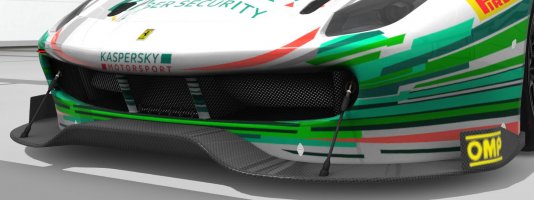
- The front and rear mesh depends on the specific car. Somewhere between 1.0 and 1.5 tends to be good. On something like the Ferrari F50 this value makes a big difference.
- With exposed exterior carbon I prefer a fully exposed beige color and on most cars bring this up to around 4.0
- The wheels also depend on the car. With darker rims you should set the value to zero. With lighter colored rims you might bring it up to around 0.8. If I bring the rim up to 0.8 then the rotor would be around 0.6. The rotor should not be brighter than the rim. I go higher on the calibers because they should outshine everything. Usually around 2.0 but on this car it is 7.0. You can even adjust the Ferrari text on the caliper. Making those changes and the wheels are entirely transformed and look more realistic than all this dark whatever
- On the rear you can adjust exhaust tips to make them appear more chrome in look. Depends on the model but 0.7 is a good value.
- Number plate to around 0.6
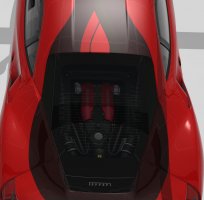
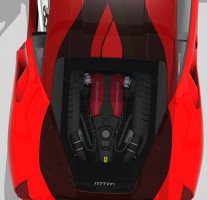
- You can brighten the engine bay and various components to your liking
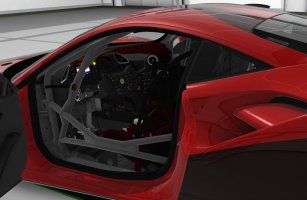
- If the car door has exposed carbon then I go heavy on that value. This car is 3.0 and looks amazing.
- With roll cages I wanted a clean/exposed look to match. So I bring the value to 2.0, that is a personal preference and makes the roll cage stand out more and being after market
- You can adjust the netting/belts to 0.7 to make those more realistic
- The interior has tons of various items that you can adjust, including the emblem on the steering wheel. I tend to bring most of these to around 0.8
- In fully exposed carbon setups I tend to expose the seat as well. On this car I did the top section of the OMP seat as a 6, this gives it a grey pattern and the bottom section of the seat is 1.0 to give it a darker maroon look. It is a fantastic combination and really compliments what is going on with the car
detailUVMultiplier should be used on all carbon changes. This value has a direct impact on how fine the carbon weave is. Different models will use different values, such as 600 or 10. Play with this value to adjust your carbon weave. This can apply to any carbon on any car, including on seats or steering wheels.
fresnelMaxLevel should be set to 1 in most cases or any number lower than this value to meet your needs. Once you adjust that max level then change fresnelC to a value below the max. For exterior paint I will use Max=1 and C=0.2-0.3 depending on the model
isAddative should be set to either 1 or 2. This value depends on how the model was created. For some cars/parts there is no value, for others there is 1 value and for few cars there are 2 values. Meaning that value 0, value 1, or value 2 all show different "detail". These are whole numbers. So the value here is either 0,1,2
useDetail should almost always be set to 1. In some cases there is more detail to be seen and you can set the value to 2. These are whole numbers. So the value here is either 0,1,2
sunSpecular is good for exterior parts and indicates how much glare will happen
ksSpecular is also good for exterior panels to shine in sun
dirt is a good value to change as it will allow the object (exterior paint) to get dirtier on track. If this value is not present then the current model does not support it or was not coded for it
dirt value tells the piece of the model if external elements (dirt, dust, grass) can stick to the model. This depends on the model itself. Recommend setting this value to any exterior piece to either 1 or 2
To access this function simply open any car in Content Manager and left mouse click on any part of the car. On the right you will see the menu change. Look at the Material: line to understand what you are selecting. Then click the ... (on the right) then Change Values on the next screen. You can drag this screen around to move it to the side. If you are unsure which object(s) are being impacted then set the ksAmbient value super high to 50 - once you know which parts are changing, adjust the value accordingly. Use the F1 button to toggle and sit inside the car to work on the interior.
Hit escape a few times to exit showroom. Your changes are automatically saved/updated to your model. Your Content Manager previews are not updated accordingly until you manually update the previews.
Using these value changes I have been able to transform certain models from good to masterpiece all thanks to Content Manager. Adjusting the value of every object on a model is tiring but well worth your time.
Please share your artwork in this thread to encourage other users
I picked a random example to share. This is the 488 GT4 by Sylvana (v1.2) ferrari_488_gt4
The actual paints and shadows can be additionally adjusted. What I am doing is adjusting the base model part values.
- On the car paint I am bringing the value up to 1.0. That is a good place to set and you can always drop this down if the car appears too bright in game.
- The emblems are brought up to 0.8. This value really matches with the paint ambient value
- The front and rear mesh depends on the specific car. Somewhere between 1.0 and 1.5 tends to be good. On something like the Ferrari F50 this value makes a big difference.
- With exposed exterior carbon I prefer a fully exposed beige color and on most cars bring this up to around 4.0
- The wheels also depend on the car. With darker rims you should set the value to zero. With lighter colored rims you might bring it up to around 0.8. If I bring the rim up to 0.8 then the rotor would be around 0.6. The rotor should not be brighter than the rim. I go higher on the calibers because they should outshine everything. Usually around 2.0 but on this car it is 7.0. You can even adjust the Ferrari text on the caliper. Making those changes and the wheels are entirely transformed and look more realistic than all this dark whatever
- On the rear you can adjust exhaust tips to make them appear more chrome in look. Depends on the model but 0.7 is a good value.
- Number plate to around 0.6
- You can brighten the engine bay and various components to your liking
- If the car door has exposed carbon then I go heavy on that value. This car is 3.0 and looks amazing.
- With roll cages I wanted a clean/exposed look to match. So I bring the value to 2.0, that is a personal preference and makes the roll cage stand out more and being after market
- You can adjust the netting/belts to 0.7 to make those more realistic
- The interior has tons of various items that you can adjust, including the emblem on the steering wheel. I tend to bring most of these to around 0.8
- In fully exposed carbon setups I tend to expose the seat as well. On this car I did the top section of the OMP seat as a 6, this gives it a grey pattern and the bottom section of the seat is 1.0 to give it a darker maroon look. It is a fantastic combination and really compliments what is going on with the car
detailUVMultiplier should be used on all carbon changes. This value has a direct impact on how fine the carbon weave is. Different models will use different values, such as 600 or 10. Play with this value to adjust your carbon weave. This can apply to any carbon on any car, including on seats or steering wheels.
fresnelMaxLevel should be set to 1 in most cases or any number lower than this value to meet your needs. Once you adjust that max level then change fresnelC to a value below the max. For exterior paint I will use Max=1 and C=0.2-0.3 depending on the model
isAddative should be set to either 1 or 2. This value depends on how the model was created. For some cars/parts there is no value, for others there is 1 value and for few cars there are 2 values. Meaning that value 0, value 1, or value 2 all show different "detail". These are whole numbers. So the value here is either 0,1,2
useDetail should almost always be set to 1. In some cases there is more detail to be seen and you can set the value to 2. These are whole numbers. So the value here is either 0,1,2
sunSpecular is good for exterior parts and indicates how much glare will happen
ksSpecular is also good for exterior panels to shine in sun
dirt is a good value to change as it will allow the object (exterior paint) to get dirtier on track. If this value is not present then the current model does not support it or was not coded for it
dirt value tells the piece of the model if external elements (dirt, dust, grass) can stick to the model. This depends on the model itself. Recommend setting this value to any exterior piece to either 1 or 2
To access this function simply open any car in Content Manager and left mouse click on any part of the car. On the right you will see the menu change. Look at the Material: line to understand what you are selecting. Then click the ... (on the right) then Change Values on the next screen. You can drag this screen around to move it to the side. If you are unsure which object(s) are being impacted then set the ksAmbient value super high to 50 - once you know which parts are changing, adjust the value accordingly. Use the F1 button to toggle and sit inside the car to work on the interior.
Hit escape a few times to exit showroom. Your changes are automatically saved/updated to your model. Your Content Manager previews are not updated accordingly until you manually update the previews.
Using these value changes I have been able to transform certain models from good to masterpiece all thanks to Content Manager. Adjusting the value of every object on a model is tiring but well worth your time.
Please share your artwork in this thread to encourage other users
Attachments
-
 Front_Before.JPG95.8 KB · Views: 159
 -
 Front_After.JPG107.1 KB · Views: 147
 -
 Side_Before.JPG132 KB · Views: 144
 -
 Side_After.JPG174.4 KB · Views: 122
 -
 Above_Before.JPG76.9 KB · Views: 126
 -
 After_Above.JPG93.1 KB · Views: 131
 -
 Interior_Before.JPG152.3 KB · Views: 132
 -
 Interior_After.JPG262.3 KB · Views: 138
 -
 Interior2_Before.JPG208 KB · Views: 136
 -
 Interior2_After.JPG305.8 KB · Views: 147
Last edited: