RainFX is coming, it's a must have and what about making the old car mods work in the wet

Edit 9-Apr-2021: a PDF with the instructions.

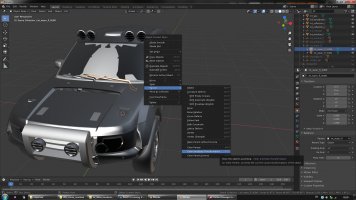
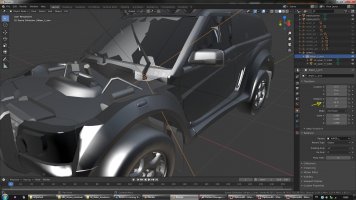
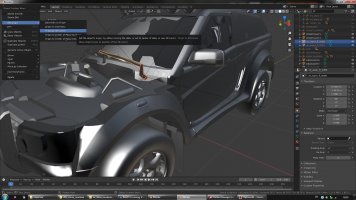
It's not a huge task and if you have a lot of nice cars that don't have working wipers I may provide here a beginner-friendly tutorial for Blender editing. So if more than 2 people say that they want to learn how to get from this
Screenshot_alpine_a110_ks_red_bull_ring_18-2-121-16-17-37.jpg


to this

Screenshot_alpine_a110_ks_red_bull_ring_18-2-121-18-51-18.jpg
Screenshot_alpine_a110_ks_red_bull_ring_18-2-121-18-52-21.jpg
Screenshot_alpine_a110_ks_red_bull_ring_18-2-121-18-54-34.jpg
Screenshot_alpine_a110_ks_red_bull_ring_18-2-121-18-54-44.jpg


write a reply in this thread and I will follow.

Cheers!
 
Last edited:
How do you get the rain fx to show water on the track? In some videos I've seen online, there are puddles and the track looks wet. But when I try it, I see the rain fx on the car's surface and windows, and I do see rain falling down. However the track seems to look dry.
 
Wow just tested on Brands Hatch with rain and the reflections look absolutely stunning! I've never seen such a gorgeous looking sim ever in my life! Content Manager+CSP+SOL really puts AC at the very top! It is now the most amazing and diversive sim ever. It even makes ACC look outdated.

My next question is how do we get complete rain effects for all other tracks? Is this something that the new versions of CSP or SOL will include? Or do we have to manually edit each track files ourselves?

General advice is not to publicly create configs yet as RainFX is still in development and changes may cause issues but there are configs out there for many tracks (I believe there are even some hosted on this site). You can of course create ones yourself if you know what you are doing.
 
do we have to manually edit each track files ourselves?

For the inquisitive and resourceful there are this instructions from the developer x4fab. Simply put - there's nothing complicated in making the paragraph for any track if you want to get the road wet. Focus your attention on

[RAIN_FX]
PUDDLES_MATERIALS = some_material ; wildcard "?" possible as usual

And the names of materials you can get from inside the game using "Object Inspector". Left-click on the name of the material to copy it and paste into an "ext_config.ini" either in the track's "extension" subfolder or into the corresponding .ini from "..\extension\config\tracks\loaded\". If the second option is used - there's a big chance your changes will soon get lost after an automatic update.

Basic config starts with only the road and road edge for puddles materials. Everything else is not mandatory.
 
Last edited:
hope to get it right
Whenever you feel stuck ask for more info here and hopefully we'll get the process streamlined for all who want to make their mod car's wipers work.
One useful update I can add already is the way in Blender to clear parent of the old wipers geometry (if there is one) and attach the same geometry to the new wiper parent without the need for additional rotations.
Operating in the "View Layer" window (top right) is necessary and using of "." key on the Numpad can get you quickly on the row of the object you need. For that the mouse pointer must be inside the "View Layer" window when pressing "." key once. For the "set new parent" part you need to select the geometry objects and lastly the wiper empty object by holding "Ctrl" and left click in the "View Layer" window. The last selected object becomes the parent after the command. You will see no movement of the geometry from its original place at that point and that's the good thing. After that you are free to work on the keyframe animation part of the job.
 

Attachments

  • clear old parent.jpg
    clear old parent.jpg
    353 KB · Views: 79
  • set origin.jpg
    set origin.jpg
    370.3 KB · Views: 77
  • set new parent.jpg
    set new parent.jpg
    376.1 KB · Views: 87
  • result with rotation.jpg
    result with rotation.jpg
    354.7 KB · Views: 86
start with the Alfa Romeo Montreal
That particular mod car has duplicated object for the body_rubber_trim so after you have the blades separated left and right you find that while moving them with rotation on the wiper there are still the duplicates resting on the old places. The smaller of the two duplicates for the rubber trim is obsolete and can be safely deleted as an object right at the start. That's the one without the doors trim. Or if you feel unsure about it - there is the option to delete only the faces of the blade duplicates in edit mode of the duplicated object.

Other than that, the colliders.ini should rather have
[COLLIDER_0] CENTRE=0 ,-0.219 ,0.15 SIZE=1.22,0.01 ,3.6 GROUND_ENABLE=1

and car.ini
[CONTROLS] FFMULT=3.8 STEER_ASSIST=0.0

After the export from Blender the lights objects have their names truncated so for lights.ini
[LIGHT_0] NAME=LIGHT1 COLOR=20,20,15 FLASH=1 [LIGHT_1] NAME=alf_montreal_70_lod0_headlightL_glass___5278_vertices_4_902cbe3 COLOR=30,30,15 FLASH=1 [LIGHT_2] NAME=alf_montreal_70_lod0_headlightR_glass___5101_vertices_4_6ce536f COLOR=30,30,15 FLASH=1 [LIGHT_3] NAME=alf_montreal_70_lod0_bumperFa_lights_glass___320_vertic_e355205 COLOR=20,20,12 OFF_COLOR=2,2,1
 
Last edited:
That particular mod car has duplicated object for the body_rubber_trim so after you have the blades separated left and right you find that while moving them with rotation on the wiper there are still the duplicates resting on the old places. The smaller of the two duplicates for the rubber trim is obsolete and can be safely deleted as an object right at the start. That's the one without the doors trim. Or if you feel unsure about it - there is the option to delete only the faces of the blade duplicates in edit mode of the duplicated object.

Other than that, the colliders.ini should rather have
[COLLIDER_0] CENTRE=0 ,-0.219 ,0.15 SIZE=1.22,0.01 ,3.6 GROUND_ENABLE=1

and car.ini
[CONTROLS] FFMULT=3.8 STEER_ASSIST=0.0

After the export from Blender the lights objects have their names truncated so for lights.ini
[LIGHT_0] NAME=LIGHT1 COLOR=20,20,15 FLASH=1 [LIGHT_1] NAME=alf_montreal_70_lod0_headlightL_glass___5278_vertices_4_902cbe3 COLOR=30,30,15 FLASH=1 [LIGHT_2] NAME=alf_montreal_70_lod0_headlightR_glass___5101_vertices_4_6ce536f COLOR=30,30,15 FLASH=1 [LIGHT_3] NAME=alf_montreal_70_lod0_bumperFa_lights_glass___320_vertic_e355205 COLOR=20,20,12 OFF_COLOR=2,2,1
I think this model is not the best for my first try. Yesterday I began the process but didn't have enough time, so for now I just created the flipped windows. It's not much work done but is my first time using blender :) Anyway in the weekend I continue the process and if have trouble I'll post here. Thanks again for your help
 
I think this model is not the best for my first try.
The model of AR Montreal is not a big challenge per se. Learning Blender is. So take your time and don't be discouraged if not all seems intuitive at first. With practice you will see it fit more and more. Also watching some YT videos on Blender basics will speed up your learning. Using the speed control to slow those video lessons down or pausing and rewinding the bits of explanations is key to start using Blender with minimal effort.
 
The model of AR Montreal is not a big challenge per se. Learning Blender is. So take your time and don't be discouraged if not all seems intuitive at first. With practice you will see it fit more and more. Also watching some YT videos on Blender basics will speed up your learning. Using the speed control to slow those video lessons down or pausing and rewinding the bits of explanations is key to start using Blender with minimal effort.
well, I'm a bit embarassed but I have to admit that it's very difficult to apply your guide to my car model. Please post a link to donwload the escalade model so I can follow step by step your tutorial. If I get it right than I can try to modify another one. In the meantime I'll search for basic tutorial to better understand how to work with blender. Thanks and please be patient
 
post a link to donwload the escalade model

If you don't feel sure about posting in an open thread send me PM with specific questions and I will try to help you get started. I made the wipers on the Montreal work for me so you may ask questions on that if you prefer. I think learning Blender (or anything) comes faster and better when there's an incentive and useful results in the process. Not basic modeling with the default cube+light+camera. And don't waste time on memorizing the key shortcuts. They will stick in your head only if you use them a lot. Everything you need you will find in the menus.
 
Last edited:

Latest News

What's needed for simracing in 2024?

  • More games, period

  • Better graphics/visuals

  • Advanced physics and handling

  • More cars and tracks

  • AI improvements

  • AI engineering

  • Cross-platform play

  • New game Modes

  • Other, post your idea


Results are only viewable after voting.
Back
Top