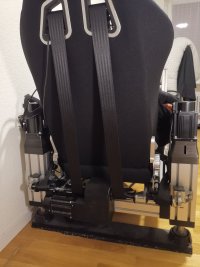
Hoernle's Belt Tensioner - Detailed Build Instructions

Can you post the link to do this, I am wanting to wire one into a center console. Also please post your settings?
Hi @TheFuture2020 : I can't help with the settings as I gave up and using Simfeedback with Arduino but here is the link to the wiring/microswitch on page 8. It's in the pdf of Thanos. Maybe I come back one day and try it with Thanos. There was also a discussion on the Thanos Discord. A guy was able to sort it out there. Check the belt section on the Thanos Discord and search for it.
But if it's working either in Thanos or Simfeedback it is totally worth the effort. I can't race now without the belt :)
 
Last edited:
I followed the wiring instructions on Thanos’ thread here on racedepartment. He also has some videos explaining it within that thread. Followed his instructions and had no issues.
 
IMG_9009.jpeg


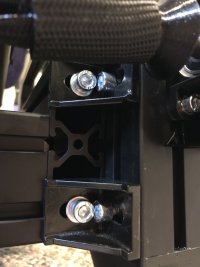
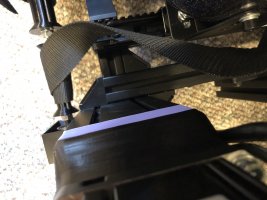
I love this belt tensioner so much. Thanks H! I have a 2 year old running around and I decided I didn’t like the bearings or especially the belt/pulley exposed so I 3D printed some covers. Looks nice and tidy now, but most importantly, safe from sticky little fingers in the area.
 

Attachments

  • IMG_9008.jpeg
    IMG_9008.jpeg
    737.9 KB · Views: 71
And another question, how did you fix that corner bracket to your back profile? It's clever to move the actuators a bit back by 4cm so that you don't need to use those little profiles for the bearings of the belt roller rod.

Screenshot_20230825_223942.jpg
 
And another question, how did you fix that corner bracket to your back profile? It's clever to move the actuators a bit back by 4cm so that you don't need to use those little profiles for the bearings of the belt roller rod.
Yeah I did that exactly so I didn't need those extra profile pieces, you're spot on. I also found that I didn't need the motor bracket spacer for your list, but I feel like this was a "your mileage may vary" situation.

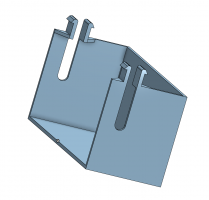
The covers I made are really basic. In lieu of having a pretty, form fitting cover, I just went with big ugly and blocky (which saved me enormous amounts of time). Those end pieces use a basic profile slot clip design. See attached pic, very basic.

I'm happy to share the STL of the endcaps (see attached). Note: The clip measurements are specific to the 100x100 profile I received from Amy Chen during the SFX100 build. I won't share the pulley cover because it is very unique to exactly how I set this up for my rig. I think people will have problems if their dimensions are slightly different than mine. It might be a waste of filament to print that big cover, just to find out it doesn't fit.

Thank you again. I still can't believe how much this adds to the experience. I love this belt build.
 

Attachments

  • Screenshot 2023-08-25 at 11.36.15 PM.png
    Screenshot 2023-08-25 at 11.36.15 PM.png
    234.1 KB · Views: 34
  • Harness Endcaps (1).stl
    29 KB · Views: 34
Last edited:
Sorry it's still not clear to me how you fixed the aluminum corner bracket (pink arrow in my picture above) to the 8040 profile. It looks like you fixed it to the 8040 that goes to the front of the rig but this means your corner bracket must be fixed to the cross-section of this profile and I thought that is not possible.
 
Sorry it's still not clear to me how you fixed the aluminum corner bracket (pink arrow in my picture above) to the 8040 profile. It looks like you fixed it to the 8040 that goes to the front of the rig but this means your corner bracket must be fixed to the cross-section of this profile and I thought that is not possible.

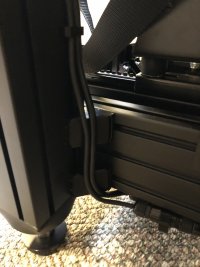
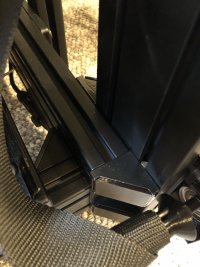
Apologies, I misread your question the first time. It’s similar to what Insert Coin shared above.

My 120x40 extrusion sides are threaded in the top and bottom holds of each end. Attaching pics.
 

Attachments

  • IMG_9096.jpeg
    IMG_9096.jpeg
    207 KB · Views: 63
  • IMG_9094.jpeg
    IMG_9094.jpeg
    265.5 KB · Views: 67
  • IMG_9093.jpeg
    IMG_9093.jpeg
    282.7 KB · Views: 65
  • IMG_9092.jpeg
    IMG_9092.jpeg
    248.3 KB · Views: 65
Hi all - just starting to look at this project. I cannot get the “SimFeedback.xml”. swap to work with the one in the appendix of the instructions - I just get error messages. If I open the original one - then I see completely different text in there - seems to be to do with extentions and not configuring the second leonardo.

I must be doing something stupid here as the instructions are awesome......

1707096956520.png
 
Hi @Andy J, could you post your original file here?

Of note, I am currently working on version 1.4 for this guide. Belt rollers and large pulley will get an update. Let me know before you start to print everything.
 
Sure thing - this is the file location and the content. I cannot help but think I must have the wrong file, and thanks !

<?xml version="1.0"?>
<ConfigData xmlns:xsi="http://www.w3.org/2001/XMLSchema-instance" xmlns:xsd="http://www.w3.org/2001/XMLSchema" Version="00.10.01" SoundCardGuid="90334a78-a12a-4813-bb39-cfb25ad67f00" Mode="expert">
<ExtensionList>
<Extension name="Stream Deck Extension" autostart="false" activated="false">
<CustomConfig />
</Extension>
<Extension name="Button Box Extension" autostart="true" activated="true">
<CustomConfig type="ButtonBoxExtension.TestConfig">
<TestConfig>
<OverallIntesity>50</OverallIntesity>
<ToggleStartStopButton>8</ToggleStartStopButton>
<ToggleDecreaseIntensity1Button>20</ToggleDecreaseIntensity1Button>
<ToggleIncreaseIntensity1Button>19</ToggleIncreaseIntensity1Button>
<ToggleDecreaseIntensity5Button>-1</ToggleDecreaseIntensity5Button>
<ToggleIncreaseIntensity5Button>-1</ToggleIncreaseIntensity5Button>
<ToggleDecreaseIntensity10Button>-1</ToggleDecreaseIntensity10Button>
<ToggleIncreaseIntensity10Button>-1</ToggleIncreaseIntensity10Button>
<ToggleDecreaseIntensity20Button>-1</ToggleDecreaseIntensity20Button>
<ToggleIncreaseIntensity20Button>-1</ToggleIncreaseIntensity20Button>
<LastusedGuidByte1>224</LastusedGuidByte1>
<LastusedGuidByte2>96</LastusedGuidByte2>
<LastusedGuidByte3>156</LastusedGuidByte3>
<LastusedGuidByte4>244</LastusedGuidByte4>
<LastusedGuidByte5>175</LastusedGuidByte5>
<LastusedGuidByte6>21</LastusedGuidByte6>
<LastusedGuidByte7>233</LastusedGuidByte7>
<LastusedGuidByte8>17</LastusedGuidByte8>
<LastusedGuidByte9>128</LastusedGuidByte9>
<LastusedGuidByte10>1</LastusedGuidByte10>
<LastusedGuidByte11>68</LastusedGuidByte11>
<LastusedGuidByte12>69</LastusedGuidByte12>
<LastusedGuidByte13>83</LastusedGuidByte13>
<LastusedGuidByte14>84</LastusedGuidByte14>
<LastusedGuidByte15>0</LastusedGuidByte15>
<LastusedGuidByte16>0</LastusedGuidByte16>
<StartStopDelay>100</StartStopDelay>
</TestConfig>
</CustomConfig>
</Extension>
</ExtensionList>
<MotionControllerList>
<MotionControllerConfigData>
<MotorList>
<Motor>
<Id>0</Id>
<Min>-4096</Min>
<Max>4096</Max>
<DeadZone>0</DeadZone>
<CenterOffset>0</CenterOffset>
<PidKP>0</PidKP>
<PidKI>0</PidKI>
<PidKD>0</PidKD>
<EnablePID>true</EnablePID>
</Motor>
<Motor>
<Id>1</Id>
<Min>-4096</Min>
<Max>4096</Max>
<DeadZone>0</DeadZone>
<CenterOffset>0</CenterOffset>
<PidKP>0</PidKP>
<PidKI>0</PidKI>
<PidKD>0</PidKD>
<EnablePID>true</EnablePID>
</Motor>
<Motor>
<Id>2</Id>
<Min>-4096</Min>
<Max>4096</Max>
<DeadZone>0</DeadZone>
<CenterOffset>0</CenterOffset>
<PidKP>0</PidKP>
<PidKI>0</PidKI>
<PidKD>0</PidKD>
<EnablePID>true</EnablePID>
</Motor>
<Motor>
<Id>3</Id>
<Min>-4096</Min>
<Max>4096</Max>
<DeadZone>0</DeadZone>
<CenterOffset>0</CenterOffset>
<PidKP>0</PidKP>
<PidKI>0</PidKI>
<PidKD>0</PidKD>
<EnablePID>true</EnablePID>
</Motor>
</MotorList>
<comPort>12</comPort>
<baudRate>460800</baudRate>
<id>1</id>
<type>SFX</type>
</MotionControllerConfigData>
</MotionControllerList>
<ProfileList />
</ConfigData>

1707177937738.png
 
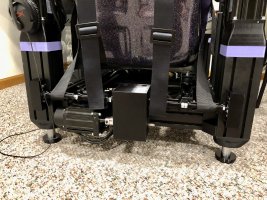
@MacRozie if your system works flawlessly I wouldn't say you have to upgrade. I just changed the hexagonal nut to a squared nut in the rollers and the large pulley. This prevents that one of the pieces slips under high torque. I also designed a drive cover similar to what you did. See attachment.
 

Attachments

  • IMG_20240202_075256.jpg
    IMG_20240202_075256.jpg
    344.1 KB · Views: 37
@Hoernle
Hmmm I am sure that something is not right. I noticed that I was running v00.10.01 and not what your instructions stated so I installed 00.09.08e - this initially would not run until I put it in the documents folder then it was fine.

I then tired to use the extension and I cannot get that to work either - the only two that I can get to show up are the buttonbox and the streamdeck that were part of version10. All others I have tried dont show up.

Is this something to do with the status of simfeedback now - I haven't donated would be more than happy to but need a sponsor - or are even new donations being accepted ? Using version 00.09.08 I do have expert mode - just like I did in version10.

Sorry to be taking up so much of your time - I just dont seem to be able to figure this out.

1707360298339.png


1707360269954.png
 
Simfeedback is donation-free since quite some time now. I wasn't aware that there is now a version 00.10.01. I have to check this out. Your issue is for sure fixable.
Regarding the mcsetupctrl plugin, close simfeedback and run the "remote_blocking.bat" with admin rights. Sometimes even running it several times is needed. I will also try to install it later today.
 

Latest News

What's needed for simracing in 2024?

  • More games, period

  • Better graphics/visuals

  • Advanced physics and handling

  • More cars and tracks

  • AI improvements

  • AI engineering

  • Cross-platform play

  • New game Modes

  • Other, post your idea


Results are only viewable after voting.
Back
Top