MUY BIEN
You are using an out of date browser. It may not display this or other websites correctly.
You should upgrade or use an alternative browser.
You should upgrade or use an alternative browser.
General Proper technique in track making plus tips
- Thread starter LilSki
- Start date
Hi!
I have a question regarding the Y-trees. Are they supposed to be composed of three V-shaped meshes, each rotated by 120 degrees so they have a front-face in all directions, having overlapping vertices at all ends, or are they simply a Y-mesh extruded downwards (with no overlapping vertices).
This is what I mean, A or B? (I have separated the planes on A for visualization)
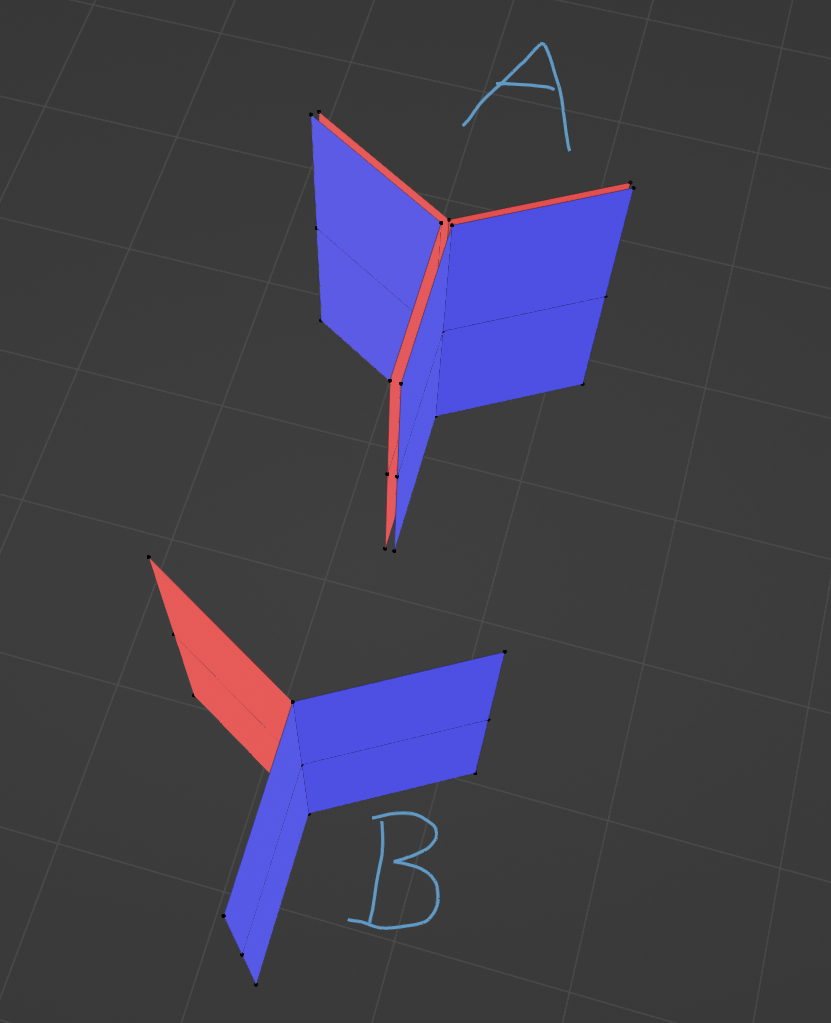
You want A just not separated and don't ever weld verticies. UV map each side the same so you don't get mirror trees.Hi!
I have a question regarding the Y-trees. Are they supposed to be composed of three V-shaped meshes, each rotated by 120 degrees so they have a front-face in all directions, having overlapping vertices at all ends, or are they simply a Y-mesh extruded downwards (with no overlapping vertices).
This is what I mean, A or B? (I have separated the planes on A for visualization)
View attachment 605159
Last edited:
Okay, thank you for a quick reply!You want A just not separated and don't ever weld verticies. UV map each side the same so you don't get mirror trees.
Thought I would add to this thread and post a basic overview of trees in AC. There is some confusion out there as to the right and wrong way to setup trees for AC. Below are some examples of different trees and what they look like in the editor/sim.
Here they are in blender. I did 4 basic types of trees and shown in red are the object names. Two of them use the KSTREE naming scheme and two do not. The TREE on the far left has all normals set to vertical. The rest the normals are untouched from default. Also notice the vertical subdivisions.
View attachment 172396
Here they are in the editor with sun overhead. You can see we now have 4 very different trees. the far left with vertical normals is fully lit with no shading at all. Next to that we see that using the KSTREE object name has altered the normals automatically. The issue here is the entire center of the tree is dark and only the edges are lit up. Next to that in group B you can see the desired result. The only difference between A and B is the extra vertical subdivision shown above. Then TREE2 is just a disaster.
View attachment 172398
Here they are at low light. As you can see TREE is still lit from top to bottom and completely unnatural. I believe this is what most RTB trees are doing. Group A doesn't look bad but again too dark in the center. Group B again is the desired result. TREE2 still a disaster. All 4 trees here are using the same shader settings.
View attachment 172399
One important thing about the tree objects is in order for the KSTREE auto normals to work properly the origin of the object MUST be at the bottom.
View attachment 172400
Now lets discuss the whole GROUP thing. It is worth mentioning that from within blender or 3DS you MUST keep the tree objects separate. DO NOT join them together. The KSTREE naming scheme does that for you with the groups.
So here is a shot of Bridgehampton trees in blender. Selected below is GROUP_A. Notice each tree is a separate object.
View attachment 172401
Just to show here is GROUP_B. This trend goes around the whole track with GROUP_C. GROUP_D, etc.
View attachment 172402
You do not have to use A, B, C, D, etc. You can use anything like KSTREE_GROUP_PINE_, KSTREE_GROUP_MAPLE, etc. I find the letters the easiest.
This is what it will look like after you load it in the editor. there will be a section called "BLOCKTRANSFORM" and you will find the group names in there. The KSTREE_GROUP part of the name will be stripped away.
View attachment 172403
I hope this clears up some confusion. Also know that just because you use the KSTREE_GROUP_x_ naming scheme DOES NOT mean you have to use the kstree shader. The entire point of the KSTREE naming is to auto set the normals for you and join to single objects according to group name. You can also use KSTREE naming on 3D trees and it will set the normals just like a Y tree. Just make sure the origin is always at the bottom and the normals will all be done for you on import to the editor.
Some final examples of trees in sim. Notice how the bottoms are all dark as they should be.
View attachment 172410
View attachment 172409
I need some help. I've been trying to add some trees, and every time I try and add my own tree on to the track the y tree seems to somehow mess up and only render one half at a time. I've named it all correctly, used the correct shader, exported it with the origin set to the bottom, but nothing seems to work. I even halved my mesh for the better shadows. I can't seem to export a proper Y tree when using blender.
A nice view of my half missing now I guess technically V tree forest
Like P_Cote mentioned, Blender will automerge verts if the setting is enabled. You won't see anything different in most cases in Blender, but it will affect the export. Make sure the verts for the two opposite planes are not united, they must be separated. AC does not (natively) use double-sided faces for any objects, and if Blender unites all the verts of two faces which have their normals in opposite directions, you can get weird results like this in AC.
Something You could try is just model one of the V shapes, with the normals of the opposite arms facing towards eachother. Then use a modifier to pattern it 3 times about the origin point. The modifiers get applied on export, but in Blender you only need to edit one set of Vs if you need to make changes. Ensure the "merge" option in the modifier is not enabled. You'll have perfect Y trees without merged verts and you only need to deal with one portion manually. Makes future updates easier (redoing UVs for updated atlases, scaling for a different tree texture proportion, etc).
Last edited:
Latest News
-
Getting Down and Dirty On Sim Racing's Short OvalsShort Oval Racing is sometimes overlooked by sim racers across many different simulators...
- Connor Minniss
- Updated:
- 6 min read
-
How to Drive Le Mans Ultimate in VR (For Now...)In its Early Access stage, Le Mans Ultimate does not currently have first party VR support. But...
- Angus Martin
- Updated:
- 3 min read
-
VR Will Hit EA SPORTS WRC In Beta Form 30th AprilVR support will arrive for EA SPORTS WRC next week, initially in beta form, as features...
- Thomas Harrison-Lord
- Updated:
- 3 min read
-
New RaceRoom Drift Content and Community Cup Final At Tuning World BodenseAn in-person final for a RaceRoom community sim racing competition will be held at...
- Thomas Harrison-Lord
- Updated:
- 2 min read
-
Fanatec Renews F1 Partnership Amidst Investment PitchesOfficial Formula 1 branded sim racing continue will continue to be produced by Fanatec, as share...
- Thomas Harrison-Lord
- Updated:
- 3 min read
-
Funselektor Teases Another Potential New ProjectNot content with the upcoming 2D management title Golden Lap, the creators of Art of Rally look...
- Thomas Harrison-Lord
- Updated:
- 2 min read
-
F1 24’s Updated Driver Career Mode DetailedThe new aim of F1 24's driver career is to increase your recognition levels, and ultimately...
- Thomas Harrison-Lord
- Updated:
- 3 min read


