I don't know how GIMP handles everything as I'm a Photoshop user, but in general I never merge anything (except when exporting the DDS, as the plugin sometimes doesn't save the alpha if the image isn't flattened). I always leave all of my layers separated and intact so I can easily make edits in the future.
There's no right or wrong way to do it—in the end, if the final texture is what you want it to be, then you've done it "right."
")
Personally, working in PS, I do everything with vector shapes and vector smart objects. I'll group all of the same
colour shapes into one layer, but they're still all separate vector objects that I can go back and tweak easily.
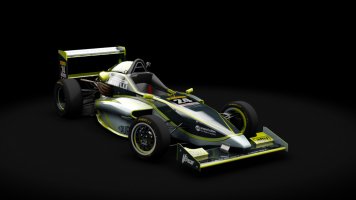
View attachment 684525
Here's a simple example for one of the liveries I did for Stereo's Chinook. For the main diffuse texture I usually start with a colour layer that is the base colour of the car, then I have as many vector shape colour layers as necessary for the rest of the main livery elements. Depending on how many of those layers I have I might group them all into a folder to keep the layer palette tidy and easy to use. Above that I'll have a folder with all of the logos (as separate vector smart objects whenever possible). On more complex liveries I'll have each different brand in its own subfolder within the logos folder again for organization. As I organize them that way I don't bother with naming the individual logo layers, usually. (Side note for any PS users who aren't aware, if you have a complex layer palette and can't find a layer you need to edit, hold control and right click on it in the main texture. A little popup will come up showing you every single layer, visible, that occupies that pixel. It'll even give you the hierarchy of folders, too)
Above all of that I have the AO layer(s) (set to 'multiply'), and if necessary any other elements above the AO that I don't want affected by it (sometimes I want a neon yellow accent for example, I'll usually put that above the AO layer so it stays nice and bright. I may have a second AO only affecting those bits, but with reduced opacity, depending on where on the car it is).
At the top I have a wireframe layer; I prefer setting this up as a white wireframe on black background with the layer set to "difference" as then the wire is always visible regardless the colours you're working with. This obviously gets hidden when exporting the DDS file.
Previously I had separate PSD files for MAPS textures, but now I just make a copy of the entire layer stack and put it into a new MAPS folder at the bottom of the layer palette. Same for the alpha. I make the necessary adjustments to those copies as needed and export to their files when ready.
———
As I mentioned, though, there is no right or wrong, there's just personal preference. At the end of the day, the end result is the important part, and how you get there is entirely up to you. This is just how I work. After 20 years of working with parametric CAD systems, I prefer a non-destructive workflow whenever possible. I never merge all the layers in my PSDs (to maintain future editability) and I don't work with raster logos unless absolutely 100% necessary (read: I can't find a vector version and it's too complicated a logo to bother recreating it on my own). Simpler logos I will always create a vector version if I can't find one.
I'll try to get a quick rundown of the CSP Extension setup for using Stereo's shader on a skin, and a bit about how to manipulate the finishes with the MAPS texture for it since it operates a little bit differently to the default Kunos shader. I prefer that shader over CSP's other custom ones as I just find it easier to work with and get the result I want. Others may prefer the other CSP setups and someone might chime in with how to make them work well. I've never successfully gotten them to work on a complex livery, only solid colours. Feel free to DM me if I forget! I'm likely to forget...
[EDIT] Screw it, I'll do it now. To put Stereo's fresnel shader to use on a single skin without editing the car itself, you need to leverage CSP's extension configs. You'll need a shader replacement entry for every material you're looking to edit. Most of the time it'll just be the main paint shader, but some cars have a couple different ones (some parts might all using the same diffuse texture, but some pieces will have a metal detail and others a carbon fiber detail, for instance. These are different materials that will both need to be edited).
To do it, inside your skin folder you need an "ext_config.ini" file. In that file, you need to enter the shader replacement setup. Here's the basic code:
Code:
[SHADER_REPLACEMENT_...]
ACTIVE = 1
DESCRIPTION = paint
MATERIALS = scn_bodypaint
SHADER = stPerPixelMultiMap_specular
RESOURCE_0 = txSpecular
RESOURCE_FILE_01 = scn_body_spec.dds
PROP_0 = fresnelMaxLevel, 4
The
header in square brackets tells CSP what the section is doing.
Active is... self explanatory.
Description I believe doesn't change anything, but it's helpful as a label inside the .ini file to find what you're looking for if you have a very complex .ini file, which some cars do if they're piling on a lot of different CSP effects
Materials tells CSP which materials to replace. You'll have to find the name of the material with CM's custom showroom—just click on the car part with the material you want and find the name in the right panel, it should be the second item from the top
Shader tells CSP which shader to replace the default one with, in this case we need
stPerPixelMultiMap_specular
Resource_0 is the first texture slot that is being changed. If you have multiple slots you're changing, the number goes up for each slot, but start at 0, not 1. In this case we're specifying that we're changing the texture for the
txSpecular slot. We have to specify this one because it's not present in the default shader, so there is no texture for it already.
Resource_File_0 is the texture name for the newly added texture. As we're adding a specular texture, I've added a _spec suffix to the file name for identification. Ultimately you can name it whatever you want, you just have to make sure this entry and the file name of the new texture match.
Prop_0 is the first shader property being edited, in this case we're increasing the
fresnelMaxLevel to 4 from whatever it was by default. This is necessary for the chrome effects.
Alright, that's the ext_config handled. Now for how to use the shader itself.
First up, when using this shader you do not need to include an AO layer in your main diffuse. For bright liveries it doesn't make a whole lot of difference, but if you're working on something darker this is great because you'll get colour banding in the shadows on dark colours due to the low bit-depth of the image, which is compounded by the DDS compression. Instead, the AO can be used in the
alpha channel of the MAPS file (which isn't used at all in the default shader). For the three main channels,
Green still controls reflection sharpness as it always has, as well as reflection sharpness. The
Red channel controls the reflection colour. White is white reflection, black is specular and reflections are coloured with the newly added specular texture (good for chrome), and mid grey is reflections are white, but specular reflections are the colour of the spec file (good for metallic). The
Blue channel controls the amount of reflection, but operates a little differently than default. The default effects are compressed into the 0-127 range (black to medium grey, which gives you no reflection to the normal amount of paint reflection). Above 127 you start add stronger fresnel reflection, initially good for some metallic close to the 127 range. As you get closer to full white (255) it becomes a chrome effect.
Feel free to play around with it and get a feel for how things work. The main thing is just mentally separating what it looks like from what it's actually doing, because the maps texture is a utility, not a final output, if that makes sense. The colours in it manipulate the surface finishes rather than represent what it actually looks like. Your final MAP output may look like a clown has exploded on your screen.
Depending on the way GIMP handles channels, this might be harder to do in GIMP. In PS I can easily paste a greyscale directly into each specific channel, but GIMP may not have that ability. In that case you'll have to choose your R,G and B values for each element together.
That's all a lot of obtuse information. It'll start to make more sense when you take it step by step and work through it on a livery. I've saved a small text file to remind me what does what, as I don't do nearly as much skinning as I used to so I forget it all every time I go to make a new skin with the functionality.