Creating a map within BeamNG.drive can be intimidating. The detailed 3-D modelling software Blender is the most commonly used tool to create your props and items for maps. Fear not, however. This article will teach you how to have fun and create maps using the built-in world editor without having to learn all of the ins and outs of complicated 3D modelling programs!


Before you step into creating maps, take a look at the editing templates provided in the vanilla version of BeamNG.drive. These maps consist of very little detail apart from terrain, giving you the creative freedom to manipulate and terraform to your heart’s content without damaging props such as buildings or other cars. Just remember to turn off AI traffic before loading into a template map.

The default key to toggle the World Editor is F11. There is also an editor-safe mode which loads with just the core editor tool extensions. To access this version of the world editor, use CTRL+F11.

Pictured above is the toolbar at your creative disposal when entering the map editor. This image breaks down the roles of these different buttons and their purposes. Use the table below to see a brief breakdown of the toolbar’s capabilities.

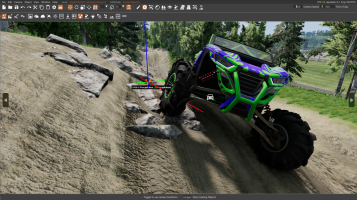
To access the map editor, press F11 while in Windowed mode, and CTRL+F11 if you want to try the ‘Safe Mode’ version of the map editor as previously mentioned. Whilst in the main menu of the editor, select a prop, such as this gas tank pictured above. Once selected, you can move this around the map as you please and create a different environment within the pre-built map.

To add an object to your map, enter the create object mode. An additional toolbar will appear below the main one: from there you can select the type of object. Click on the 3D Viewport to add the selected object or objects to your map.

And that is it for the basics! This tutorial aims to inform you of this editor that a surprising majority of BeamNG players fail to realise exists. Here at OverTake, we are genuinely interested to see what you can make with this amazing free tool!
Have you tried BeamNG.Drive’s hidden career mode yet? Check out our guide and let us know what you think!
Make sure to upload the links to your mods or screenshots over on X and tag us @OverTake_gg or submit them in the comments below!
World Editor Templates
Before you try anything in the world editor, make sure that your BeamNG.drive is updated to the most recent version and that you do not have any outdated UI mods installed. Speaking from personal experience, it can make editing the world a whole lot harder if these outdated mods are constantly throwing error messages and crashing your game.Before you step into creating maps, take a look at the editing templates provided in the vanilla version of BeamNG.drive. These maps consist of very little detail apart from terrain, giving you the creative freedom to manipulate and terraform to your heart’s content without damaging props such as buildings or other cars. Just remember to turn off AI traffic before loading into a template map.
BeamNG.Drive’s Built-In World Editor
The World Editor is a set of tools that help create and modify game levels and related data and resources. The world editor is built using core functions written in C++, with much of the logic in Lua scripting language. The UI presentation, however, is written in Dear Imgui.The default key to toggle the World Editor is F11. There is also an editor-safe mode which loads with just the core editor tool extensions. To access this version of the world editor, use CTRL+F11.
The Map Editor Toolbar
Pictured above is the toolbar at your creative disposal when entering the map editor. This image breaks down the roles of these different buttons and their purposes. Use the table below to see a brief breakdown of the toolbar’s capabilities.
Camera | Camera Related Functions |
Window | Contains All The Tools The Editor Comes With |
Help | Helpful Documentation |
Edit | Editing related functions, as well as the Editor Preferences |
Object | Function related to the selected object |
File | Open, load and save a level |
View | View related settings |
Editing Vanilla Maps – World Editor
Once you feel confident in the template maps, try changing and editing an existing free-roam map within BeamNG.Drive. The more you experiment with the map editor, the more confident and easy-to-use the editor will appear. Do not be intimidated by the prospect of corrupting your Vanilla maps. Simply use a modded map and get to grips with that first.To access the map editor, press F11 while in Windowed mode, and CTRL+F11 if you want to try the ‘Safe Mode’ version of the map editor as previously mentioned. Whilst in the main menu of the editor, select a prop, such as this gas tank pictured above. Once selected, you can move this around the map as you please and create a different environment within the pre-built map.
Edit Tool
The Edit Object mode is the default mode of the editor. It allows you to select objects from the viewport or scene tree, and edit them in different ways, most commonly:- Translate, Rotate, Scale
- Edit object parameters via the Inspector window
Keyboard Bind | Mode |
|---|---|
1 | Translate |
2 | Rotate |
3 | Scale |
4 | World or Local Coordinates Toggle |
How to add new objects
The Create Object mode allows users to add new level entities to either an existing map or a template map. These objects can include but aren’t limited to Sky, Clouds, Lights, Sound Emitters and LUA Triggers.To add an object to your map, enter the create object mode. An additional toolbar will appear below the main one: from there you can select the type of object. Click on the 3D Viewport to add the selected object or objects to your map.
Terrain Editor
The Terrain Editor is used to create and modify the Terrain object of the current map. With the various Brushes, it is possible to create valleys, mountains and canyons wherever you want! This tool also contains the Terrain Painter which you can use to assign terrain’s textures and materials, changing the look and feel of a given surface (e.g. asphalt, dirt, gravel and mud).Section | Description |
|---|---|
1. Heightmap Import/Export | Use this to import a grayscale heightmap image as a terrain, or to export the current terrain as a grayscale heightmap image |
2. Brush Shape | Shape of the brush, either round or square |
3. Sculpt Modes | The edit mode of the brush (raise, lower, smooth, etc.) |
4. Terrain Painter | Paint the terrain surface with different textures & materials |
5. Brush Properties | Settings that affect the brush dynamics |
And that is it for the basics! This tutorial aims to inform you of this editor that a surprising majority of BeamNG players fail to realise exists. Here at OverTake, we are genuinely interested to see what you can make with this amazing free tool!
Have you tried BeamNG.Drive’s hidden career mode yet? Check out our guide and let us know what you think!
Make sure to upload the links to your mods or screenshots over on X and tag us @OverTake_gg or submit them in the comments below!