Wearing the track boundaries in

What tips and tricks do you guys use to make the track boundaries look "worn in"? I have grass meeting tarmac, say, and it's difficult to give each material that sort of roughed up look where they meet (especially with terrain). There are lots of other "boundary" conditions - sand trap to grass, sand trap to tarmac, track edge to grass, etc... Anyone care to share their methods? :D Thanks.
 
The way I've done it, the first thing you need is the texture itself: it needs to be half tarmac-half terrain. Then you make the track a little wider than normal and insert the worn-in texture at the edges. That way the worn-in texture will actually be the edge of your track.

Alternatively, you could use the blend tool in the terrain window (the option which is like the spray feature in Photoshop, not the one that blends the whole terrain at once) on the edge of the terrain. Select some type of earth, for example, and then spray it over the grass at the edge of the track. That doesn't look as good, but it's simple and easy.
 
This
trans.jpg


is this
notrans.jpg


with this just above:
tgtrans.jpg


I found that what really helps with the transition texture is to set the mipmap filter to 'nearest'. That's what it's called in Gimp, but I'm sure there will be something similar in other programs.

I use surfaces to turn off the material wherever there's a kerb or an intersection with another track (e.g. the pitlane). I use walls to make kerbs, so I edit their cross section to add that dirt texture.

For gravel traps I keep things simpler:
ggtrans.jpg


That's a narrow track with a grass-gravel texture (no transparency) with terrain added to it, and joined to the terrain from the main track to make sure there are no gaps.
 
Soul, thanks for the great post. That's very clever and it works well. So the dirt "surface" is a duplicated track which you then break at kerbs and pitlanes?

Can you also explain your gravel trap technique a bit more - what do you mean by joining to the terrain from the main track?
 
Great Soul, tnx

Threedays 2nd solution also nice, thought about this myself ;)

Alex: I think Soul is trying to teach us some basics, after that we have to discover ourselves.
Sometimes I have to read his posts 5 times before I've finally got the picture :)
 
I don't mind elaborating in this case because I wasn't very clear.

ggtrans2.gif


You can see two tracks - the main track and the transition track (the narrow set of triangles). You add 1 panel of terrain to the left of the main track, then add 1 panel of terrain to the right of the transition track, then merge the nodes of the two pieces of terrain to eliminate gaps/overlapping. The two pieces of terrain (e.g. Left1 and Right1) can also be merged.

Regarding the dirt texture, it helps if you pick one that is from the edge of a road. In my case the track and dirt textures were both taken from the same image on cgtextures. In the section \ Roads \ Roads is a go kart track. I've also helped myself to the kerbs.
 
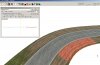
I would make it like this - everything belongs to the track, which has three-part crossection: middle part for the road and roadsides. The textures were taken from Default Xpack (I just skip bump & specular maps). The road itself and outside grass are just original textures. The most important thing was to make:
- the roadside (just the grass with some tarmac and a thin "stripe" of sand) - now it looks more like worn road edge
- the "sand trap"
- also, the start of sandtrap (which is actually also the end - the material is positioned then "upside down").
So, there are altogether five textures in project's XPack.

It needs just little time to add new sections with Material Change and add proper materials (and flip them horizontal and/or vertical to fit them to various places). Note that the sandtraps don't have to start at the same places, since we have left and right side... But I would not suggest to add new material sections in the middle of textures. The default material change was 12 meters, and panel lenght was 5 meters - that made approx. 3 squares (road's polygons) in a line to place new sections. You can still move the sections (hold M + drag the red section's line) a little.

I've added some little shape to the sandtraps and randomness to make them be more "dangerous" ;) You can still play with the width of the roadsides/add more shapes - I did not want to spend time on it.
After you are satisfied with your building (after you have set global track's widths/angles etc), you can add terrain (conventional way) and fill it with grass texture. There's is actually some terrain in the attached project - I did not pay too much attention for the number of polygons, so maybe there too many of them for rFactor.

Here is the BTB project if you want to check how it is done:
I hope it will look good in rFactor too!
http://www.sendspace.com/file/plq8mx
NOTE: You need to add Default XPack there to avoid errors (but the project works in "my" BTB even without it)

... and .psd file if you like the sandtrap texture (Photoshop PS2, I hope you can open it with earlier version):
http://www.sendspace.com/file/pyq5zn
The sand texture was also from Default XPack, painted a little :)

This way you can use more textures to make the track look even more interesting...
And this was how I've build 100% of the roads and roadsides in my GB Sprint rally stage :) (the crossections were just more complex).

R Soul's method is still great, I would use it for texture transtions placed more away from the main track/road :)
With "blending" like that you can use your own texture mixing AND avoid blending materials in BTB, which can be not accepted if you would like to convert the track to original RBR format.

And finally - IMPORTANT (rFactor) - I'm not sure if I've set proper surfaces for the materials - please check them in XPack first.
 

Attachments

  • sandtraps.jpg
    sandtraps.jpg
    98.1 KB · Views: 561

Latest News

Are you buying car setups?

  • Yes

  • No


Results are only viewable after voting.
Back
Top