Project CARS Modding Questions & WIP

@jurej
sms car classes: you can change them via the crd method but you need to install crowtrobot's custom grid tool (no need to run the tool; once the mod is activated you get access to some loose files and crd's are among them).
changing physics of mod cars requires hex editing all the physics files.
thanks for informations :)
 
Ok guys. So I'm working on a new version of the Formula A car from the game. A standalone version with "current" 2016 Formula 1 physics.

ERS system ( used with throttle and not a button ) + Turbo + 650HP engine.
Car has less downforce, 8 gears. Monstruous torque.
Tyre temperature window is key on this car ( even though I didn't change compound, it's working really nicely with the new physics )

I'll try to make a little video to show how it handles at the moment. But it's really a hard car to drive at 100%

Only issue so far is the 8th gear that I can't yet to make work correctly with AI. So I may rollback towards a 7 gears car.
 
Helo, another modification
A tune's version of the Ford Focus RS
350 hp/500nm 1495 kgs / big brakes / Dunlop Tyres
link : Focus RStune
Enjoy
pCARS64 2016-07-02 19-14-44.jpg
 
Hey, does any modder that uses to work with new cars experienced at some point the inability to save a setup while on a track ? As soon as you get back to the tuning screen, it reverts to default. Now I now that it can be fixed by making a clean profile ( default.sav ). But it does happen only on a new cloned car I'm doing... weird ?
 
Animated mebs:
Today, I successfully decoded the animation Binary file. Some time ago, I knew about 66% of the code within, then didn't bother investigating any further. Recently, a member here got me interested in re-reviewing the animation binary. Now I know what all the new floating point data is related to. So, right now I have a car with shaking mirrors and bouncing bonnet. I'll try to figure out how I can write this up so that people will be able to understand in the near future.
Our next car coming out is 2006 Ford GT and will have those animated side mirrors and animated bonnet.
 
Last edited:
Animation binary file editing. A Tutorial

For now, I'll explain the process of making S2U animated mebs work in the pCars environment. If you're animating a meb from scratch, there's an additional layer of complexity, due to creating skeleton/bones and weight painting vertices for bone affection. However, this guide as to how to edit the animation *.bas file applies for both S2U converted mebs and scratch made animated mebs.

Step 1) the animation *.bas to be chosen is based upon which car will be providing the donor wiper animation as that is most important.

Step 2) Open the cockpit *.bas and review the items available for animating. There will be times that not every animated meb you have will be in the donor *.bas. So, you'll be limited to only animating the options available in donor cockpit *.bas
NOTE: the *.bas is formatted with containers for each animated element. It seems possible to add new elements to the file, but there is a convoluted chaining in place between each element to solve (portions of chain are easy to follow, while some of the chaining is odd). Also, a different configanim.bin would be required that includes any new elements you are attempting to add.

Step 3) Compare the Root and bone names in the code of your animated mebs against those in the code of the donor cockpit *.bas file. If there is a mismatch and the character length is the same, edit the root and/or bone names to match the *.bas file. If there is a mismatch and the character length is different, import the animated mebs into Zmodeler, change the root and/or bone names, then export.
Restore all missing data sections and do typical fill patterns on any exported mebs from Zmodeler.

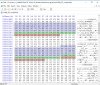
Step 4) Review the attached image of highlighted code.
For the S2U animation BAS, you have a transform data entry for your bone/root...
Code:
        <NODE name="cockpit_kit00_BONNET" mirror="cockpit_kit00_BONNET">
            <!--      0.00000050      0.20636831      0.97847438      0.00000000 -->
            <!--     -1.00000000      0.00000031      0.00000044      0.00000000 -->
            <!--     -0.00000021     -0.97847438      0.20636831      0.00000000 -->
            <!--     -0.00000004      0.81309271     -1.67113531      1.00000000 -->
            <TRANSFORM data="3505F37F 3E535237 3F7A7D4C 00000000 BF800000 34A7349F 34EE87EB 00000000 B464C324 BF7A7D4C 3E535237 00000000 B33AEA93 3F5026D8 BFD5E7C3 3F800000 " />
        </NODE>
Convert the 16 "Transform" words to little endian, then enter in order into the code highlighted in blu-ish color. You enter the values in order as if you were reading the Transform data entry left to right.
Note: the above code is reference only, does not reflect actual data in the attached pic.

Step 5) (bone or root orientation values) Import animated meb into Zmodeler. Unlink Root and bone from skeleton. Convert root and bone to dummy. Add suffix of "_cpit" to names of root and bone in node browser. Export as "CarName_cockpit.vhf.bml" to a temporary folder. Open the XML generated by zmodeler. Locate the bone name and copy out the 4 values for Orientation.
Example...
Code:
Orientation="-0.009315 -0.997149 0.035250 0.066149"
Orientation=" Value 1,  Value 2,  Value 3,  Value 4"
Note: the above code is reference only, does not reflect actual data in the attached pic.
Convert all values to floating point hex in little endian....
Code:
Value 1 = F19D18BC
Value 2 = 28457FBF
Value 3 = 4E62103D
Value 4 = 2079873D
Note: the above code is reference only, does not reflect actual data in the attached pic.
Back to the attached picture. For the code marked in green, enter the values in this order... Value 4, Value 1, Value 2, Value 3
Notice how the data is entered out of sequence. Be careful not to mix things up.

Step 6) (bone or root offset values) Back to the attached picture. For the code marked in Red, simply copy the 13th, 14th and 15th values (words) of the Transform data (highlighted in blue) and paste that in following the same order.

Other notes: I also changed all code in the "Root" element to match the S2U *.bas file, too.
 

Attachments

  • Anim_Code_Markup.jpg
    Anim_Code_Markup.jpg
    799.2 KB · Views: 309
Last edited:
Does anyone happen to have an unpacked+named Kart_01 (125cc) lying around? I'm working on some drag cars at the moment and the kart tires are perfect in width and profile for drag use if you scale them up and stick them on a different car :)
 
Here is some revised information for CGP file, which includes headlight color on the track surface. Both for 32bit and 64bit versions of the file.
Code:
**** 64 BIT *****
0x30-0x3F // headlight color on track surface
E1 7A 54 3F 0A D7 63 3F 33 33 73 3F 00 00 A0 41 // code for white
00 00 80 3F 66 66 66 3F CD CC CC 3D 00 00 A0 41 // code for yellow

0x54-0x57 // Bonnet Cam Lateral adjust
0x58-0x5B // Bonnet Cam Vertical adjust (more positive = upward)
0x5C-0x5F // Bonnet Cam Fore/Aft adjust (less positive = more forward)

0x60-0x63 // Cockpit Center Cam Lateral adjust
0x64-0x67 // Cockpit Center Cam Vertical adjust
0x68-0x6B // Cockpit Center Cam Fore/Aft adjust

0x6C-0x6F // Roof Cam Lateral adjust
0x70-0x73 // Roof Cam Vertical adjust
0x74-0x77 // Roof Cam Fore/Aft adjust
================================================================

**** 32 BIT *****
0x30-0x3F // headlight color on track surface
E1 7A 54 3F 0A D7 63 3F 33 33 73 3F 00 00 A0 41 // code for white
00 00 80 3F 66 66 66 3F CD CC CC 3D 00 00 A0 41 // code for yellow

0x50-0x53 // Bonnet Cam Lateral adjust
0x54-0x57 // Bonnet Cam Vertical adjust (more positive = upward)
0x58-0x5B // Bonnet Cam Fore/Aft adjust (less positive = more forward)

0x5C-0x5F // Cockpit Center Cam Lateral adjust
0x60-0x63 // Cockpit Center Cam Vertical adjust
0x64-0x67 // Cockpit Center Cam Fore/Aft adjust

0x68-0x6B // Roof Cam Lateral adjust
0x6C-0x6F // Roof Cam Vertical adjust
0x70-0x73 // Roof Cam Fore/Aft adjust

Also, you can change the code for headlight color to pretty much any color.
The floating point words are in order....
R, G, B, Intensity
 
Last edited:

Latest News

What's needed for simracing in 2024?

  • More games, period

  • Better graphics/visuals

  • Advanced physics and handling

  • More cars and tracks

  • AI improvements

  • AI engineering

  • Cross-platform play

  • New game Modes

  • Other, post your idea


Results are only viewable after voting.
Back
Top