You are using an out of date browser. It may not display this or other websites correctly.
You should upgrade or use an alternative browser.
You should upgrade or use an alternative browser.
Cars WIP - Honda Life Step Van (First Mod, help appreciated)
- Thread starter Omaatjehenk
- Start date
simply here
line, rectangle or whatever you feel like
like if you draw a line with few vertices, right click on a selected vertice to make it bezier
selective adaptive (or increase steps) to have cleaner looking splines
hope this helps!
First step works:

Clicking bezier does something I do not want it to do though

Ben O'Bro
Premium
aha well yeah
bezier needs some fine tuning in order to recreate the curve you want, following your blueprint, you can rotate, scale etc. your tangents
you can also take one vertice and apply a chamfer, or fillet etc. to have a clean round corner for example
the ready rectangle has option for corners when you create it
Maybe i opened up a door full of new mysteries with my spline theory
but when modeling a car, it really helps me, having made some clean splines running through my doors, and the important lines on the car, for then adjust my polygons more accurately to keep a nice flow to it
I decided to redo the topology on the side and back of the car and make it really simple since it's mostly flat panels. Is this a step in the right direction?


Progress:


Any feedback on the geometry? Struggling with the areas around the windows/doors. These pics show the problem areas:


Any feedback on the geometry? Struggling with the areas around the windows/doors. These pics show the problem areas:


Ben O'Bro
Premium
usually the idea is to line up everything to get the flow of the car, and once it looks good, you start drawing the "chamfer" to get the hard edges, then you detach/cut areas like doors etc.
The detaching step is convenient because you can "evacuate" edges easily rather than making them run through your whole car
hoping that makes sense
For the bottom of the windshield area, you detached it too soon. At the moment your mesh doesn't have the flow you can see in the picture
very basically drawn, here's the idea :
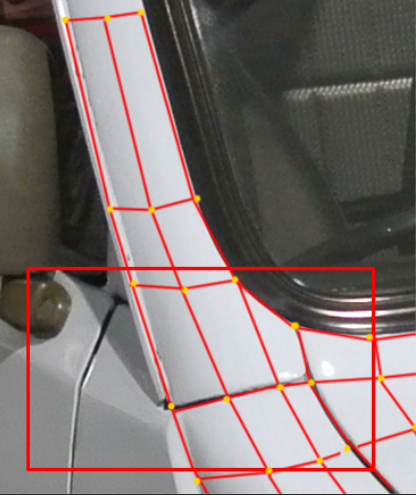
For the bottom of the windshield area, you detached it too soon. At the moment your mesh doesn't have the flow you can see in the picture
very basically drawn, here's the idea :
View attachment 301567
Thanks for the advise! Does this look a bit better to you?

The total picture looks like this at the moment:

Finally figured out what the situation around the pillars, especially the A-pillar. Struggled finding good reference pictures, but finally found one that was good enough to finish it and get it over with. here is the result:


Any advise on what the next step should be? Maybe work on the front and back some more so that I can split body panels? A question about splitting the body panels, how to do it properly without getting gaps in the body?


Any advise on what the next step should be? Maybe work on the front and back some more so that I can split body panels? A question about splitting the body panels, how to do it properly without getting gaps in the body?
I'd leave splitting it till after you UV mapped it
I guess our definition of splitting is different. I would like to create the body panel gaps after polishing the shape some more. How do I create the "creases" between the body panels without messing up my geometry?
Ben O'Bro
Premium
i know it's convenient to ask and hope to get the right answer, but you can also look into some tutorial videosI guess our definition of splitting is different. I would like to create the body panel gaps after polishing the shape some more. How do I create the "creases" between the body panels without messing up my geometry?
that being said, i'm not giving up on helping
just saying, whatever skill we are, for example i spent 1 hour yesterday looking at videos to make unwrap (instead of doing my work XD) and i learnt new things
i tried "car modeling 3dsmax" in youtube, but couldn't find a good one to point you out
you can type "hard surface 3dsmax" in youtube for example, and that should give you a wide selection, it's usually more towards mesh smooth on top of an editable poly, but the basics of handling polygons and how the flow and smoothing group behave etc. are there, and some useful stuff in there! Too long to list them in here anyways
i know it's convenient to ask and hope to get the right answer, but you can also look into some tutorial videos
that being said, i'm not giving up on helping
just saying, whatever skill we are, for example i spent 1 hour yesterday looking at videos to make unwrap (instead of doing my work XD) and i learnt new things
i tried "car modeling 3dsmax" in youtube, but couldn't find a good one to point you out
you can type "hard surface 3dsmax" in youtube for example, and that should give you a wide selection, it's usually more towards mesh smooth on top of an editable poly, but the basics of handling polygons and how the flow and smoothing group behave etc. are there, and some useful stuff in there! Too long to list them in here anyways
There are indeed loads of videos out there and a lot of them show different techniques and ways to do things. I don't know what search terms to look for, because I don't know what things like these are called.
I found this video, what would be the best way to make a panel in my case?
When I see the latest update on the Subaru by Stereo I see he made the crease between the bumper and the rest of the body. This is exactly what I'd like to learn to do. And for some reason I trust you guys that actually model these cars a bit more than a random guy on youtube, since I came across quite a few tutorial videos that were not that good.
Last edited:
I do that in essentially 2 steps

bevel with 3 rows
extrude the middle row backwards
For panels you want to actually be separate (eg. opening doors) delete the middle row afterwards, otherwise just turn it black.
On flat surfaces like between the doors it just kinda gets the job done immediately ->

If it's not all flat like this, you probably need to nudge the edges a little bit to get the surface smooth. Eg. the hood to top of fender split I pulled the middle row of the extrusion downward a bit extra to help get continuous curve.
I also do it with beveling 1 row and extruding, then manually knifing in the supporting edge loops on either side, if the geometry's messy.
Any time seams meet I just manually redo the mesh to how I want it, eg. the hood/grille meet like this:

(grille is inset so it's extruded inward a second time). Green outline is just a quad that I cut up a couple extra times to smoothen the visible edge out. I didn't notice the bad triangle on the left side before, I would rotate that edge to make 2 less sharp triangles.
The extrusion itself would create an extra edge where the white line is, just delete that (and the faces on either side of it)
It's good to leave it until as late as you can cause it makes it much more tedious to adjust overall shapes of panels afterwards, or to have a good idea of curve flow across them. Cause 1 vertex is turning into 6, all along the seam.

bevel with 3 rows
extrude the middle row backwards
For panels you want to actually be separate (eg. opening doors) delete the middle row afterwards, otherwise just turn it black.
On flat surfaces like between the doors it just kinda gets the job done immediately ->

If it's not all flat like this, you probably need to nudge the edges a little bit to get the surface smooth. Eg. the hood to top of fender split I pulled the middle row of the extrusion downward a bit extra to help get continuous curve.
I also do it with beveling 1 row and extruding, then manually knifing in the supporting edge loops on either side, if the geometry's messy.
Any time seams meet I just manually redo the mesh to how I want it, eg. the hood/grille meet like this:

(grille is inset so it's extruded inward a second time). Green outline is just a quad that I cut up a couple extra times to smoothen the visible edge out. I didn't notice the bad triangle on the left side before, I would rotate that edge to make 2 less sharp triangles.
The extrusion itself would create an extra edge where the white line is, just delete that (and the faces on either side of it)
It's good to leave it until as late as you can cause it makes it much more tedious to adjust overall shapes of panels afterwards, or to have a good idea of curve flow across them. Cause 1 vertex is turning into 6, all along the seam.
Last edited:
The problem I find is its hard to explain how to do this stuff without just ... doing it.There are indeed loads of videos out there and a lot of them show different techniques and ways to do things. I don't know what search terms to look for, because I don't know what things like these are called. When I see the latest update on the Subaru by Stereo I see he made the crease between the bumper and the rest of the body. This is exactly what I'd like to learn to do. And for some reason I trust you guys that actually model these cars a bit more than a random guy on youtube, since I came across quite a few tutorial videos that were not that good.
Its true that when I was started a few years back I couldn't find any tutorials that were really all that helpful, but in the end the best help was just by trail and error, building your own experience and finding out what gives good results and what doesn't.
I know its not fun to hear because it involved months if not years of work that in the end may not amount to anything, but it works.
You clearly already have the basics of how to navigate and build basic meshes in 3D - so to me you have passed the tutorial stage and are ready to just start making stuff, make mistakes, learn from them, improve, restart, fix, edit etc.
Someone can tell/show you what a cleaner mesh should look like, but its not going to mean anything to you if you didn't go through all the effort of understand why, and more importantly why not.
This is one of the first progress shots I have, dated to october 2015. You can see I had no real grasp of what I was doing (look at the top of the windscreen corners for example...), and it seemed impossible to understand how to move forward. But after many months of failing, it slowly started to make more sense, and a few projects later I came back to finish it. And whilst the newer pic shows clear progression, just know its not a perfect mesh, there are a lot of things I'd do differently now, because we are always learning. It never stops
Thanks for the advise guys! Will try to use it in the future. @garyjpaterson I know that modeling is a long process and an ever evolving skill. I would like to share the progress and get feedback on it in this thread.
A new issue I ran into, I tried modeling the area around the side window the furthest to the back. The geometry looks very messy, but I don't know how to fix it. Reflections also look a bit weird after smoothing.


What would be the best way to tackle this area?
A new issue I ran into, I tried modeling the area around the side window the furthest to the back. The geometry looks very messy, but I don't know how to fix it. Reflections also look a bit weird after smoothing.


What would be the best way to tackle this area?
Ben O'Bro
Premium
you most likely have unwelded vertices in the same position
you can weld them using weld
 and choose option to have a small value (like 0.1cm not to weld things you don't want)
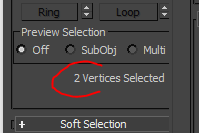
or you can make a selection using square select on top of a vertex, to see how much it shows "2 vertices selected" means you have double
you can weld them using weld
or you can make a selection using square select on top of a vertex, to see how much it shows "2 vertices selected" means you have double
you most likely have unwelded vertices in the same position
you can weld them using weld View attachment 302940 and choose option to have a small value (like 0.1cm not to weld things you don't want)
or you can make a selection using square select on top of a vertex, to see how much it shows "2 vertices selected" means you have double
View attachment 302941
That's what I thought at first, but that's not the case.. I'm kind of puzzled here. Sometimes it seems gone when I look at it with smoothing and the mirror modifier turned on. Not sure if it's 3ds messing with me or if it's the geometry I messed up.
Ben O'Bro
Premium
it happens sometimes to have a "broken mesh"
often when importing objects from other softwares, or obj / 3ds / fbx files (again, from other 3D softwares)
one way i found to fix it, is to had a meshsmooth modifier on top of it, iteration 0, you loose all your smoothing groups, but... it kinda resets everthing and clean the mesh from these mistakes
it happens sometimes to have a "broken mesh"
often when importing objects from other softwares, or obj / 3ds / fbx files (again, from other 3D softwares)
one way i found to fix it, is to had a meshsmooth modifier on top of it, iteration 0, you loose all your smoothing groups, but... it kinda resets everthing and clean the mesh from these mistakes
That actually totally worked, that's a weird problem but thanks a lot! I just accentuated the red line, still some fixes to do around the blue box, but that's for later. Slowly learning how to make these geometries work, thanks a lot @garyjpaterson @Stereo @Ben O'Bro !

Last edited:
Latest News
-
Fanatec Appoints New CEO To “Tackle Delivery Issues”Following the pushing aside of company founder Thomas Jackermeier in March, Andres Ruff is the...
- Thomas Harrison-Lord
- Updated:
- 1 min read
-
Sponsored Pimax Crystal Light Giveaway: Win A Freshly-Unveiled High-End VR HeadsetTwo new VR headsets join the Pimax lineup: The Chinese manufacturer revealed both the Crystal...
- Yannik Haustein
- Updated:
- 3 min read
-
2024 Formula One Chinese Grand PrixRound 4 of the 2024 Formula One season takes place in Shanghai, China. This is the first time...
- Connor Minniss
- Updated:
- 2 min read
-
Cammus Launches Load Cell LC100 Sim Racing PedalsThe Chinese manufacturer expands its sim racing range even further, with pedals now available...
- Thomas Harrison-Lord
- Updated:
- 1 min read
-
MotoGP 24: Riders Market And Revised Moto2 Handling ShowcasedThe rider transfer market has been detailed for MotoGP 24, following only a brief overview...
- Thomas Harrison-Lord
- Updated:
- 2 min read
-
Steyr 1108: Possibly The Fastest Tractor In Assetto CorsaThe world of sim racing mods is fascinating - not just because of its authentic recreations, but...
- Yannik Haustein
- Updated:
- 3 min read
-
Asetek SimSports Launches RaceHub 3.0 SoftwareThe latest update unlocks customised LED use on Asetek’s wheel bases, steering wheels and...
- Thomas Harrison-Lord
- Updated:
- 3 min read


