Showing Background Scenery (the hard/easy way?)

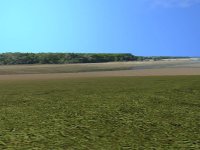
I wanted to show a mountain region in the distance, on one part of the track. Managed to map it to an object (former pitwall). (Couldn't map it to the horizon unfortunately, since it'd keep repeating.)

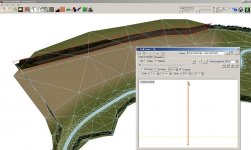
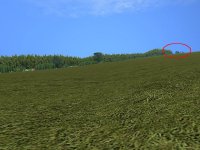
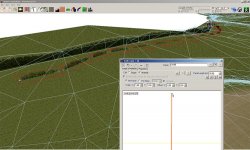
But despite the image having its alpha channel set for transparency, it shows up like this:

http://www.postimage.org/image.php?v=aV4thQ0

:confused:

On the left side, it's visibly flickering, too. Any ideas for improvements, or other methods to show such background scenery?

Regards, R
 
I used to build walls instead of objects - I think they can be more flexible and still use just few polygons. It's always matter to experiment with Panel Length and Material Change.
Please have a look on the settings for these walls on my screenshots. The materials use very small textures with alpha channel of course (DTX3, no mipmaps, in BTB/XPacker settings are: Render Normals Up, MIP=0, use Alpha).
According to the screeshots: single, non-repeating texture is 1024x128 (65 kb) (but Material Change - 500 meters ;) Could be bigger, but it shows itself in game just for a while in long distance, so I wanted just to have something ;)
The second texture (repeating since Material Change is at smaller distance) is 512x64, 17kb...
Screenshots are from RBR, but I'm sure it will look good in rF too.
Remember to do something with Y offset for the transparent materials - as you can see on picture #3, I still need to correct it at some places - with Y offset = 0, you will probably see some dark line above the texture. There are also two single trees (in the middle) growing at the wall for better look :) And another wall behind (as on BTB view - pict #4 - objects are hidden)
The flexibilty: that kind of walls can have shapes on the ground, (ctrl+click on it to add "blue dots") and vertical shape sections, even different materials within one wall - and randomness too - couple clicks and they look less like repeating "mosaics" :)
 

Attachments

  • wall_singleTex_game.jpg
    wall_singleTex_game.jpg
    76.5 KB · Views: 456
  • wall_singleTex_btb.jpg
    wall_singleTex_btb.jpg
    92 KB · Views: 504
  • wall_repeatTex_game.jpg
    wall_repeatTex_game.jpg
    89.6 KB · Views: 467
  • wall_repeatTex_BTB.jpg
    wall_repeatTex_BTB.jpg
    132.7 KB · Views: 450
Raido, what format is the image for your mountains? Some file types won't do transparency. dds is best I think.

Remember to do something with Y offset for the transparent materials - as you can see on picture #3, I still need to correct it at some places - with Y offset = 0, you will probably see some dark line above the texture.

The dark line is an overspill from the bottom of the image with the mips. If you leave 2 or 3 pixels clear at the bottom of your transparent images you won't get this problem.
 
Thanks for the answers, chaps. I did originally think of using a wall, but didn't know how to set the texture not to repeat itself every 100 meters - the mountain range would be about 1000 to 1500m I guess.

Image format I used was .dds. DX1 with mipmaps I think. Transparency in alpha channel was there - probably gotta try some other dds variety I guess (ah, the joys of Microsoft-related formats, always 4256 types to choose from and each with their own bugs, yay! )
 
Image format I used was .dds. DX1 with mipmaps I think. Transparency in alpha channel was there - probably gotta try some other dds variety I guess (ah, the joys of Microsoft-related formats, always 4256 types to choose from and each with their own bugs, yay! )

Can you post the image itself? Maybe by looking at it someone can suggest what the problem is? I don't think different .dds varieties would affect the transparency.
 
DTX1 will give rough, bad looking edges. Try DTX3. I'm using DDS plugin for Photoshop for that. If you want to post the image, you have to zip it, since RD's upload system won't accept dds file, I guess.
Edit: study my pictures, then you will know how to set material change length. Or make some wider picture for your mountains. I think there will be nothing wrong if the "pattern" repeats - you can randomize it a little by using shape sections within the wall.
 
You can make it part of the skybox by including the instance of the object in the skybox instance in the scn file.

Instance=skyboxi
{
Moveable=True
MeshFile=skyboxi.gmt CollTarget=False HATTarget=False Render=False
Pos=(0.0,0.0,0.0) Orient=(0.0,0.0,0.0) // move and rotate whole skybox if required
Instance=CLOUDS
{
Moveable=True
MeshFile=horizon.gmt CollTarget=False HATTarget=False
Instance=NightLight00Glow
{
Moveable=True
MeshFile=horizonlights.gmt CollTarget=False HATTarget=False
}
Instance=Sky
{
Moveable=True
MeshFile=Sky.gmt CollTarget=False HATTarget=False
}
Instance=scenery
{
Moveable=True
MeshFile=(Your_sceenery).gmt CollTarget=False HATTarget=False
}

}
}

Or something like that, I think. I can't remember exactly if you need to include an instance name or if you can just bang it in there with with another instance.

You can also check out how the scenery works in the Great Britan XPack.
 
Made progress thanks to your input, kids. After some fiddling, the mountain range shows up now (used dxt3 dds, with mipmaps, transparency is there too). And the texture is depicted ok - in the end, used a wall like Martinez described.

Still some details to work out though (see interim result here):

http://postimage.org/image/4v7z56ck/

- No matter what I do, it leeps looking dark (dark blueish hue), even if I make the texture WAY bright. Do I need to set the object to 'receive lighting'? Or is this due to something else?


- For some reason, now one of my normally invisible timing gates shows up as a big square in my mirrors with a 'cement' texture! Weird, since I haven't done anything to those... It only shows in my mirrors, but it's baffling nonetheless.


PS. Just noticed your message Mianiak - that looks like a good idea too! As it is, using a wall will do the job ok though. :)
 
I'm gonna try this as it has been a niggle right from the beginning of my build on Roy Hesketh. I have two 180 deg photo merges of the horizon, and this is what I want to do.

But how do you delete the generic BTB one that is exported ?
 
- No matter what I do, it leeps looking dark (dark blueish hue), even if I make the texture WAY bright. Do I need to set the object to 'receive lighting'? Or is this due to something else

Check specular color for the texture, and maybe specular power (spec. power doesn not work in RBR, so you may need some experiments). Here is something on specular color (scroll the screen, it starts after some other conversation):
http://www.racedepartment.com/bobs-track-builder/32621-problem-bump-specular-etc.html

Also, try to set (the box should be checked) for the material "Render Normals Up" or "Double Sided", but also the wall your maybe stands so you see it's back side?
Unfortunately, I have only experience with BTB/RBR...
 
You can make it part of the skybox by including the instance of the object in the skybox instance in the scn file.

Instance=skyboxi
{
Moveable=True
MeshFile=skyboxi.gmt CollTarget=False HATTarget=False Render=False
Pos=(0.0,0.0,0.0) Orient=(0.0,0.0,0.0) // move and rotate whole skybox if required
Instance=CLOUDS
{
Moveable=True
MeshFile=horizon.gmt CollTarget=False HATTarget=False
Instance=NightLight00Glow
{
Moveable=True
MeshFile=horizonlights.gmt CollTarget=False HATTarget=False
}
Instance=Sky
{
Moveable=True
MeshFile=Sky.gmt CollTarget=False HATTarget=False
}
Instance=scenery
{
Moveable=True
MeshFile=(Your_sceenery).gmt CollTarget=False HATTarget=False
}

}
}

Or something like that, I think. I can't remember exactly if you need to include an instance name or if you can just bang it in there with with another instance.

You can also check out how the scenery works in the Great Britan XPack.

Could this be elaborated on or is there a full tutorial anywhere on how to do this? Sounds like a great way I have been wondering if there was any way of changing the background.
 
Could this be elaborated on or is there a full tutorial anywhere on how to do this? Sounds like a great way I have been wondering if there was any way of changing the background.
All it is is taking the instance from the scn file and moving it into the skybox instance.
It's an instance within an instance.

Try this,,,
make a small circle track about 100m in diameter,
add terrain,
then add a wall into the centre and make it a circle about 20m diameter.
put some texture on the wall so you can define its direction (this texture will do fine, http://www.cgtextures.com/texview.php?id=24183&PHPSESSID=5c422b24065eaa0d49aa60b34b479927 just edit it and make it a power of 2, 1024 wide by 128 high and save it as a dds or tga. Don't worry too much about transparency for this experiment.
then export the track. Once exported, open the scn file and look for the wall you added, it will be the only wall in the scn file. cut and paste the wall instance into the skybox instance like I have shown in that example above,
then run the game and load the track, you will see the wall follow you around.

Ok couple of questions here.
1. By add the texture do you mean change the material to one side of the wall?
2. If the above is correct it shows on every panel of the wall and it is on the wrong angle e.g. sky and earth are left and right of the wall not top and bottom.

Sorry just not sure on all the terminology yet.
 
I did it when I was experimenting with rain but I cant find any of the files that I made for it. Give me a bit to see if I can dig them up, I know I got them somewhere :D

[ED] For the image direction, just use the rotate/flip buttons on the material's part of the wall editing dialogue.

[EDD] Ok I found them lol. So yeah, just make sure the wall is in the centre of 3d land. (0,0,0) and edit the scn file like I first said, it should work.

You might like to remove the outer parts of the wall so that it only has one face which is facing in.

I will make a full tutorial if you like.
 
I will make a full tutorial if you like.

Yes please this would be a very valuable tutorial for any newbie like myself. I am more of a visual learner e.g. screenshots or videos so I can see the process occur. I would be greatful if you wouldn't mind. Either that or if we could hop on vent and work through it at the same time.

Also do you know any good links for tutorials for creating string objects in sketchup? I want to replicate the fences used at NZ speedway tracks and they vary from track to track but I want each track to be as realistic as possible rather than using generic walls and fences. I am guessing the difficult part will be creating it but once that is done then it is just a matter of packing it up in Xpacker and utilising it. Feel free to tell me if I'm dillussional lol.

Thanks for all of your help it is not often unfornately that you meet someone with the willingness and patience to mentor.
 
Wow that is perfect. Just the sort of tutorial that I need. Would you mind making one for the sketchup and how to create fences to use as string objects? I know I'm asking alot but good help is hard to find. Perfectly understandable if you don't wish to just thought no harm in asking :)
 

Latest News

How long have you been simracing

  • < 1 year

    Votes: 353 15.6%
  • < 2 years

    Votes: 247 10.9%
  • < 3 years

    Votes: 243 10.7%
  • < 4 years

    Votes: 178 7.9%
  • < 5 years

    Votes: 301 13.3%
  • < 10 years

    Votes: 259 11.4%
  • < 15 years

    Votes: 166 7.3%
  • < 20 years

    Votes: 126 5.6%
  • < 25 years

    Votes: 99 4.4%
  • Ok, I am a dinosaur

    Votes: 293 12.9%
Back
Top