Show us your Rig / Cockpit

Almost " done ". Still have some wiring to clean up and some small additions on the way.
20220418_134511.jpg
20220418_135225.jpg
20220418_134616.jpg
20220418_134654.jpg
20220418_134606.jpg
 
Last edited:
Hiya all.
I already showed my cockpit before but some updates have been made and would love to show you as this is a proud result of long time (and money you know it) invested on it.
Thanks to communities like this we all find new ideas and resources to enjoy our niche hobby.

In the YouTube link there is a description of all the components and some step by step building on some parts (SFX and wind simulator)

Hope you like and enjoy it and... Before shouting at me for the high seat position... Hahahah I know will make some of you bleed your eyes but it is comfortable as hell the way it is.

Edit: people might freak out because of image movement. Keep in mind that my brain moves according to the image you see onscreen so I see pretty good while playing. What's more, any real racing car is stiff and your head bounces like crazy so you can't expect a flat image if you try to make it as real as possible

 
Last edited:
I have a rig question. Does anyone know if either of these wheel deck upright arrangements is better than the other?
1: attached to the top of the base
1651942261718.png

2: attached to the sides of the base
1651942505348.png

It looks like the second one allows more bolts to be used for increased security, but also that more bolts are needed because there's nothing solid to simply support the weight.
I can see a little more width for getting in anout out with the second one, but it's not clear if that's significant.
Or is this a dangerous question to ask?
 
Last edited:
a dangerous question
Unless you strongly push and/or pull on the steering wheel while driving,
most of the forces to be resisted are rotational and lateral,
for which wheelbase mounting is more important.
Of the two above rigs, the upper seems better for steering FFB.
On the other hand, if motion is contemplated,
then running uprights down the sides of main rails will better handle sway,
but 4 corner brackets for each upright would suffice.

Supporting weights is typically less problematic than resisting torques.
 
I have a rig question. Does anyone know if either of these wheel deck upright arrangements is better than the other?
1: attached to the top of the base
View attachment 565095
2: attached to the sides of the base
View attachment 565099
It looks like the second one allows more bolts to be used for increased security, but also that more bolts are needed because there's nothing solid to simply support the weight.
I can see a little more width for getting in anout out with the second one, but it's not clear if that's significant.
Or is this a dangerous question to ask?

I prefer the first style, especially if you use machining for the column profiles. It will be stronger. Furthermore, you can add additional brackets or connection plates to reinforce it even more.
 
I personally would strongly prefer the second solution.

Without having taken measurements I´d guesstimate that the torsional stiffness
(the resistance to the FFB and with that the fidelity of the FFB ) should be much better because the uprights are connected to the complete height of the structure and not "rotating on top" of the profile.

The first one should be fine for a T300, but I wouldn`t use it with a DD.

MFG Carsten
 
From a design/engineering standpoint, the 2nd one is the stronger more solid solution.
It will be stiffer all around than the first one.
 
Last edited:
The uprights side-mouinted on shear plates of the 2nd rig is notably stronger than the bracketed butt joint of the top one. However the wheeldeck solution from the top rig uses shorter spans of profile between attach points and would be the more rigid wheeldeck. Combine the approaches for best of both worlds
 
I haven't been here long and would just like to show my rig I've finished this weekend. I've been sim racing on and off for a long time, but until recently on consoles with Logitech and thrustmaster stuff. After buying a decent laptop last year I found a T150 for $50 so I grabbed it. That was it having, a chance to play pc sims got me hooked completely. Lately work has been very busy giving me heaps of o.t so my wife let me buy some really nice gear. I would have finished last week but my clubsport v3s failed after a month so I ordered heusinkveld sprints and will sell the fanatecs after they are fixed. Here's the rig I made it my self and it works great. Mind you I am no carpenter! That's my 3 year old daughters rig next to it lol.
 

Attachments

  • PXL_20220516_004301822.jpg
    PXL_20220516_004301822.jpg
    508.3 KB · Views: 211
  • PXL_20220516_004248228.jpg
    PXL_20220516_004248228.jpg
    535.6 KB · Views: 204
  • PXL_20220516_004152387.jpg
    PXL_20220516_004152387.jpg
    421.7 KB · Views: 206
DD setup for not a whole lot of money (or space)

Yes I took the plunge on the Cammus wheel base. I was on the fence between DIYing a MIGE setup or the CSL DD when I found out about it. Glad I did because this thing has more torque than I'll ever need and came standard with 6x70mm mounting holes so I didn't have to pay $200 (cough) just to bring my own rim. I'll be 3d printing a flappy paddle gearbox as well to keep costs down.

Oh and yes that is a guitar strap attached to the rig. I'm stuck having to use a desk chair for space reasons, and it keeps me from sliding back under hard braking. You wrap it around the center pole of the chair and put a carabiner on it. A good strap will have virtually no stretch so you can still be consistent with a load cell.
5 months later, how is it holding up? Would you recommend it esp. for a new hobbyists? Cammus quoted my $1100 for wheel, base and pedals shipped to FL. What say you?
 
5 months later, how is it holding up? Would you recommend it esp. for a new hobbyists? Cammus quoted my $1100 for wheel, base and pedals shipped to FL. What say you?
It's holding up great. If you can afford the whole package go for it, but it also works with great with generic aftermarket rims and 3d printed button box solutions.
 
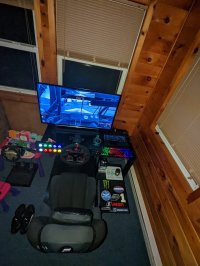
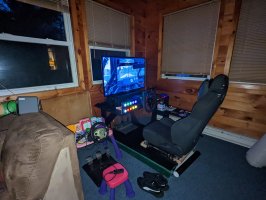
Updated photos of my cockpit. I'm posting just a few of them. The rest are on Imgur. These are the changes:

- New bucket seat: Sparco Grid Q Ski, a bit wider and more comfortable than my previous Mirco. New vinyl decoration on the back.

- Full renovation of my shakers, replacing my old Rockwood BS301 with 5 new Reckhorn 200i, more powerful and of better quality.

- Added a new Fosi Audio TPA3116 amplifier, just to have more individual control over the shakers.

- New 12 cm fan under the shaker below my pedals, now with speed regulation.

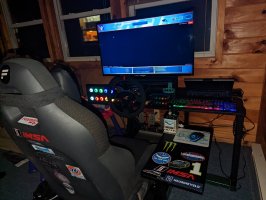
- 3D-printed paddle shifters, improved with resin treatment and painted, installed on mechanisms by Simracing Coach. They are mounted on a custom-designed piece of 4 mm aluminium, cut and bent to follow the shape of my semi-dished steering wheel, so that the paddles face inwards for a better comfort. The electronics go on a separate box, with the cables routed through my steering wheel spacer and using a 8-threaded coiled cable.

- Horn button plugged and operative (using the same coiled cable).

- I removed the old mini button box on the front of my steering wheel mount (aesthetically didn't match the rest and was hard to reach now with the paddles), and replaced with a new one with the same style as my other button box: 3D-printed stand, painted methacrylate front and the same 2 buttons for quick functions.

- Little 3D-printed connection box on the right side of my cockpit, for the USB and audio cables (shakers). The connectors have colour identification labels matching those on the cables under my desk.

- The box holding the power connector has been replaced with a 3D-printed plate, screwed to the profile.

- New board for my pedals, using thicker MDF, now a bit larger, painted in black and with both pedals a little closer to each other to prevent cables joint. The star-shaped locking manual nuts were replaced with T-shaped models (easier to untighten).

- Mouse tray repainted in black.

- Triangular plastic pieces for the corners of my custom mount (to hide the ugly parts where the side clamps attach to the front).

- Old generic racing harness replaced with a Sparco model (6-point).

- Springs for my harness removed.

- Fan cables are now better hidden.

- 2 big brackets added between the columns and the central profile. Not needed, but they add even more strength and rigidity to that part of the cockpit.

- Sparco K-Pole racing boots, with their own bag.

- Sparco Arrow K gloves, featuring external sewing.

Elaphe-cockpit-may2022-001.jpg

Elaphe-cockpit-may2022-002.jpg

Elaphe-cockpit-may2022-004.jpg
 

Latest News

How long have you been simracing

  • < 1 year

    Votes: 279 15.1%
  • < 2 years

    Votes: 190 10.3%
  • < 3 years

    Votes: 191 10.4%
  • < 4 years

    Votes: 139 7.5%
  • < 5 years

    Votes: 249 13.5%
  • < 10 years

    Votes: 219 11.9%
  • < 15 years

    Votes: 136 7.4%
  • < 20 years

    Votes: 112 6.1%
  • < 25 years

    Votes: 85 4.6%
  • Ok, I am a dinosaur

    Votes: 242 13.1%
Back
Top