Valerio Vinassa
PrestoGP Veteran
Hi all
Im start years ago with the costruction of my cockpit( is beauty buy a
farm cockpit but is much more fun to build their own ) step by step this
year I wanted give a little push at my work so I decided to take a
direction of full simulation") .For move the cockpit I search on net and
.For move the cockpit I search on net and
after seeing many beauty cockpit built by large companies found
Frex-GP nice solution and pertinent price but I have another philosophy
must build something but the lowest possible price because for me
everyone can and should be able to build their own,so running here and
there on net found this place "X-Simulator.de" think better place for
build a simulator,can say very technical about
software,electronics,hydraulics ecc...,sometime bit hard understand for
me, but as I finish the race in last position but I finish also here I
continued so must learn What is a diode? or relais I put this diode,
why? I like to understand and know what to do.Ok, stop with this thing
and start with the descriptions.
-------------------------------------------------------------
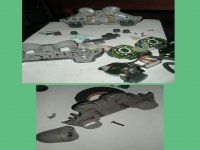
While growing envy seeing various and magnificent mod in this forum an
idea jump I also want more controls on steering-wheel so use an old PS2
game-pad. Disassemble all 7 screws out and 1 srew on electronic near
red led , cut the zone around the two motors (served after) and take a
plate of fiber-glass modeled in contact with game-pad, weld all with
resin do 4 hole at the middle of back-cover game-pad put in holes the
screws and glued to the bottom is necessary so the screw stay hold
when you fix to the plate, for fix to G25 I use a plate 0.8x90x180mm.
of inox steel ( I had one ) , I know Brian "Carbon Fibre" is better
but.....;-).
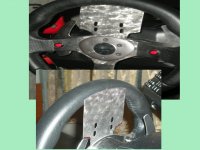
Disassemble the central plate of G25 use the plate as model refer the
6holes on inox and do the holes,reassemble all the inox-plate is between
sponsored cover and steer use marking-pen draw the outline of steer,
put the back cover of game-pad on steer and mark the hole on
inox,disassemble again take the inox do hole marked and with a rasp
ovalised the holes, this is convenient for adjustment assembly,cut along
the line marked before,is better do first the hole because the plate is
more solid and you have more space for fix on workbench.The height of
the plate to get to half the diameter of the outer ring wheel,this is
because the plate on steer and plate on game pad screwing together
function as a grip , will give strength to all.Make sure the screws on
game pad are hold reassemble the game pad mounting the game pad on
steer Now all is done connect with adapter PS2 to usb and you have 20
buttons to set.
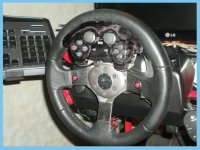
Problems to be solved and impressions:
1)pass through the center of steer is a problem the cable is little bit
large
2)when the G25 is in setting must be taken the cable and weight of
game pad feels also when you drive,I think the next step will be lighten.
3) sure a new paint for buttons.
------------------------------------------------------
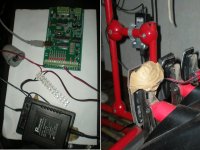
Now simulation:from "x-sim.de" dowln software (is freeware) I bought a
Velleman K8055 card ( around 50,00 Euro,in alternative you can use
LPT1 port or RS232 of PC ),use the motors of old game pad and power
supply from 3V to max 12V continuos and 100mA otherwise burning the
card,the motors of PS2 no needed much Volt, I use 6V.
Connection is easy see the snap "Vell1", black wire negative red positive,
red wire from powersupply go in connection "clamp" ( is write on card )
and another to the motor, black wire go in "GND" on card, from digital
"output 1" (I use this output but there is 8 digital output and 2 anologic)
connect a wire that go to motor.
install the software, make sure they are connected,steer and card,
launch the program "Force-Sender" after open "Force-Profiler" launch
the game when you are on game ( in my case ALT-TAB no have 2 PC )
push ALT-TAB to switch and on "Force-Profiler" press "Start" return
on game and a new world is under your feets eheheheh.I use a simple
motors of game pad but removing this motor you can put actuators or
Hydraulic-pistons,sure with a bit more of electronic.Im a noob in this
adventure and from somewhere must start,now i can managed
"longitudinal acceleration" and "G" effect so when the car begins to slip
you can feel and more slip more shake the motor same thing with the
Longitudinal effect,is fantastic feel hard shake at middle of turn that
bit a bit fades into straight, every software action may be set, more
or minus , long or short.
Problems to be solved and impressions:
next step do a some type of movement, perfect and much easy is buy 2
actuators Euro350/400 one piece aaaaarrrrrrgggghhh!!!!! or use
wiper-motor price Euro 30/40 max from old car of junkyard, another
opportunity that give the software is exit for gauge.For connect more
motors or with more power is needed relais for a correct connection
between new motor and Velleman card so supply in this case is free in
Voltage and Ampere.
its all for now, if someone like do someting like this Im here.
C U GUYS
Im start years ago with the costruction of my cockpit( is beauty buy a
farm cockpit but is much more fun to build their own ) step by step this
year I wanted give a little push at my work so I decided to take a
direction of full simulation
.For move the cockpit I search on net and after seeing many beauty cockpit built by large companies found
Frex-GP nice solution and pertinent price but I have another philosophy
must build something but the lowest possible price because for me
everyone can and should be able to build their own,so running here and
there on net found this place "X-Simulator.de" think better place for
build a simulator,can say very technical about
software,electronics,hydraulics ecc...,sometime bit hard understand for
me, but as I finish the race in last position but I finish also here I
continued so must learn What is a diode? or relais I put this diode,
why? I like to understand and know what to do.Ok, stop with this thing
and start with the descriptions. -------------------------------------------------------------
While growing envy seeing various and magnificent mod in this forum an
idea jump I also want more controls on steering-wheel so use an old PS2
game-pad. Disassemble all 7 screws out and 1 srew on electronic near
red led , cut the zone around the two motors (served after) and take a
plate of fiber-glass modeled in contact with game-pad, weld all with
resin do 4 hole at the middle of back-cover game-pad put in holes the
screws and glued to the bottom is necessary so the screw stay hold
when you fix to the plate, for fix to G25 I use a plate 0.8x90x180mm.
of inox steel ( I had one ) , I know Brian "Carbon Fibre" is better
but.....;-).
Disassemble the central plate of G25 use the plate as model refer the
6holes on inox and do the holes,reassemble all the inox-plate is between
sponsored cover and steer use marking-pen draw the outline of steer,
put the back cover of game-pad on steer and mark the hole on
inox,disassemble again take the inox do hole marked and with a rasp
ovalised the holes, this is convenient for adjustment assembly,cut along
the line marked before,is better do first the hole because the plate is
more solid and you have more space for fix on workbench.The height of
the plate to get to half the diameter of the outer ring wheel,this is
because the plate on steer and plate on game pad screwing together
function as a grip , will give strength to all.Make sure the screws on
game pad are hold reassemble the game pad mounting the game pad on
steer Now all is done connect with adapter PS2 to usb and you have 20
buttons to set.
Problems to be solved and impressions:
1)pass through the center of steer is a problem the cable is little bit
large
2)when the G25 is in setting must be taken the cable and weight of
game pad feels also when you drive,I think the next step will be lighten.
3) sure a new paint for buttons.
------------------------------------------------------
Now simulation:from "x-sim.de" dowln software (is freeware) I bought a
Velleman K8055 card ( around 50,00 Euro,in alternative you can use
LPT1 port or RS232 of PC ),use the motors of old game pad and power
supply from 3V to max 12V continuos and 100mA otherwise burning the
card,the motors of PS2 no needed much Volt, I use 6V.
Connection is easy see the snap "Vell1", black wire negative red positive,
red wire from powersupply go in connection "clamp" ( is write on card )
and another to the motor, black wire go in "GND" on card, from digital
"output 1" (I use this output but there is 8 digital output and 2 anologic)
connect a wire that go to motor.
install the software, make sure they are connected,steer and card,
launch the program "Force-Sender" after open "Force-Profiler" launch
the game when you are on game ( in my case ALT-TAB no have 2 PC )
push ALT-TAB to switch and on "Force-Profiler" press "Start" return
on game and a new world is under your feets eheheheh.I use a simple
motors of game pad but removing this motor you can put actuators or
Hydraulic-pistons,sure with a bit more of electronic.Im a noob in this
adventure and from somewhere must start,now i can managed
"longitudinal acceleration" and "G" effect so when the car begins to slip
you can feel and more slip more shake the motor same thing with the
Longitudinal effect,is fantastic feel hard shake at middle of turn that
bit a bit fades into straight, every software action may be set, more
or minus , long or short.
Problems to be solved and impressions:
next step do a some type of movement, perfect and much easy is buy 2
actuators Euro350/400 one piece aaaaarrrrrrgggghhh!!!!! or use
wiper-motor price Euro 30/40 max from old car of junkyard
, another opportunity that give the software is exit for gauge.For connect more
motors or with more power is needed relais for a correct connection
between new motor and Velleman card so supply in this case is free in
Voltage and Ampere.
its all for now, if someone like do someting like this Im here.
C U GUYS