My new racing set up.

Here's my brand spanking new racing set-up i've just purchased. Now I'm stoney broke, still crap, but thoroughly enjoying myself.

My racing set-up.jpg
 
It's definitely worth it in my opinion, Allan.

Tip1 - overlap (physically) the bezel of your screens. If each bezel has, for instance, 1,5cm, without overlapping you will have a gap of 3 cm (2x1,5cm) between each display. If you overlap them, you reduce the gap to half.
Tip2 - after setting bezel compensation, you desktop ill be set at the new bezel compensation resolution. I don't want that, so I go to Windows screen resolution and set 5760x1080 again. Then I go to GTL Configuration and only there I set the bezel compensated resolution (next one after 5760x1080 32 bit).

My bezel compensated resolution is 5940x1080, but that depends on the size of the bezels of the monitors you're using, the angle between them, and your position/distance to monitors when you set bezel compensation. Therefore, each scenario will end up with a different bezel compensated resolution, for example 5960x1080 or 5990x1080.

Overlapped bezels:

cfic.jpg
 
Last edited:
Now the button box looks like this, with new stickers:

button_box.jpg

Buttons are, from left to right and bottom-down: Brake Bias, Ignition, pit speed limiter, starter, pit request, mirror, hud, cycle in car lcd display views, dials and gear display on screen.
It's home made, I've bought a 8 euros joystick, used the inside circuit board and replaced the original buttons for those, by soldering wires. In windows, it is recognized as the original joystick with no drivers necessary. Then just go in game and map the buttons to the functions you want. The box was bought in an electronics shop, and it's na universal connections box (around 4 euros). the whole thing, with the buttons (those were the most expensive buy) should be around 30 euros.
Here's some pics of the process:

diyusbbuttonboxraw007.jpg

diyusbbuttonboxraw008.jpg

diyusbbuttonboxraw002.jpg

diyusbbuttonboxraw005.jpg

diyusbbuttonboxraw003.jpg
 
@Andrew James - Its really simple - Get a USB Joypad - make sure the joypad works with your pc and that all buttons function - make sure it works and that buttons can be mapped - while your wheel/controllers for driving are plugged in and operational - no use going to all that trouble if it won't/doesn't work in the first place.
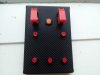
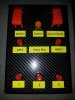
Next make a note of what buttons press which numbered buttons in Game Controllers on your PC - this helps because you can wire your box so that the numbers follow on from each other - ie, On my box the Red top left button is Button 1, The large Start button is 2, Green 3, blue 4, The first toggle switch pulled left is 5 right is 6 and so on. the bottom 4 buttons(red) on my box are Up, down, left right - which means they act as multiple press buttons, I understand you can switch this repeat rate off in windows somewhere - but I use them for seat adjustment - use them as they are for say brake bias or lights and it will cause the button to be pressed multiple times meaning you can't definitely switch lights on or off (if that makes sense)
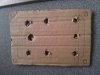
Next pull the controller apart - what your looking for is circuit boards that are made of metal so you can solder to them - apparently some controllers don't have boards you can solder to (so I have been told).
Next you need to solder a wire to each side of the contact - try one at first - then if your confident - and making sure NO CONTACTS ARE BRIDGED you can plug the controller into your pc - touching both ends of the wires you soldered to the board should have the effect of pressing the button that corresponds to what you just soldered to. Thats just a test to make sure you haven't already fried your board.
If you logically follow the tracks on the board you will see that some will share the same 'earth' tracks meaning you can solder on wire and then connect off that to the 'earth' on your switches (saving fiddly soldering)
Don't use too high a powered solder iron or you can melt the tracks or even the chip as heat transfers through the board into the components.
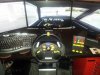
Remember each button on the controller, as far as windows is concerned is simply a button - that applies even to the start,and select buttons if you controller has these - so can be attached to a button on your button box.
Ideally you should avoid programmable pads or pads with turbo modes etc because if you somehow end up programming a button it may cause major headaches getting it unprogrammed once you no longer have the casing that the board came in!
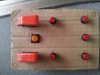
Buttons should be PUSH TO MAKE type and NOT- ON/OFF switches, as you want contact to only be made (the two wires joined together) when you are actually pushing the button - That is important PUSH TO MAKE - (push to make contact)
Thats a brief how to I hope it helps you or others as many of us have old controllers lying around maybe unused or even broken and its great to get use from something that may well otherwise end up in landfill.
 
Super, Dave! Thank you thank you! When I have a spare few quid hanging about, I am definitely going to try this. If successful, I may go on to make something similar for when I am using my flight sim set up.

Really, excellent, thanks for the help.
 
rite guys..UPDATE..after some great help from @Antonio Tavares and @Dave Flower i,ve made my first button box..:):thumbsup:.so heres a few pics, and already on with the second 1 :rolleyes::D:laugh:..and the set up as it is now...:sneaky:
 

Attachments

  • 534372_10151783537684372_2041649140_n.jpg
    534372_10151783537684372_2041649140_n.jpg
    143.8 KB · Views: 237
  • 1375130_10151783537864372_1045654033_n.jpg
    1375130_10151783537864372_1045654033_n.jpg
    89.2 KB · Views: 238
  • 1468679_10151783725544372_1690225635_n.jpg
    1468679_10151783725544372_1690225635_n.jpg
    49.7 KB · Views: 250
  • 1394338_10151796359579372_959018819_n.jpg
    1394338_10151796359579372_959018819_n.jpg
    119.8 KB · Views: 243
  • 969413_10151796346904372_2064147627_n.jpg
    969413_10151796346904372_2064147627_n.jpg
    83.5 KB · Views: 247

Latest News

How long have you been simracing

  • < 1 year

    Votes: 356 15.7%
  • < 2 years

    Votes: 249 11.0%
  • < 3 years

    Votes: 243 10.7%
  • < 4 years

    Votes: 178 7.8%
  • < 5 years

    Votes: 302 13.3%
  • < 10 years

    Votes: 259 11.4%
  • < 15 years

    Votes: 166 7.3%
  • < 20 years

    Votes: 127 5.6%
  • < 25 years

    Votes: 99 4.4%
  • Ok, I am a dinosaur

    Votes: 293 12.9%
Back
Top