Mobile Driving/Flying Cockpit with Motion and Tactile ( Build )

RCHeliguy

Premium
Table of Contents:

It was suggested that I created a dedicated thread for this build so it wouldn't be buried in another thread and because it might be of use to others.

I had a few goals with this build.
  1. Mobility. I needed to be able to roll it into the corner of my room when not in use or into a storage room if it needed to be out of the way.
  2. Quick setup. I didn't use my last rig very much because it was a pain to setup.
  3. Support a Motion System
  4. Support Tactile feedback
  5. Support both Driving and Flying
  6. Rigid to support any hardware I might want to use in the future.

Starting Point
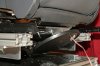
A little over a year ago I built the following using a WheelStand Pro and a passenger seat out of a wrecked 2006 Volkswagon Passat. I highly recommend this seat. It's fully manual with height adjustment, recline and lumbar support. It's attached to the car with only 4 bolts and has solid flat slides. It weighs 45lbs with the slides. I only had to cut off one metal peg under the right track with my Dremel cuttoff disk. I picked the passenger seat because it was less worn than the drivers seat, but the passenger seat having the slides offset to the right worked well later on.

newcockpit_2912.jpg


The seat was shared between these two rigs. Fully lowered the seat was more reclined and worked well for driving and in the highest position the seat base is more level providing a better position for flying.
flightrig_2924.jpg


The flight rig side of this worked well, and I logged many hours in Eve Valkyrie using this, but the driving side was hard to move, hard to setup and not nearly rigid enough. I got tired of having my shifter moving around and being able to pull my wheel out of position and losing FFB detail to an unstable mount.
 
Last edited:
I decided to start with a Sim-Labs P1 Cockpit because it is rigid enough to handle anything, had some nice fittings for the Controls I had and had room to fit a Next Level Racing V3 Motion system.

Nov 5th, 2019 update: Use a little grease on the parts that rub and operation is much smoother!
It will also wear smoother over time. 3 of my 4 are currently smooth as silk. I need to work on the 4th a bit.


Goal 1 Mobility.
I started with a set of these retractable casters.
https://www.amazon.com/gp/product/B00SX3T2LO/ref=oh_aui_search_asin_title?ie=UTF8&psc=1

Out of the box they don't bolt up to 8020.
I drilled out the existing top hole to 8mm and drilled another hole 40mm lower.
casters.jpg

In addition, the second hole caused clearance problems for stock 8mm bolt heads when the wheels retracted. So I got these 16mm long button head bolts to allow them to function properly.
https://www.amazon.com/gp/product/B01F7OKCRY/ref=ppx_yo_dt_b_asin_title_o07_s00?ie=UTF8&psc=1

These casters are rated for 100lbs each and have been working well to easily move my rig out of the way when it isn't in use. This was a VERY important feature for my wife. I also enjoy room scale VR so I can roll the rig out of the way when I want to play In Death or Beat Saber :)
stowed_3990.jpg


This is how the caster looks in its final form. The tabs on these corner braces add a lot of rigidity.
I used these 8mm locknuts.
https://www.amazon.com/gp/product/B012T3GYVE/ref=ppx_yo_dt_b_asin_title_o06_s00?ie=UTF8&psc=1
castersFinal_3964.jpg
 
Last edited:
I'm including links to many things I ordered just for reference and not because I'm trying to shill for anything.

Having a drill press is something very useful for some what is coming.
Having some decent drill bits is also helpful.

I got these reasonably priced jobber bits before I started.
Some of the odd looking sized bits are specifically undersized for use tapping threads.
https://www.amazon.com/gp/product/B07FF9DXX5/ref=oh_aui_search_asin_title?ie=UTF8&psc=1
I also got these bevel bits.
https://www.amazon.com/gp/product/B01LX87BDA/ref=oh_aui_search_asin_title?ie=UTF8&psc=1

Working with aluminum is not much harder than working with wood. Aluminum drills easily with decent drill bits and a bit of WD40 as lubricant.

Drilling steel like for the casters above is much harder to do by hand and you will want a thicker cutting oil.

I start by marking a center point in masking tape and then striking a punch with a hammer to get a starting point before drilling.
 
Goal 2 Quick Setup

Now that I can roll my rig into the center of my VR area quickly, I want to be able plug it in quickly and with a bunch of transducers, USB ports and power cables there is a lot of wiring to manage.

I got some banana plugs like these for quick connect of the transducers.
https://www.parts-express.com/compression-style-banana-plug-2-pair--091-3622

and binding posts for them. I had some 1/4 ABS laying around that I drilled and labeled for this.
https://www.parts-express.com/gold-dual-binding-post--091-335

tactileplugs.jpg


I use Flexo F6 to run my wires. This stuff is great. You can stuff your wire into it, open it up and reuse it. I like it in 3/4 and 1/2" sizes.
https://www.amazon.com/Techflex-Split-Sleeving-Ft-Black/dp/B007VSTFMI

The great thing about routing wires into F6 is that you can add wires into it and pull them out at any point. because of how it wraps.
flexoF6_3965.jpg


I got a pile of these thin velcro ties a while back for wires under my desk.
https://www.amazon.com/gp/product/B001E1Y5O6

They can be pulled through the slots in the 8020 wire management clips, cut to size and then you can open them up any time you want when you change things. I like them much better than zip ties for this.
velcrowireguides_3966.jpg
 
Goal 3 support a Motion System

Sim-Lab has a bolt kit to mount the NLRv3 to the P1 Cockpit, however the unit ends up pretty high and the seat ends up very high as well. I think this mount would be perfectly fine on some of their other cockpits, but for the P1 this would mean lifting your pedals which aren't designed for much vertical range. The wheelbase also ends up at it's highest maximum extend at least for me. Technically you could always buy some longer 8020 material, but I saw a number of other people lower the NLRv3 into the frame using 1/4 thick angle aluminum.

I got mine from Stock Car Steel. They are reasonably priced and deliver very quickly.
https://stockcarsteel.com/aluminum-angle-6063-4-x-2-x-1-4

Warning these are rough cut! Mine came with sharp burrs, uneven edges and were oily. If you want something clean and cut perfectly, McMaster-Carr can help you for a higher price. Just remember Aluminum cleans up easily with 220 grit sandpaper and a bit of degreaser and elbo grease.

anglemounted.jpg


There is an image inside the Next Level Racing documentation with the Center positions of the bolt holes.
These holes either need to be drilled oversized or very precisely. I chose very precisely and drilled 8mm holes for 8mm bolts. Many people just drill 10mm holes to give them some wiggle room.

dimensions.jpg


This is how I mounted my seat on the seat mover.
NLRV3SeatMount.jpg


In my first attempt I didn't have enough clearance and the bolts were touching.

IMPORTANT NOTE: Use the software diagnostics and move your motion system through it's full range of motion before trying to use it!

interference.jpg


Without the bolts I just barely had clearance.
fullright.jpg


So I ordered new bolts and counter beveled for more clearance.
Counter beveled 8M x 16mm SS bolts
https://www.amazon.com/gp/product/B078YY765J

You can also see that I drilled new holes a bit higher than my first holes to give me a comfort margin for flex etc.
recessedredrilled.jpg


It looks much cleaner with the recessed bolts.
recessedboltsinstalled.jpg


BTW I don't have a full machine shop by any stretch. This is the first time I've worked with aluminum.
Below you can see some files and sandpaper and just above you can see a reasonably clean finished result.
aluminumAngleDrilled.jpg
 
Last edited:
Goal 4 Tactile Feedback is almost done for now, but in a state of flux.

Peddle Transducers
I wanted to isolate the transducers from the rigid frame without making the brake mushy.

I ended up with this for my current Fanatec CS 3.0 pedals, but by design this will also handle a set of Heusinkveld Sprints that I hope to add in the near future. In the future, my feet would rest on the vibrating plate, but the pedals would be hard mounted to the frame.

Disclaimer: I am not a transducer/tactile expert like some others on this forum, but I am happy with the results.

I got a 5 pack of these 8mm thread isolators and mounted them to angles. https://www.amazon.com/gp/product/B00F7EBR6U

These required button head bolts to have clearance.
transducermountTake2a.jpg


I added 1/4 aluminum shims to give the transducers room to vibrate.
The rear mounts for the pedals have a rubber bottom that allows for a little motion at the back but not much. The vibration is mostly in the front.
fronttransducers.jpg


For the seat I put another Aura 2B in place after trying a TS209 and not being happy with it.
SeatTransducer_3983.jpg


I tried out a TS209 in this position, but it was noisy and didn't seem to pack the same punch.
EngineVibetranducer.jpg


I'm currently using the built in Tactile support from the NLR motion software that will support a large number of channels. It's not advanced but it's working reasonably well. I have a copy of SimVibe that hoping to have working with this soon. I've used SimVibe in the past and may try other software.
 

Attachments

  • seatTransducer_3944.jpg
    seatTransducer_3944.jpg
    262.8 KB · Views: 682
Last edited:
Goal 5 Support Driving and Flying

I removed the bottom plates from my Thrustmaster A-10 Warthog stick and throttle and bolted new bases to them. The stick also has an extension tube that I ordered with the Crosswinds pedals. I had some African Purpleheart that I could never find a use for, so I used it for the wood.

FlightControls_3947.jpg


There is a set of rails in front of the driving pedals that is partially covered when in car sim mode.
The car pedals slide back first.
The Flight pedals secure to this using the screw knobs.
https://www.amazon.com/gp/product/B00KHTRNCM
FlightPedalSupport_3960.jpg


LotsofPedals3956.jpg


The chair lifts up into flying mode and the Flight stick and Throttle bolt in place.
Notice there is a T-nut acting as a stopping point so I can put the Throttle exactly where I like it quickly and repeatably.
underchair_3961.jpg


The Stick and Throttle bolted in place.
stickmount_3957.jpg


I also remove the H-pattern shifter so there is no motion interference with the seat lifted.
flightmode_3953.jpg


It takes about 5 minutes to switch between driving and flying mode.
There is a T-nut stop for the driving pedals, so they slide forward to the same place and a T-nut stop for the H pattern shifter mount.
drivingRigGettingCloser.jpg
 
Right now, I have a button box ordered, another transducer arriving Monday and a little more clean up left to do and then it will be "finished for now". Waiting for Heusinkveld to get caught up with demand and waiting to see how well received the Fanatec DD is.

I use VR exclusively, so there are no triple screens coming and I'm enjoying how the rig works now which is all that matters. Dirt Rally has been amazing with the seat mover and I've been spending some time in DCS World. Lots more to play with.

I hope this is helpful to someone. I know I'm having a lot of fun with it!

On that note, this is a video taken before I had the transducers mounted the first day I got my seat mover working. It wasn't done yet and I've tweaked the software settings since then, but it was still a lot of fun which is all that matters :)

 
Go Speed Racer Go!
GoSpeedRacer.jpg

I did a bit more cable management and the supervisor watched my every move. When I was done, so was he. I ended up putting the Aura back on the Wheel, Shift cluster. And I've finally found a decent mount to get an Aura back under the seat. I was not happy with the how the TS209's worked or sounded.
 
I lightened this picture up a lot so the cable routing is more visible.
I'm pretty happy with how the cables are routed and supported at this point.

I have the NLRv3 power cable in an 8020 channel, but put a sheath around it at the end to protect it from the sharpness at the edge. Still waiting on the button box, but I have a USB cable routed and waiting. There is a little strap at the very front to hold all the cables while I move the rig so the don't get caught on anything.

CableLayout_3984.jpg
 
All nicely done, @RCHeliguy !!

What's your take on the isolators you used for your pedal setup? I've been considering those.

So far so good, but to be fair, I'm still figuring things out.

If I mount Heusinkveld Sprints, I will likely remove two of the front isolators and have the plate supported in a tripod arrangement with one centered in front and two in the back, since the pedals will be mounted directly to the pedal frame completely separately and I won't worry about the brake getting squishy. This would put my heels directly on the transducer plate and should allow a lot more to come through and have no way to interfere with braking.

With the 5 isolators mounted like I have them under the Fanatec CS 3.0 pedals, the brake is pretty solid, but I'm sure a lot of the vibrations are dampened out as well. I can feel the transducers well, but any Left Right separation is lost between the 5 dampers, transducer plate and then the whole pedal frame bolted to that.

I'm still trying to get my tactile software setup and I've been swapping around transducers. I just went back to all Aura's and have two TS209's that will likely collect dust now.

The NLRv3 tactile software is by far the easiest and most intuitive to setup and works OK. I haven't felt much in the way of left vs. right separate from it yet.

I'm running a hybrid setup. L + R front and then seat and Shifter/Wheel

SimVib has a Chassis Mode but it assumes all 4 channels are at the 4 corners. Then it has an Extension Mode but there is only a Front and Rear bumps / Texture input because it expects a single transducer on the pedals and on the seat. In order to use both chassis and Extension mode I need two separate audio cards, so I have a compromise either way.

I've been trying Shaker in SimHub, but haven't gotten that where I like it either. It seems to assume a 4 corner setup, but I don't know it well yet either.

For now I may just use SimVibe in Extension mode and have merged L/R front channels.
 
You can definitely customize SimHub's Shaker to direct any effect to any particular unit and they don't have to be in a l/r layout. I have two LFEs mounted one in front of the other. So, for example, I can direct l/r road bumps to one while gear change and RPM go to the other. Select the multiple soundcard option and you will see all the effects offered for multiple audio channels. You can turn the effect on/off per channel.
 
You can definitely customize SimHub's Shaker to direct any effect to any particular unit and they don't have to be in a l/r layout. I have two LFEs mounted one in front of the other. So, for example, I can direct l/r road bumps to one while gear change and RPM go to the other. Select the multiple soundcard option and you will see all the effects offered for multiple audio channels. You can turn the effect on/off per channel.

That was it. LOL! I felt completely trapped by what it came up with before I changed that setting.
Thanks!

Edit: I've made a decent amount of progress with Shake It now. Not bad! Seems pretty well featured. I've got plenty of tactile coming out of the seat now with the Aura mounted there. Actually it seems like I've got quite a bit more power than I need and I've got the amplifier set at 50 volume all channels and then I've pulled back inside the Shake Settings.
 
Last edited:
I should probably include this. I've referred to this as my "Ghetto" amplifier. I have to admit really looks out of place with my new cockpit, but it works great, cost me under $100 to build and drives 100W into 4 channels with no fuss and has no problem driving 4 ohm transducers.

It has plenty of power to drive the four Aura 2B transducers I'm using.

transducerAmp_3986.jpg

It's a class H 400W powersupply driving a 4 x 100W class D amplifier.

Major Parts for this if you want to build your own:
  • eBay: 400W 11A 36V AC to DC Single Output Switching Power Supply SMPS S-400-36 For LED $23
  • Parts Express: Sure AA-AB33184 4x100W TDA7498 Class-D Amplifier Board $49.50
  • Parts Express: Axxess AALC 2-Ch Remote Level Controllers 2 x $7.69

The Class D amplifier wants 39V and the PS had a pot that could be adjusted to turn the 36V up to 39V.
 
Last edited:
OK, here is a video with full transducers and a screen.
FYI, the view in VR is larger than what is showing on the screen, but at least you get a reference point.

You can see that it is natural to lean into the turns so I'm still not using any VR compensation for the motion.

 
Last edited:
The Derek Spears P1 Button box arrived today.
buttonbox_3995.jpg

This is the RAM mount solution that I ended up with.

A combination of this is the single bolt attachment point designed for a motorcycle, but it works well in this application. https://www.amazon.com/gp/product/B0012TRIY4

And this double ball mount. https://www.amazon.com/gp/product/B000G1ENQA

The notes on this button box mention that it is pre-drilled for the two hole standard RAM mount and it is. There is a left and right mount point off center at the bottom. Unfortunately the plastic on the back of the box flexes quite a bit and I felt the need to open up the box, add another hole and through bolt it as shown.

There are up/down momentary switches at the top of the box and the plastic box flexed way too much when using the bottom horizontal mount holes.. With the vertical bolt pattern mount and a larger surface area the box is more stable. There is still a bit of flex in the RAM mount system, but it isn't bad.
rammount_3996.jpg
 

Latest News

How long have you been simracing

  • < 1 year

    Votes: 222 14.7%
  • < 2 years

    Votes: 154 10.2%
  • < 3 years

    Votes: 150 9.9%
  • < 4 years

    Votes: 115 7.6%
  • < 5 years

    Votes: 216 14.3%
  • < 10 years

    Votes: 179 11.9%
  • < 15 years

    Votes: 118 7.8%
  • < 20 years

    Votes: 80 5.3%
  • < 25 years

    Votes: 65 4.3%
  • Ok, I am a dinosaur

    Votes: 209 13.9%
Back
Top