Handy track building hints...

This thread can be for handy track building hints.

My first one, after spending 4 hours wondering why my movable objects were not working is...


Make sure you delete the trackdir\cache\trackcollision.bin file when you make updates to the main surfaces.

I have just had cones falling through my track and no idea why, but the above file acts as the lookup for the physics for the movable objects.

This file is generated the first time the track is loaded, so if you are working slowly on adding parts, this file needs removing often to make sure it is regenerated to reflect the new track layout as you add parts!


Dave
 
Very good advice Mr Whippy. Another one that can come in handy is this.. make a plan before you start, otherwise you can end up with a total mess that cannot be completed. Also, play around with the models until the settings look and feel right, sometimes altering the plan is better than sticking to it. Just my 2c and you are very welcome ;)
 
Movables, (cones, barrels etc.) can have a trigger located anywhere on the track to reset them, great fun knocking them about and them putting them back to do it again. My Surfaces and sounds track has a big cube and a bunch of cones with a trigger to reset.

You can get it in the download thread to see how it is done.
 
That sounds like a good plan Boomer, thanks for that!

I need to set a trigger for my elk test and slalom layouts, so when you drive round they can reset!? :D

Dave
 
Window reflection shader (non-cg)

AFAIK there is no decent window reflection shader for no-cg Racer,
so I have been testing some ideas. This is the best I have been able
to come up with.

A problem with earlier window reflection shaders is that the reflection
is applied to the whole texture, and not just the glass. This makes
the shader look fake and bad. So I came up with a method to reflect
only the glass, leaving the other materials non-reflective.

Consider the two images. The first (.tga) is the "main" texture that is
applied to the mesh. The second (.tga) is what I prefer to call an "overlay",
a layer1 shader that is a "cut-out" of the windows in the main texture.
These "cut-outs" have then been manipulated, lightness is improved,
contrast lowered, and saturation set to a minimum. The amount of
reflection is adjusted by manipulating the lightness of the shader, i.e.
the lighter it is the more it reflects. For dark windows lower the value
of lightness and you get a nice and dark and yet reflective window
which is perfect for old houses, factories and other more "obscure"
facilities. ;)


The layers are then divided in three sections, layer0=$trackenvmap -
layer1=window cut-out - layer2=main texture. Then it is all put together
in the shader_ section of track.shd like this:

Code:
shader_msc_bl35
{
  layer0
  {
   ; env reflection
   map=$trackenvmap
   texgen_s=reflection_map
   texgen_t=reflection_map
   texgen_r=reflection_map
   emission=0.5 0.5 0.5 0.5
   shininess=120
  }
  layer1
  {
   ; window reflection only
   map=msc_bl35_shader.tga
   emission=1 1 1 1
   blendfunc=filter
  }
  layer2
  {
    ; main texture
    map=msc_bl35.tga
    blendfunc=one src_alpha
    shininess=120
    mipmap=0
    reflection=1
  }
}

What it looks like? Well. here it is "in action"..

Here is another with the same principle applied to some1's "Factory Test Track".

Thanks for reading, and I hope someone finds this useful :)
 
Well, it's a bit awkward method imho.

I would just use one main texture with alpha color, where the windows have black alpha and the rest is white. Then in layer0 I would use trackenvmap and layer1 the main texture with blending.

Something like this...
Code:
shader_building_windows
{
  layer0
  {
   map=$trackenvmap
   texgen_s=reflection_map
   texgen_t=reflection_map
   texgen_r=reflection_map
   emission=0.5 0.5 0.5 0.5     
  }
  layer1
  {
    map=building_main.tga
    blendfunc=blend
  }
}

Code from my head, didn't test it...

Or isn't it really the same result?

EDIT: It would be better to mabye use a custom texture for the envmap as the live envmap is rendered from the car's point of view.
 
Should you use emission on the envmap? Pumping it up seems the wrong way to go.

Remember on many LDR (old non-cg) tracks, the skies are under-exposed. I'd pump the white up on the sky texture to fake the over-brightness of it, which also reduces the blue saturation which hurts the realism of many pre-cg tracks with deep dark blue reflections in the car from the sky :(

So, add 33% or so to the sky brightness (edit texture directly?), rather than adding 50% emission to just the glass reflection shader...

Imo

Dave
 
@some1: Thanks for the advise. Will try it later. I still think the method is useful though, for
example if you use non-alpha compliant formats. It is of course possible to convert to tga, but
it might be a waste of space in some aspects. This method lets you assign sort of an "external
alpha", if you get my drift.

@Mr Whippy: emission is only used here for the window shader. If you lower the brightness
value and still have emission it gives a nice effect, as I did with FTT, but it did not show on the
screenies.

Thanks for advice though, I really appreciate it! No need to do things the "awkward" way if
there is a better way ;)
 
Well, it's a bit awkward method imho.

I would just use one main texture with alpha color, where the windows have black alpha and the rest is white. Then in layer0 I would use trackenvmap and layer1 the main texture with blending.

EDIT: It would be better to mabye use a custom texture for the envmap as the live envmap is rendered from the car's point of view.

You are right. It is better to do it your way - for CG. Why? Because the tracked generated track.shd
does not understand the layers in the nocg shader and puts a "dummy" texture in its place. If it was
done the way you suggest then tracked would make a correct shader and I would not have to do it
all over again. So, thanks for the tip!

Since my ATI x600 is able to do SM2 shaders, and since Ruud has greatly improved ATI support,
I have started to look more into CG, and I admit, once you have been able to use CG there is no
turning back. It is like a drug. Finally I understand what the entire conflict about cg/nocg has been
about, and I must agree with the CG users, it is far superior. Not only because it looks better, but
because it takes stress off the CPU and loads the GPU instead.

This will of course have a great impact on my future tracks, as you might understand, because CG
gives me a greater range of shaders to play with than the old shader system - which is not dead as
I first thought, but much of the old shader system can be applied to the cg as well.

Ok, sorry for the long post.. it is strange though, that after being such an advocate for nocg I have
eventually shot myself in the foot.. I have turned around, I have seen the (cg) light.. and my tracks
will be converted.

With humble respect.
 
Ok, time to bump this thread too.. not that I /have/ any tips, but need some, and thought
that the answers (if any) might be helpful for everyone.

1. Texture rendering issues. Have asked about this before. If I make a texture "bigtile.tga"
and have two entries for it in the shader (shader_bigtile and shader_bigtile2) with different
values, is the texture then loaded twice? What effect would this have on performance?

2. Transparency issues. If a texture (like low grass f.ex.) is 512x512 and only the lower
half (256x512) is grass and the rest is transparent, does the renderer do more work
than if cutting the texture to 256x512? I.e. does the transparency have an impact on FPS?
It might seem so as tracks that are loaded with transparent textures with trees and grass
seem to get a lower FPS (Factory Test Track and Swiss Stroll are good examples of this..)

Edit: found this (among many others on the net) about transparency:
"With transparency, displaying routine has to sort polygons in the right order from the
farthest and the nearest to camera. That's done by cpu, not by gfx card."
Also, everything I read about the theme is that transparency is a CPU killer. So, the
larger the area, the more workload on the CPU, thus giving less FPS. So I will have
to do some optimization on my textures.


3. Bumpmapping. Does the renderer benefit from bumpmaps that are smaller than the
texture they bump? Say a texture "stonewall.tga" is 1024x1024, would it benefit from
using a bumpmap that is only 128x128? (I think it might..)

Edit: Reducing the size of the bumpmap helps. An image that is 1024x1024 can
have a bumpmap that is 128x128 as it is not the size that matters but the proportions.
I.e. an image of 512x256 can have a bumpmap sized 128x64 and so on. It even
smoothes the edges, so you actually gain from using smaller bumpmaps.


Any answer at all is appreciated.. even off-topic.. any hints of life.. as this forum seems
pretty dead and dry at the moment.. ;)

TIA
 
@ the first question, I don't know an answer, but it can't hurt to structure the shaders with that in mind - eg. if two materials share the same texture, use

shader_bigtile2~shader_bigtile
{
; only things that are different, e.g.
emission=1 1 1 1
}

I have this kind of thing on the Aronde's wheels - the entire thing is a single texture but only some is chrome. The ~references copy everything that's not explicitly replaced, so it gets layer0, cg shaders and so forth directly. In the case of chrome it's only changing the fresnel properties.

Think I did something similar when I was adding cg shaders to some tracks, all that's really in each shader is the primary texture, the rest just links back to a basic "grass" or "signs" shader etc.
 
@stereo: Thanks. This is good news. Did not even think that it was possible to call
the shader entry like that (only used ~vf_whatever). And of course, did not remember,
a texture is reused (called) several times when using multi-image textures. Will try to
make some new and optimized shader entries for the track based on your very useful
comment! :)
 
Using those nested shader entries won't alleviate the potential problem that a texture is loaded twice. All Racer does is expand those sections out when it reads them... so it's essentially like that just for making your life easier when editing/making consistent.

I'd like clarification on that issue though. Reference it many times, is it loaded many times? Hmmmm....!

Dave
 
I'd like clarification on that issue though. Reference it many times, is it loaded many times?
Last time I checked only the first entry is loaded if multiple of the same variable are specified, like in .ini's

Nesting is handy when u have a large amount of different shaders requiring identical settings, like inserting alphafunc into transparent shader levels, saves large search/replaces and less chance of typo's creeping in.
 
Hmmmm, another one I'm thinking about.

Grass scatter objects are quite popular these days, filling in the sides of the road with small plants, grasses, and so on.

Each one only needs a texture about 512x64 or so...

Which is more efficient. Have ONE shader for ALL grasses, and ONE texture, and then have one combined grass texture, maybe 512x64 built up to make 1024x1024 (that would give 16 images of grasses/plants in one 1024x1024 texture)

Is it best to have one big texture and a simple reference for all of them via one shader and texture, or have them all split up?!

Then you can just reference this main shader and have a few variances if you want, say in colour or what have you.


Hmmm

Dave
 
I don't think it matters much either way, I've tried testing along those lines before, but made little difference fps wise.
all the textures get loaded into a buffer somewhere, and get referenced by offset locations; so whether they start out as seperate images or one larger one, they still end up the same.
 
Hm. Interesting. I have been working with textures a lot lately, and in Zmodeler it is often not enough to define the texture file once, but you must do so for every instance where it occurs - IF the models are separat. But after redoing the surfaces I discovered that I could keep roads, terrain and even ponds in the same basic surface (by moving vertices), and even though it was rather large, all I had to do was to assign UV to the various locations, and after selecting the area(s) assigned the texture and reduced the number of references by many.

So instead of having seperate roads, terrains and ponds, with multiple references (as seen in Zmodeler), I now had 3 textures that completed the entire area. I think that improved performance quite a bit. (This seems to be possible only where the mesh is one connected dof, and not several dofs - of course..)

Another thing. I tried FSR's Rudskogen track (not tahustvedts Ruudskogen), and without the skydome I got a tremendous FPS improvement. There must be some serious problems with the new skydome as it seems to be a mega FPS killer..

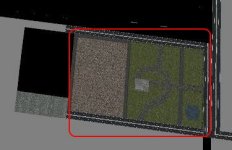
EDIT: The area marked with red in the attachment is a singe surface with only 5 textures, one for each surface type (tarmac, gravel, grass, sand and water). If larger surfaces were created, less textures would thus be loaded as they already were "attached" to the mesh.
 

Attachments

  • surfaces.jpg
    surfaces.jpg
    29 KB · Views: 304

Latest News

How long have you been simracing

  • < 1 year

    Votes: 290 15.4%
  • < 2 years

    Votes: 194 10.3%
  • < 3 years

    Votes: 195 10.4%
  • < 4 years

    Votes: 140 7.5%
  • < 5 years

    Votes: 251 13.4%
  • < 10 years

    Votes: 223 11.9%
  • < 15 years

    Votes: 140 7.5%
  • < 20 years

    Votes: 114 6.1%
  • < 25 years

    Votes: 85 4.5%
  • Ok, I am a dinosaur

    Votes: 247 13.1%
Back
Top