BUILD LOG: Racing + Flying VR Rig

Hello all! New sim racer here and looking to start a bit of a build log for a couple reasons:
  1. It seems like you guys like this stuff like I do :)
  2. Because I know I am going to need some guidance and input along the way
Before I get into the present and future of my build, first I'd like to briefly share a bit of background. I'm 100% new to sim racing (currently focusing on ACC only, as I love GT3 cars), but I'm not new to simming in general...

BACKGROUND

Around mid 2014 I heard about Digital Combat Simulator (DCS) and given I spent my entire adolescence wanting to be a fighter pilot (before the Navy told me the dream was dead due to me being red/green colorblind) it seemed like something that might be relevant to my interests. Boy was I right! As I assume most of you have experienced, I quickly fell down that peripheral rabbit hole. Said "rabbit hole" become more of a "black hole" that I was falling down at hyperspeed, and the rest is history. From one HOTAS to the next, I ended up becoming very enthralled with the high-end boutique peripherals. Over the ~6 years since I started on DCS, I've gone through waves of being on and off with playing - "off" times being mostly due to my career taking too much of my time and/or other personal life obligations - and I've ebbed and flowed with my level of seriousness with playing. I've joined virtual squadrons and fought in the SATAL league there, I've read military flight manuals front to back to learn more about operating the jets, etc. To this day I still retain a love and enjoyment for DCS, although I haven't played much the past year or so.

Around June of 2020, after years of thinking "I should get into sim racing" (and being told as much by some of my flight sim buddies), I started to get serious about it. Again, I fell down that rabbit hole and became determined to get a racing rig put together. The twist this time was that my wife and I were expecting our first child in July, and we had just bought a new home that was undergoing a lot of renovations...plus there was a small global pandemic going on. Not exactly optimal timing, but life rarely lines up perfectly, so I said "Screw it" and proceeded ahead anyway. With the learnings from my flight sim hardware shenanigans, I subscribed to the "Buy Once, Cry Once" philosophy from day 1 here with the racing build.

I had never sim raced before, but I own an AMG and have always loved fast cars. In 2018, I did an AMG Academy Track Day @ Leguna Seca which was incredible and gave me confidence that I would love sim racing the same as I do flight simming. That day I was told by "Nipper" (my instructor for the day) that I "was a natural", but still I never took the leap to get a racing rig put together. Now that has changed...

PRESENT DAY BUILD

At the end of July, after the baby had arrived, I started ordering the racing rig hardware and checking hourly for the out of stock items to come back into stock. Below is what I settled on for the build and I ordered as soon as the items came back into stock:
  • Rig: SimLab P1-X (Black)
    • Add-ons: SimFeet + Seat Rails + Seat Slider + Keyboard Tray + Mouse Tray + Cup Holders
  • Pedals: Wave Italy WAVE FORCE MONZA - SIM PEDALS PRO
    • I ordered the 2 pedal set with no clutch, as I have 0 intentions of ever racing a car that doesn't use clutch paddles
  • Direct Drive Base: SIMUCUBE 2 Pro
  • Rim: Ascher Racing F-28 Wireless
    • I wanted the F-64 but ran out of patience in waiting for Martin to get this back into stock
    • I might add a new rim in soon, but TBD (would be a F-64 or a Gomez rim)
  • Seat: Sparco Evo II QRT
The Ascher rim took the longest to come back into stock, which was painful, but by the end or end of October I finally had everything I needed. Those few months of waiting were rough. Unfortunately, the waiting didn't stop there as our new home had some undisclosed water damage/issues in the basement, which required a very costly waterproofing system to be installed. This also meant that the finishes of the basement needed to be totally ripped out as they dug the perimeter of the cement up to install all of that. While this was quite costly, it did mean that I had a clean slate to work with for remodeling my man cave...so that is exactly what I did.

The contractors were here for a month or so getting all of that done, and at this point everything is mostly finished besides some things I am going to DIY myself, and then having the painters come (which we cancelled in early December due to COVID spiking again, and we will likely have them come in the Spring once things hopefully have settled down).

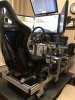
Here are some photos of the build....

PROGRESS SHOTS:

G7QhMzh.jpg

DoiYrz6.jpg

JRGbkvE.jpg

Buk07PR.jpg


FINAL PRODUCT:

Xjkd9CO.jpg
vTdYAjy.jpg


I have since cleaned up all the wires with some TLC on cable management. I will get more photos of that up soon.

NEXT STEPS:
  1. Add a pedal slider to the racing pedals
  2. Add tactile feedback to the rig
  3. Add my flight sim peripherals to the rig
  4. Build button boxes for both racing and flight
  5. Add motion
With the guidance of @Mr Latte , I've gotten a small start on adding tactile feedback to the rig. Yesterday I ordered a Behringer NX3000D + 2x ButtKicker Concerts. Configuration of the two BK-CT's is TBD, but I am likely going to add one to the seat and one to the pedals. Unfortunately, the amp is on backorder under the end of January (yay, more waiting!) but once that is here it will mark the next big progress I am able to make on the rig. Once I get this all set up, I will work on adding anywhere from 4-8 exciters onto the seat. On my old flight setup, I used a JetSeat SE from Andre, which was very nice, but I know it will pale in comparison to what I am working on for this build.

Regarding adding my flight sim equipment to the P1-X, I still have some more thinking/planning to do on this one. Since we all love photos, here are some shots of my current gear...

FLIGHT GEAR:

0DD5zlE.jpg

Sbd180E.jpg

  • Rig: WheelStandPro for TM Warthog
    • Add-ons: Left Side RSG module
  • Pedals: Slaw RX Vipers
    • Add-ons: Motorcycle damper
  • Throttle: Custom made Throttletek F/A-18C throttle
    • Add-ons: Made with Halls sensor instead of a standard pot, and I procured ~$500+ worth of custom switches for them to use in the build, these are the OTTO mil-spec switches that are used in the real jet
  • Stick Base: Virpil VPC T-50 base
    • Add-ons: Sahaj 15cm Black extension
  • Grip: Thrustmaster F/A-18C Replica
    • I also have my old A-10C/F-16 Warthog grip from when I had a TM Warthog HOTAS
I've got some plans to change some of this stuff up a bit as well, but one step at a time...

Regarding the button boxes, I have about $1500 worth of mil-spec switches, rotaries, and other misc stuff that I purchased when I was planning to build a 1:1 replica cockpit of a F/A-18C Hornet. These are mostly Honeywell and EATON/Cutler Hammer, and are incredibly high quality with a great tactile feel. I've also got a landing gear handle from a GR-4 Tornado fighter jet that I will need to build into one of the botton boxes as well, as well as a landing HOOK handle. My point here is that I've got a lot of the materials already on hand that I can use for a racing box, I'll just need to add a few things here or there maybe.

While I've never soldered a thing in my life, and am largely not "handy" whatsoever, I did acquire all the necessary soldering equipment before...despite never finding the time to use any of it :) Hopefully that changes in 2021, but I'm not so sure given it seems that newborns take quite a bit of your free time, and I've got a lot already on my plate. Someday, though.

That is all for now....the baby needs fed again...but I hope you've enjoyed reading. I'll get the specs of my rig and VR put up sometime soon. Looking forward to hearing everyone's thoughts and feedback!

Happy New Year to all!

------------------------------------------------------------------------------------------------------------------------------------------------------------------

Edit to add PC specs:

GAMING RIG:
  • GPU: Nvidia RTX 3090 Founders Edition
  • CPU: Intel i7-9700K
    • Still searching daily for a AMD 5900X to come into stock and allow me 2 seconds to be able to add it to my cart before the scalpers, and which point I will just go ahead and update the mobo, RAM, AIO, etc.
  • Motherboard: Gigabyte Z390 Aorus Master
  • AIO Cooler: Corsair H115i RGB Platinum
  • RAM: 32GB Corsair Vengeance Pro RGB 3200
  • Monitor: Dell U3415W Curved 3440x1440
  • VR HMD: Reverb G2
 
Last edited:
You are golden then ;)
Dayton Thruster exciters are 60mm diameter.
You could also think about isolating the seat from the main frame. Maybe 4x rubber isolators attached to the L-frame bracket which attach the seat to the rails; showed on your first picture.
Looking good sir.

Had not considered rubber isolators between the seat and seat brackets, but that is a great idea.
 
Upvote 0
For my exciters I'm using this cheap device. Seems to work fine.


I decided on 6 exciters total, and that seems to be plenty for me. I was going to add 2 more, but not now. For the bottom I use only the LFE, The 6 exciters go on the seat back - 2 lower back, 2 sides, 2 shoulders. I used this layout from Mr Latte.


pAMZF9f.png
 
Last edited:
Upvote 0
Ive got catching up to do but here is what I wanted to illustrate to people following this thread and who may install tactile directly to their 8020 frames. I like to go into detail and hence posts are often long but its an old habit. This will contain things I have said in the past but may not of been seen/known by some viewers.

8020 Profile Installation:
If you make the 8020 frame the primary contact surface for the transducer, then however long/wide that surface is you are letting the units energy travel through that. If this surface connects with other vertical/horizontal profile then the energy will also travel across that bridge and freely move over the opposite connection profile.

What you are doing here, is giving away the unit's output energy to places on the rig you don't even have bodily contact with. Yes, certainly a single, rear-mounted transducer unit, placed behind the seat could then be felt in the pedals for example. However at reduced strength and with less range or detail in the frequencies (depending on frequencies used) but higher frequencies with less bandwidth will not be felt as well over distances.

In some scenarios, a user may want as much body interaction from one unit and are happy for the energy to flow.
A common trait with this is people will crank the volume and often overdrive the effects output gain levels to make up for the energy that is dispersing over the rig.

A perspective often mentioned is an opposing view.
"But a real car has vibrations that flows all over the chassis right"?

My take on this is.....
Simulation and what we are trying to achieve here is not real scenario. Too often people will try to look at the real scenario rather than what helps achieve improved immersion. Your sim rig is all about immersion, so the aim is to do what improves that immersion and entertainment factor. Also, the user's connection with the car's handling/feedback and the user's own inputs that then combine with what you feel, see,hear and sense.

With that out of the way, let's consider the volume/area that allows the transfer of the vibrations to enter into the seat and into the actual user to those of the main cockpit frame.

From a performance perspective:
Let's take a closer look at a common installation approach.

So with a transducer attached to a bit of profile or on a plate behind a seat.


Take a moment to look and determine the structural volume/area of connecting pieces to the surface you will have the unit installed to. These are all pathways for the vibrations to flow and from those, it will also flow into the floor.


Highlighted Circles: Red = No Contact With Seat / Green = Contact Point

What we see, is that even the seat risers that the energy will flow into from the 8020 profile. These do not even make contact with the seat. The only point of contact from the seat risers is the 4x M8 bolts. Does this help illustrate how limited this approach is in bringing the best felt tactile and detail to the actual user?

To my own understanding, what you basically have folks, is the largest body region we can use to feel the tactile and its getting the most restricted entry for the tactile to enter into the seat. This will not produce the best potential with popular bucket type seats on seat risers and users installing and applying tactile directly to the frame of the cockpit.


Attaching directly to the seat
This of course will let the user feel more directly the output of the unit and also better feel whatever range in frequencies it operates with or is being determined via a crossover. The user will also not need as much wattage or the requirement to use high gain levels on most effects and this in turn produces a more balanced output with less clipping or possible distortion.

So whats the drawbacks, well consider having dual large BK to one. Apart from using such for potential stereo for lateral based effects. With two units you can get a better spread of the bass energy at a more controlled volume.

A common issue with directly mounted transducers is determining the volume comfort level for different frequencies. A transducer may have specific frequency bands that it outputs more than others. What happens is you increase the volume to get more low bass punch and a certain range of Hz will feel annoying. I refer to this as the character of the units performance output which will vary on different models. I also refer to this issue as a hotspot. In that the installation point of the unit itself has the most energy but cranking the volume makes it a bit unbearable right where the unit is installed. So in some cases 2 units or more gives the user the ability to increase the felt sensation and spread of the tactile (not limited to one installation point) with less chance of hotspot issues.

This is also relevant to a seat with multiple exciters. Additional units offer a better spread of the same effect via multiple impact zones but it also enables more effects over different channels to be better represented. I wont go into the exciters too much at this point.

Seat / Rig Reverb
Different materials will reverberate with different frequencies. So a user may also find that with directly mounted transducers that are sending more energy/vibration into the seat that the seat itself starts to hum/reverberate. This is something that can be detected with frequency sweeps during installation but as an example, I have found issues with peak Hz and higher volumes. This can feel a bit and sound annoying, what do we do?

The Thing They Say You Don't Need
So here in this example, with hotspots, with different units having their own characteristics in peak outputs for certain frequencies and also potential reverb problems. It is beneficial having controls via DSP/EQ that can let a user set the felt strength +/- of different frequencies (amplitude) not just the volume.

Why? To pinpoint or rectify these issues with peak frequencies and to help boost others for much-improved immersion. Basically, a user can tune the output to suit their own preferences and rig installation but now also has much more control of pushing low bass.


While different effects combinations create different levels of amplitude for the frequencies being used.
Here is an example of the same effect but with the amplitude increased for lower frequencies.

As levels are increased more frequencies may come into the range of being felt, yet the higher dB of other frequencies may then begin to spike. In this example, a crossover is limiting that from happening with the higher frequencies. This felt output, will vary by the specifications and output character different transducer units also have.

So, if we can alter felt sensations for different frequencies to suit the user's preferences and to suit the character output of the model used?
Isn't that kinda brill? In some cases to extend the energy of certain frequencies or to reduce the output swamping others. To better feel more variation from the felt energy and detail of individual frequencies.
Using normal amps and just increasing volume does not enable these benefits.

This is why I strongly advise DSP, especially on large BK units.


Isolation:
For performance, this can be important. In some cases, a user may want the energy to flow from the seat (as the primary installation point) and still flow into pedals or other regions of the cockpit. Here they still are getting the primary energy/detail the unit outputs as it directly goes into them but nothing is offering any resistance to prevent energy pass into the 8020 profile.

So without using methods of isolation we are still letting this energy escape via the seat risers into the 8020 frame. One thing I continue to see with a certain amount of disbelief is that someone with more common transducers like the 50W or even BK Mini and multi-exciter installations will use the typical eBay bobbin isolators.

However, why is it that then someone with a large BK with about10x the wattage and much more bass energy being output uses the same thing?

Possibly more tests could be done to offer more findings with this. My initial perspective is that with much more capable transducers used for these largest BK and also potentially multiple exciters installed onto a seat. Then such imho warrants looking at using improved isolation options or combined materials.

Improved Decoupling & Dampening
Using multiple materials both sound-deadening and vibration reduction is the approach I am taking with my own build. Not relying on a single or small solution. The worst that can happen with such an approach is the improvements are limited but still worthwhile.

The more resistance and longer the vibes are felt in the seat then the better the immersion from it should be contained as more of that energy is fed into the users body.
 
Last edited:
Upvote 0
A lot of very useful information there, but as a complete and utter novice on this, I’m not sure what to make of it in terms of “What should I be ordering?” for an install

For the 4 points where my seat is mounted to the seat rails, I am assuming these will be my best bet for as much isolation as possible?

Isolate It: Sorbothane Vibration Isolation Washer 70 Duro (.13" ID - 0.5" OD - .13" Deep) - 12 Pack https://www.amazon.com/dp/B019O46D12/ref=cm_sw_r_cp_api_glc_fabc_DrM8Fb5JY7864?_encoding=UTF8&psc=1

I would have to double or triple up depending on how much space I can make.

Regarding the hot spot with a direct mount to the seat, conceptually it makes sense. But what are you recommending to do to avoid it? Putting two BK-CTs in stereo? Or just EQ tuning around it?
 
Upvote 0

Attachments

  • My Sim Rig 11.JPG
    My Sim Rig 11.JPG
    1.7 MB · Views: 221
Last edited:
Upvote 0
With the isolation, my point is on a rig to the quality yours is and using the most powerful shakers we can discuss and look at options. Often people rely on 1 solution or material but they dont consider the high wattage and power output the large BK have compared to commonly used transducers. We can look at potential ways of improving beyond the typical methods with some creativity.

I already devised a simple but effective isolator solution that is cheap which combines the common bobbins with isolators used with Clark TST transducers. The Bobbin fits inside and is sandwiched to double up and we can also apply neoprene or other materials for some rebound. It dampens like a spring as it compresses under the weight of the user.

Solution previously shared with others


Suggestion only, If it was my rig I would be considering two narrow custom-made plates that will bolt to the 8020 under the seat risers that allow the seat rails to be mounted also and these plates have their own dampening and sound-deadening layers. You can use rubber washers and soft isolators at the 4xbolt regions of the seat to help dampen these.

Now for installing the BK itself, rather than just bolt the unit to the seat directly...
It is possible to improve the bass to the back of the seat by bolting custom made 8020 sections to the underside of the seat, these then can be extended as 2 lanes that go from under to up the back of the seat and are bolted to the seat at the top section. In doing this you help to route the energy of the BK to dispearse it better over the seat as multiple contact/entry points and not just a single impact region limited to the length of its own feet.

I have used this approach in tests successfully to the point of using not one but upto six ButtKickers onto a seat section with each unit able to handle specific or various effect roles. I couldn't drill my seat at the back but got creative

Crazy Prototype Tests

Early prototype examples, dual central units underneath the seat to custom frame, primarily for RPM/SPEED roles.
Additional extensions and contact points to the back of the seat does create an additional entry point for the bass to enter the seat to give you more directed low bass in the back and shoulders.


Each left/right side will support dual BKs mounted per side with 4xBK couch plates and each of these BK are partnered with 4x crossover balanced TST units. These primarily for stereo/positional effects.

So, if you want to get creative and do something a bit more special with even one BK to the seat, or the bog-standard thing then that is upto you. Help or guidance can be offered. It depends how much performance you want to get from this single unit. To just bolt it to the seat directly (easy) or a simplified variant like this approach I have tested?

My own research (having tried lots of options over the last 2 years) let me see that doing this method and combining the exciters to specific body regions on the seat goes well beyond the performance of normal installations bolted to the rig's mainframe sections.
 
Last edited:
Upvote 0
First off, that prototype is incredibly cool! I wish I had the time and the know how to do something like that for myself. Unfortunately, at this stage in my life, I think it is a bit out of reach for me (on both front of time and knowledge) -- otherwise it might take me a year or more before I even have any tactile set up on my rig. Free time simply does not exist with a newborn, and I am not a handy person whatsoever.

All of that said, what you're saying mostly makes sense to me, which is helpful as I try to learn. The theory and principles (outside of the technical sound stuff which is still over my head, for now) are great learning for me, and I am tracking at least at an elementary level.

I think for me, the best middle ground is going to be to add some of the Buttkicker Furniture Isolators to the points where my seat is mounted to the seat rails. This Sparco seat is more narrow in the butt than the thigh area (hence the 2x washers on the back mounting spots), so I will need to achieve around a 1/4" of offset, but I think I should be able to fit these:
I will be cutting it very close in terms of being able to widen out the seat riser pieces of profile, but I think I should be able to make it work.

This is by no means a perfect solution, but it should be better than the bare minimum. Agree?

Regarding the mounting of the BK-CT to the seat, I will reply with some thoughts soon there. I am back to work today after the holiday, so limited time to read and reply.
 
Upvote 0
On second thought, I will likely just use 4x Medium Buttkicker Isolators on all mounting spots for the seat, and then add the same washers back on top to manage the offset in seat width. It will challenge me a bit more with making it all fit, but I think I can make it work.

Once this is all installed and up and running, I can evaluate the vibration bleed to the rest of the rig quite easily. I will be doing just the seat first, in isolation, before I ever start working on the pedals. Lacking equipment for testing I will most likely just do the old fashioned water bottle test for this. If I still have a lot of bleeding, I can add then work on adding the small custom plates @Mr Latte referenced with their own damping/isolation to the seat risers. I will go one step at a time to determine what is necessary, rather than doing it all at once and then not really understanding the incremental improvements and/or necessity of certain additions.

In other news...UPS has my PartsExpress order out for delivery today. I can't tell if it includes the backordered NX3000D or not, but will know soon enough I guess. I am lucky that I live only about 90 minutes away from PartsExpress.
 
Upvote 0
Feel free to ask more questions but using only the BK isolators while okay its likely to still let a fair bit of energy leak into the frame.

Dont worry either way, it will come together, just focus on one thing at a time. Soft washers or isolators at the seats bolts is fine., its just to add another element of dampening. But if unsure ask more, below I present more info on the solution I think is worthwhile going with over the standard BK isolators.

The custom isolators I showed are easy to put together but placed under the seat rails they will perform better than standard BK ones on their own. The only drawback if set on 40mm profile they don't sit quite as well as intended so a wider support under them (in my view) would help and look better.

Im not a big d.i.y person but you can order metal plates etc cut to size.


Isolators
Ive looked at a few options ;)


Penn Elcom do this larger 64mm isolator which appears similar to the Clarke TST ones sold at Parts Express but cheaper. These are quite firm and work well with female/male threaded bobbins. You just buy the size/length of thread you need and @30mm diameter or slightly smaller.

See your own local online store.

UK Store Example
64mm Isolator

* Just noticed Ahhhhhhh


Will let you decide but this solution isn't expensive or that hard to incorporate.
 
Last edited:
Upvote 0
@Mr Latte doing the custom isolator setup you're showing would add 2 inches of height to my seating position, correct?

That is my only real concern with going that route...that I am starting to run out of room in the vertical, where my legs are going to start to block my ability to turn/rotate the rim. If I am raising my seat and pedals each by 2", but my wheel deck is already at max height, I am cutting 2 inches off of my legs <----> rim clearance.

Darn

The vertical heights of the main supports do seem to be limited on these rigs.
I guess it depends on how a wheel is also being mounted but if you don't have any additional profile to offer options in altering the seat support region or the main wheel deck section. Then if the height is an issue it limits you to less isolation from the main rig frame.

At the very least consider using under the seat supports and seat rails some Dynamat Extreme or similar branded sound deadening.

Bit of a shame as I think more creativity here with how the seat and the isolation is done could be improved. Although someone one day with an 8020 based rig might fancy doing a "Latte" inspired pro tactile version.
.
 
Last edited:
Upvote 0
I am starting to run out of room in the vertical
If you would not mind some P1X disassembly/reassembly, consider
  • obtaining 4 more corner brackets
  • moving the center crossmember forward enough to allow..
  • lowering 2020 seat rails down between middle and rear crossmember, held up by those corner brackets
 
Last edited:
Upvote 0
If you would not mind some P1X disassembly/reassembly, consider
  • obtaining 4 more corner brackets
  • moving the center crossmember forward enough to allow..
  • lowering 2020 seat rails down between middle and rear crossmember, held up by those corner brackets

Great call, I think I will do that. Shouldn’t require too much extra work or disassembly/reassembly. Especially since I’ll already have the seat off to get the BK-CT mounted on the bottom.

That middle crossing piece is honestly probably the easiest piece to move. Thank god for that.

You don’t think this will give any structural integrity issues, do you?
 
Upvote 0
Glad to see people offering additional solutions...
So is this below kinda what is being suggested?


Green is being dropped down in to Yellow?

Now giving you a lower seat mount both level and parallel to the main outer frame.

Can I enquire what distance would then be for A-B and the size of the gap for C
 
Last edited:
Upvote 0
You don’t think this will give any structural integrity issues, do you?
I don't know P1X corner bracket strength;
corner brackets are available in different strengths.
Perhaps something like this beneath the rails:
14098_photo.png

Can I enquire what distance would then be for A-B and the size of the gap for C
Good point; upper rear main frame corner brackets might need to be removed
and replaced by hidden corner connectors:
33440_photo.png

Center crossmember upper corner brackets can be flipped to the other side...
 
Upvote 0
I am not an 8020 owner neither but structural integrity won't be hard to sort guys.

You could easily have a horizontal 8020 runner in below these seat support rails
Placing a runner at the rear and mid-sections.
 
Upvote 0
The standard seat rails are very narrow and (if) adding wider isolators doesn't quite seem a good match.

Just ideas:
So an aluminum plate (60mm x 8mm) could be one option to offer more support if the custom isolators were being considered. Easy to find on ebay with companies cutting to size. Just request new/unscratched cuttings as for a project.


Such could also be polished to look nice against either black or silver profiles and its just some ideas for the OP or anyone following this thread with a similar rig.


Here are base plate examples of 8mm aluminum plates I am using on my own custom made isolation towers


Optional solution:
An adjustable (linear bearing) sliding and locking mechanism may also be a good approach.
With different types of 8020 profiles, some options may need to be confirmed as compatible, As I am only offering options that would help take a P1 rig via advanced tactile to a higher level.

I dont know if 8020inc is the same as what Simlabs use? Though they mention offering these in fractional/metric solutions.

Lots of other companies offer linear bearings with wider supports than normal seat rails.
 
Last edited:
Upvote 0

Latest News

Are you buying car setups?

  • Yes

  • No


Results are only viewable after voting.
Back
Top