
Jarrod Crossley
Rubbin Racer!
So your looking at producing your own renders, You've got one of the many version of 3d max and your wondering whats next.
Well here is some of the ins and outs :
First off you'll need Spluterfish's Brazil you can download the demo vresion known as Rio from there site here:- SplutterFish, LLC: Home
Next you'll need the 3D max car scenes for Race07 and those are availble via:- Portal - raceskinning you'll have to register there.
So now you have evrything you need to get started. All you need to do now is load up a scene and go right?
Wrong due to the fact these scenes where made with a differant version of MAX and a full version of Brazil, Youlll have to make some alterations to get it to look the way you want.
So you load your scene and it looks like this:

Terrible isn't it well first off we need to set up are renderer so on the top menu bar find "Rendering" and from the drop down find "Render Setup" click on that and you'll get a menu:

Now due to the fact we are using Rio we are restricted to image size (1024x511 max) so for now select 640x480. Now on the same menu scroll down tp were it says "Assign Renderer" This is where we are going to be telling it to use Brazil Rio. So click on the three little dots:

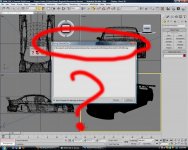
and from the drop down menu select Brazil:

Well here is some of the ins and outs :
First off you'll need Spluterfish's Brazil you can download the demo vresion known as Rio from there site here:- SplutterFish, LLC: Home
Next you'll need the 3D max car scenes for Race07 and those are availble via:- Portal - raceskinning you'll have to register there.
So now you have evrything you need to get started. All you need to do now is load up a scene and go right?
Wrong due to the fact these scenes where made with a differant version of MAX and a full version of Brazil, Youlll have to make some alterations to get it to look the way you want.
So you load your scene and it looks like this:
Terrible isn't it well first off we need to set up are renderer so on the top menu bar find "Rendering" and from the drop down find "Render Setup" click on that and you'll get a menu:
Now due to the fact we are using Rio we are restricted to image size (1024x511 max) so for now select 640x480. Now on the same menu scroll down tp were it says "Assign Renderer" This is where we are going to be telling it to use Brazil Rio. So click on the three little dots:
and from the drop down menu select Brazil:
 This image has been resized. Click this bar to view the full image. The original image is sized 800x640.
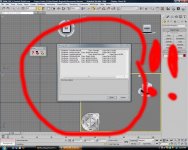

")


