SketchUp

It takes some time to work with this prg but it's great fun.
I wish to thank escpecially Martinez for teaching me the very basics, but you're proberly still not happy with my amount of object poly's :D
But you are very right to try to keep it all as 'small' as possible.

I found that working with jpg's in SketchUp is (for me) the most difficoult part. I mean to import a jpg in a model and mess around with those axes...

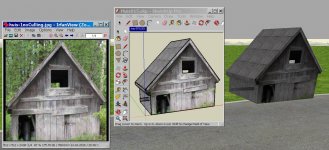
This is my first created house and I gladly want to get some critical comments about it. No mercy ;)
What I did: found some jpg on the Inet (more or less 2D) imported in a SketchUp model (just a square) and build it manual into a 3D model.

However I'm not too happy about the end result in rFactor, see pic (from left to right) Maybe something to do with sun&shadows ? too gray imo. Btw on the right side of the building, wich you can't see, it's brighter.
sketch_model_as_001.jpg
 
Not bad :) I would still remove a half of the faces, so the cross-sections of these rails could look like letter L (upside down). If you do so, you won't probably notice any difference ;) (unless you want to wash your car in the pool)
(remember to remove also "empty" egdes too!)

Yep, thanks again, me fool ;) Just wonder how it looks in rf or rbr, testing tomorrow.
 
Mine has 42 polys each (84 all up) and is 6 sided. I recommend making a pole a minimum of 5 sides, preferably make it 6 sides but no more than 8.

In your rails, the top bit only really needs to be 3 or 4 sections, you have 7 or 8, you can see that my whole model has 7 sections all up.
Also something else to take into consideration, don't go overboard on the amount of sides you use, (I dunno how to explain this well) If you have a curving tube like a steering wheel for example and if you give it too many sides, you will see a kink in the smoothing for each section, the less sides you give the tube, the less sections you need to use, but you have to give it enough sides to make it round.

These are the little tricks you can use, when making something round, its a battle between the smoothing and the polys, you have to find a good medium.

You bloody Blender :) Very good indeed. And absolutely true this is, the battlle !

Don't need to send a vid here how I did it, but there's still room for improvement.
Why get into poly's when you're passing the objects with 200 + KM/hrs....
Good point.
 
2 objects same texture

I don't understand this. Create an object give it a texture. Create a 2nd object give it the same texture but when I change the X, Y values it infects the 1th object texture also:confused:

[video]http://members.ziggo.nl/world/BTB/tex002_as.avi[/video]
 
thats because they are both the same material/texture, easy way around it is to just change the material name on first object then select the standard material again and use it on the second object, changing x,y values will not affect both any more
 
@Lasercutter: Tnx, and ofcourse Im talking about materials, not texture ;)
But when I follow your advice then I've got 2 materials. And that's exactly what I try to avoid.

edit: hmm, I think I found another approach will explain later.
 
as I always edit these things in simed (or max) after then having two materials doesn't matter as I can make them one material at that stage, not knowing exactly what you are trying to do makes it difficult to give you the best advice
 
as I always edit these things in simed (or max) after then having two materials doesn't matter as I can make them one material at that stage, not knowing exactly what you are trying to do makes it difficult to give you the best advice

You're right, I'm trying to achieve something wich is quite difficoult with SketchUp. Forget it for the moment ;)
However I solved it very simple by copy some object with same material, resized etc and then all ok.
 
Another interesting Sketchup Material issue.

Only building a new house, start with square, import material, Push, all fine.
Export to 3D, collada export result: 1 material.

Then I Move the object to fit on x,y,z axe for BTB, otherwise the famous red dot wich you use
to edit whatever object, can be far away ;)

However when I export again, hopla suddenly 4 materials !
And when I created the vid, reproduce, suddenly even 11 materials !

I found btw the same issue when you rightclick on the face, Texture/Position, when you only
use the green pin all ok, same amount of materials but when you dare to use the yellow pin to
transform some things, hopla again extra materials !

Bug in v6 ? And yes I'm aware of v7 and save as 6 ;)
Funny, isn't it ?

[video]http://members.ziggo.nl/world/BTB/mats001_as.avi[/video]

Edit: Are there more of you who can't play the avi ?

ok, replying myself ...

This evening I did exactly the same and now all ok, material stays 1 !

No grouping, no component, all ok now.
So must be a S6 bug ?

Converted also to mp4, maybe less problems for some. Open plz with DivX.
Vid goes very fast but it's just to show you material stays 1.

http://members.ziggo.nl/world/BTB/mats002_as.mp4
 
Thanks :) There's also CHIP Magazine in Poland, so I guess they know what they are doing ;)
I'll try that S8, hope it can export my objects with the right format for xpacks?
There was not on RBR though :D

Don't have a clue about cjip thingy.

eu.nl no 8, last is 7.1 .

Save as, possible for versions 3 tm 8.
Export, check Pro Exporters:
Maybe your rbr format is there.

Exporting and Importing


Export 3D models: 3DS, DWG, DXF, FBX, OBJ, VRML, XSI
  • yes
Export 3D models: KMZ, DAE
  • yes
  • yes
Export 2D vectors: PDF, EPS, EPIX
  • yes
Export 2D rasters: JPEG, TIFF, PNG
  • yes
  • yes
Import 2D and 3D CAD files: DWG, DXF (Learn more)
  • yes
Import: DAE, KMZ, 3DS, DEM, DDF and image formats
  • yes
  • yes
Export 2D CAD files from LayOut: DWG, DXF

or: http://sketchup.google.com/intl/en/product/whygopro.html

OOPS: be carefull :

S8.jpg
 
Can anyone tell me how to turn an object made in sketchup into a working light? I have created a basic 3d model of a pole with a box to use as the light. Is there something that needs to be done before it is exported and put into the xpack or is it something I need to setup from within the xpack or none of the above lol. I am just trying to get the principle of it working before I worry about the fine tuning and perfecting a model etc.

Any assistance would be greatly appreciated.
 
The principle behind it,,,
In game, it needs to have a specific name, the part you want to turn on at night time needs to be called Nightlight00Glow (where 00 changes for every extra light, 01 02 03 etc) Then you need a NightLight00 instance that has to be placed in the .scn file before any object instances.
The name NightLight causes it to only be turned on at night, If it is called just LightGlow Light00Glow it will light up round the clock (good for tunnel lighting)
You can only have 4 light glows on each piece of mesh, so if you have 8 light on one mesh only 4 will light up. You will need to break up the track with the materials cross section to create different track objects

Code:
Light=NightLight00
{
 Type=Omni Pos=(-223.159912, 11.439373, 12.055908) Range=(0.000000,  43.000000) Active=True Intensity=(1.000000) Color=(255, 255, 255)
}


Instance=NightLight00Glow
{
  VisGroups=(36)
  MeshFile=NightLight00Glow.gmt CollTarget=False HATTarget=False 
}
So when you create an xpack, in the Object tab, make sure to give the Purpose as LightGlow, then on the light tab you can set the values of the omni light. It looks as if in xpacker LightGlow defaults to NightLightGlow. I thought I saw something somewhere that said only switch on at night but I might be confused with something else.

Unzip the Default.zip xpack into the xpacker folder so you can open it up in xpacker and see how the lights are done.
 
Thanks for the quick reply mianiak. Unfortunately that went over my head like an F16 swooooosh..... Can you or anybody else break it down for me a bit more please. If anyone has ever made there own light for BTB using sketchup or a similar program could you please list me a tutorial covering the steps you completed. Creating a dirt oval so the lights are pretty important.

Looked at the 3 lights from the Default XPack from BTB and only one was operational at night. The only difference I could see between this light and the others was that it appears to have a 3d part coming down from the light which is colored a greyish/white.

Really enjoying BTB again now that I have learned alot of the basics and things that used to take me hours (days lol) are now taking 5-10 minutes bt just hit this hurdle and have not been able to find a clear and concise answer/solution.

Again thanks in advance.
 

Latest News

Are you buying car setups?

  • Yes

  • No


Results are only viewable after voting.
Back
Top