Abdul-if you do it properlyp) and make your own wheel, then it is actually easier, and more like real life, to basically make a little window for the display. If you get some polaroid filters, then the colours look better, and it looks pretty sexy with carbon to boot
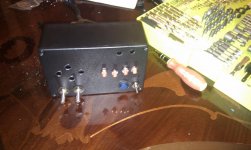
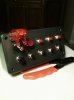
Here is my way of starting a crappy button box with a not so aligned buttons on the right. Its still a WIP and something to kickstart my electrical degree LOL.
Nice Abdul, that is an awefully nice looking wooden work bench you have there. Are we going to see you at ATCC season 3, faster than ever with your new custom setup?
Mrs was fuming when I was using the dinning table for DIY. I am definitely in ATCC S3, a lil bit handicapped having not raced the cars in yonks, but its the taking part that counts. Thanks William
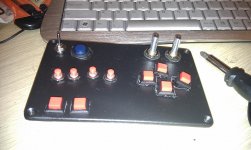
Done with the buttons. Once all is working fine I will fine tune the DIY by using the other side of the box. Will make sure everything is in a straight line and looking pleasing to the eye lol. Time to start the wiring.
I have 14 buttons, while the USB controller has 12 direct connection to buttons. It does say a maximum of 32 buttons. How can I connect all the 14 buttons?
Whoever laughs I'll call my boys over to sort ya out.
generally to use more buttons you have to wire in a matrix. How this is done will vary depending on the board.
I made one a school years ago but its been a while
General Idea is that each button will actual be connected to 2 or more inputs on the board. This allows you to have as many buttons as you have combinations of switches. Which combinations map to which theoretical button number is something you'll need to dig out from the boards documentation.
eg to make 3 inputs from 2 on the board
DIRECT
switch # / board input #
1 / 1
2 / 2
MATRIX
1 / 1
2 / 2
3 / 1 & 2
as the number increases you start to not want to be using the direct inputs and only use matrix otherwise press buttons 1 and 2 together would equal the same as pressing button 3 and thats usualy not a desirable outcome.
Depending on the board and software some inputs may become modifier channels. So in the example about direct input 3 could be the modifier giving:
1 / 1
2 / 2
3 / 1 & 3
4 / 2 & 3
using this method you could use software to add huge amounts of extra buttons.
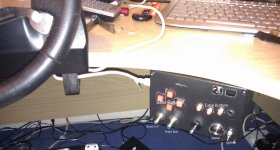
A massive thanks goes out to Will Marquez. Helped me alot, he also sent me template for the SLI Pro and the cables to connect SLI pro to buttons which is worth £7 alone. Thanks m8. Also thanks goes out to Brian and Kris and everyone involved. You lot infected me with modding my wheel.
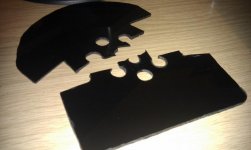
More work to be done. Trust me when I say the backside of the plate is messy. But this will do for now until I come up with a solution soon.
When you mount it, is it going as it is in the picture (ie. infront of the wheel), or are you moutning it behind the wheel?
Just a note, if your moutning it behind, be careful of trapping the little wires for the G25`s buttons, those little buggers worm there way into the path of the bolt shaft and 'chop', the button no longer works (i fell for that trap lol).
What ever you do, dont set it up to use, or you'll never tidy the wires up!
Seriously though, you may want to get those tidied as best you can and as soon as you can, because imagine going through all that hard work getting it made, and one or more of those wires snags on something. :no:
Kris, already minor bugs to be sorted. Its mounted infront of the wheel. I unplugged the g25 buttons for now. Working on a new design to accomodate all switches/encoders n buttons. There is empty space around the plate I could use lol.
SLI Pro is some crazy stuff. Amazing piece of hardware.
Thats excellent! Nicely done, you took a little time to line it all up and the effect is first class, dunno about econo-box, Ive seen worse that have had loadsa money thrown at em Good Job!
I did it all for around 30 bucks. The next one will be a bit more, but for my first go, I like it. I am pretty handy with tools, so it went easily. When I was a kid all the way back in the 70's, my grandfather used to take me to his machine shop. Things kinda stayed with me a bit
That kind of thing doesn`t seem to happen anymore and its a damned shame.
I used to stand watching and later helping my grandfather in his garage working on all kinds of cars.
Shame i never carried it on.
Let this be a lesson to everyone here. If you have any basic or advanced tools skills, PLEASE, teach them to your kids. Lets keep the tools knowledge rollin'
Ok, I have been looking everywhere I can think of, but haven't found a template for a wheelplate???
Does anyone have one, for use with the G27???
Sorry about my english...

") p) and make your own wheel, then it is actually easier, and more like real life, to basically make a little window for the display. If you get some polaroid filters, then the colours look better, and it looks pretty sexy with carbon to boot
p) and make your own wheel, then it is actually easier, and more like real life, to basically make a little window for the display. If you get some polaroid filters, then the colours look better, and it looks pretty sexy with carbon to boot